

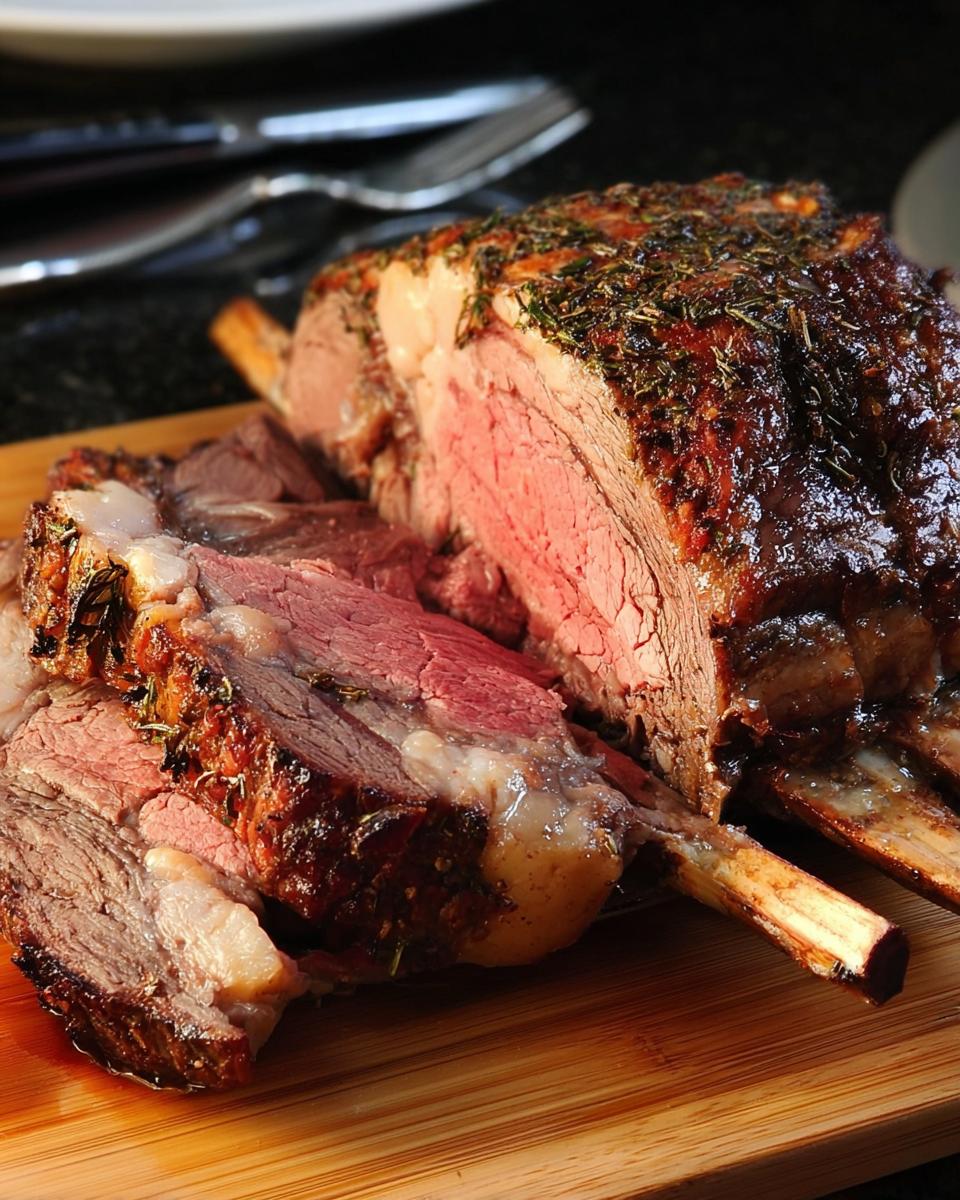
There is nothing quite like that moment on Christmas day when the centerpiece roast is finally pulled from the oven. The smell alone signals that this isn’t just dinner; it’s *the* meal!
For years, the thought of roasting a huge Standing Prime Rib Roast terrified me. I worried about serving something gray in the middle or worse, something completely raw. But I decided years ago that I wasn’t going to let worry stop me from making a spectacular holiday meal. I remember the first time I tackled it; my in-laws were visiting, and my nerves were certainly high! I used every trick I knew, balanced with a little improvisation, and wow, did it pay off.
That experience taught me that the secret to holiday success isn’t complicated recipes; it’s having a rock-solid, straightforward plan. That’s exactly what I’m sharing with you today: my tried-and-true Prime Rib for Christmas Dinner — Step-by-Step Plan. By Maria Fernandez, Certified Family Nutrition Strategist, I promise this guide gives you the confidence to nail that perfect medium-rare every single time and make your Christmas gathering truly memorable.
Why This Prime Rib for Christmas Dinner — Step-by-Step Plan Works (E-E-A-T Focus)
Look, trying to pull off a massive roast like this when you’re juggling appetizers and making sure the kids don’t burn the tinsel requires more than just a good ingredient list. It needs a foolproof roadmap, which is why I developed this specific Prime Rib for Christmas Dinner — Step-by-Step Plan.
As a Certified Family Nutrition Strategist, I focus on consistency and results, especially when time is tight during the holidays. This method minimizes guesswork and prioritizes the two things that make or break your roast: controlling the internal temperature and respecting the resting time. It’s designed to give you that beautiful, pink center without burning the outside—something I learned the hard way that first Christmas!
Key Benefits of Our Prime Rib for Christmas Dinner — Step-by-Step Plan
- You get foolproof temperature control because we rely on the thermometer above all else.
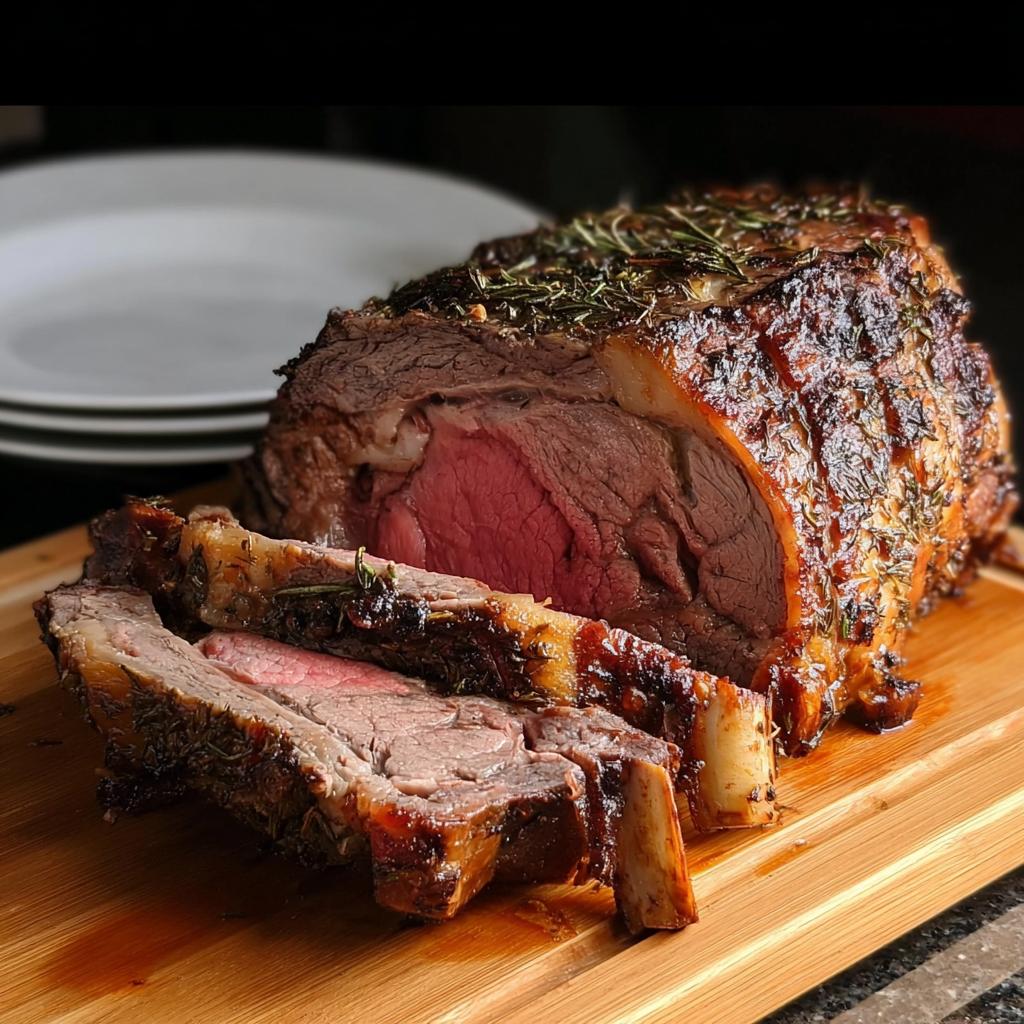
- It guarantees you develop that gorgeous, flavorful crust you see in all the magazines.
- The timeline is clear, which means you aren’t stressed wondering when to turn the heat down!
Gathering Supplies: Equipment for Your Prime Rib for Christmas Dinner — Step-by-Step Plan
Okay, before we even think about garlic and rosemary, we need the right tools for the job. You don’t need a whole professional kitchen, but there are three things here—three heroes—that will make or break your Prime Rib for Christmas Dinner — Step-by-Step Plan. Trust me when I say you can argue with ingredients, but you can’t argue with the right equipment.
First up is a good, sturdy roasting pan. If you have one with a little rack, great, use that! Even if you don’t, setting the roast up slightly on some carrots or onions works wonders to keep it off the bottom where the drippings get super hot.
But here is the non-negotiable item, the one thing I absolutely insist you do NOT skip: the meat thermometer. Seriously, throw away any recipe that tells you to cook a standing prime rib roast just based on time. Time changes based on bone structure, oven quirks, and how cold the meat was starting out! I promise, investing in a reliable instant-read thermometer is the difference between a showstopper and a total holiday disaster. It’s the hallmark of knowing how to roast prime rib well. You stick that probe in the thickest part, avoid hitting bone, and you know exactly when to pull it out.
Lastly, make sure you have a small bowl ready for mixing your glorious herb paste. That’s it! Simple setup, massive payoff.
Ingredients Needed for the Perfect Standing Prime Rib Roast
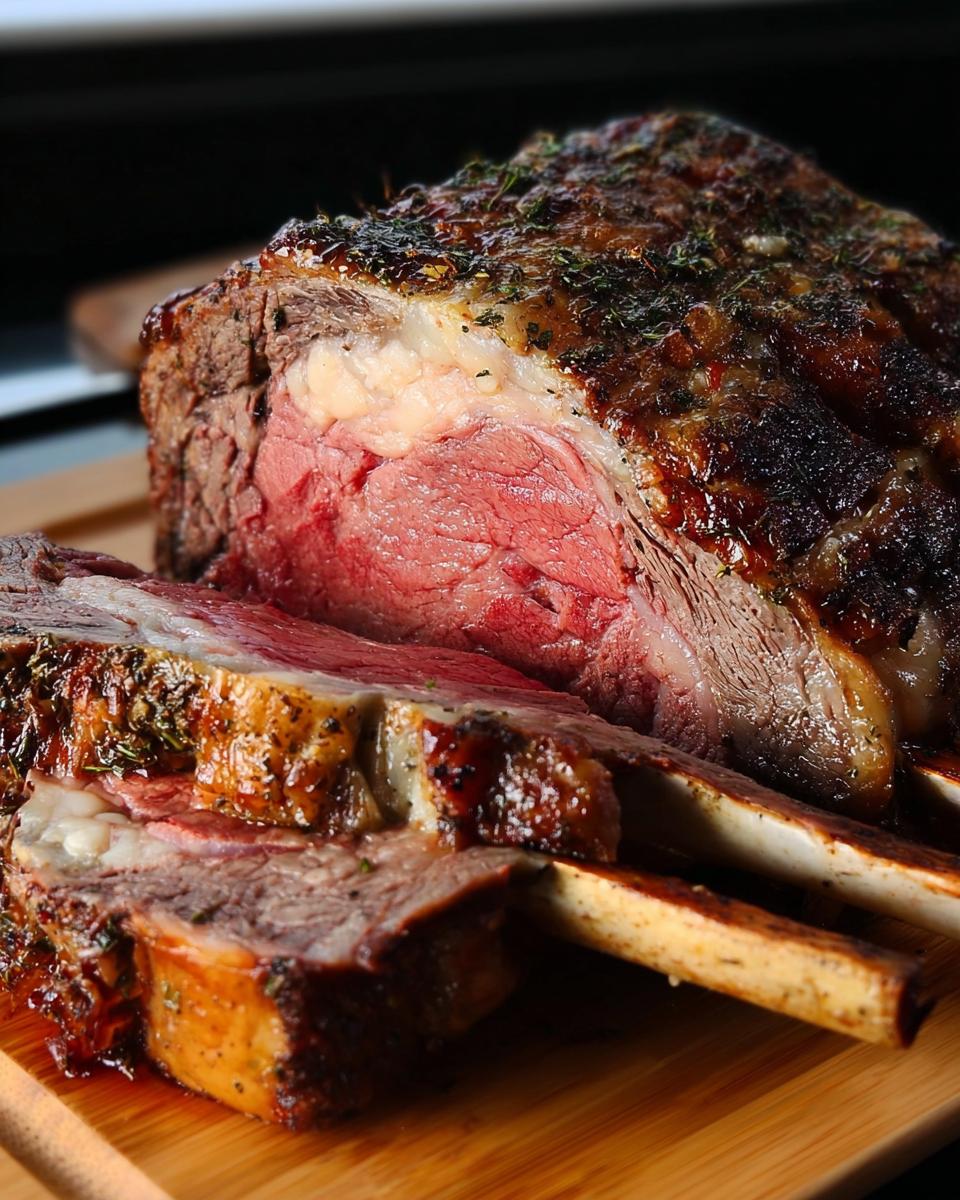
Wow, look at this list! It looks simple, right? That’s because the magic in a great roast isn’t piling on a million things; it’s using *great* ingredients and treating them right. When you buy your prime rib, remember that going bone-in usually gives you better moisture and looks absolutely incredible on the table—it’s my recommendation for a showstopper!
We’re keeping the seasoning paste simple but powerful. I always grab my favorite spice blends here, which helps save me time when things get hectic before Christmas dinner. Check out my go-to spice mixing guide if you want to know what I reach for!
For the Prime Rib
- 1 Prime rib roast (6-7 pounds) – Bone-in is my favorite for flavor!
- 3 tablespoons Olive oil
- 6-7 cloves Garlic, minced up super fine
- 2 tablespoons Fresh rosemary, chopped up small
- 2 tablespoons Fresh thyme, chopped exactly like the rosemary
- 1 tablespoon Coarse salt (Don’t use fine table salt here, please!)
- 1 tablespoon Black pepper
- 1 tablespoon Smoked paprika
- 4 tablespoons Unsalted butter, softened up so it can mix easily
Optional Flavor Boosters
- 1 tablespoon Dijon mustard – This is what I used the first time I made it, and it gives a lovely little tang under the crust!
The Essential Prep Work: Getting Ready to How To Roast Prime Rib
Alright, we have the ingredients, we have the equipment—now it’s time for the prep work that sets you up for success! The biggest mistake people make when they try how to roast prime rib is pulling it straight from the fridge and jamming it into a hot oven. Don’t do that! We need time for the cold to leave the center.
Take the roast out of the refrigerator at least one full hour before you plan to start cooking. This simple step ensures the roast cooks more evenly. If the outside is cold and the inside is freezing, you end up with an overcooked outer ring and a cold core—nobody wants that on Christmas!
While that beauty is warming up, get your herb paste ready. Grab that small bowl and mix your olive oil, minced garlic, rosemary, thyme, salt, pepper, and that gorgeous smoked paprika. Stir it all together until it looks like a thick, fragrant mud. That’s the flavor blanket!
If you have extra time, and I mean *extra* time, my favorite trick (which I learned from watching the pros!) is to coat the entire roast in that paste and wrap it tightly. Let it sit in the fridge overnight, or even just for four hours. That marinating time really lets those woody herbs soak deep into the meat, giving you incredible flavor when you start the process of how to roast prime rib.
Step-by-Step Instructions for Prime Rib for Christmas Dinner — Step-by-Step Plan
This is where the magic happens, friends! Getting our Prime Rib for Christmas Dinner — Step-by-Step Plan into the oven is surprisingly straightforward once you have your prime rib at room temperature and your herb paste ready. We are going to use a high-heat blast first to seal in all those beautiful juices and build a crust you could eat with a spoon. Trust me, this two-temperature method guarantees you’ll know exactly how to roast prime rib successfully.
Remember how I stressed patting the roast dry earlier? That’s key! Moisture is the enemy of a good crust. Grab your roasting pan, put that herb paste all over everything—seriously coat it thick—and get it in the oven.
Phase 1: Seasoning and Initial High-Heat Sear
First things first: Crank that oven up to 450°F (230°C). We are searing hot! Place your prepared roast fat-side up in the pan. If you have the bones in, let those bones act as a natural little rack for you. We are leaving it there for just 15 minutes. This high heat starts the Maillard reaction, which equals flavor you can’t replicate any other way. Don’t peek too much; let that heat work its magic creating that gorgeous brown surface.
Phase 2: Low and Slow Roasting for Perfect Doneness
After those initial 15 minutes, it’s time to settle down. Reduce the oven temperature immediately down to 325°F (160°C). Now we roast low and slow! This part is all about patience and watching that meat thermometer like a hawk. You are aiming for about 13 to 15 minutes per pound for medium-rare, but the thermometer is your best friend here. You want to pull the roast out when it hits 125°F to 130°F internally. Be sure you’re aiming for the thickest part, and for goodness sake, don’t let the probe touch the bones, or you’ll get a false, high reading!
Keep an eye on the temperature—I even check it every 15 minutes once we hit the halfway point. For more detailed thermometer tips, check out my guide on perfect probe placement. If you want to see how others nailed the sear, check out this great tips piece on making the perfect prime rib for Christmas!
The Crucial Rest: Mastering the Final Stage of Prime Rib for Christmas Dinner — Step-by-Step Plan
You did it! You pulled that gorgeous hunk of beef out of the oven, and the internal temperature is reading exactly what you wanted. Now, listen to me very carefully: DO NOT CUT IT. I repeat, do not touch that carving knife for at least 15 minutes! This rest time is probably the most important, yet most skipped, step in any Prime Rib for Christmas Dinner — Step-by-Step Plan.
I know the excitement builds, and your family is ready to eat, but if you cut it right away, all those beautiful, hard-earned juices—the ones we worked so hard to keep inside with our two-step roasting method—will just flood right out onto your cutting board. And once the juice is gone, your roast feels dry, even if the temperature was perfect!
What I do as soon as the roast comes out is plop those four tablespoons of softened butter right on top of the hot roast. It melts and bastes slowly as it sits. Then, I tent it loosely with foil. Not tight—loose! You want the heat to stay in but still allow the temperature to equalize slightly. This resting period allows the muscle fibers to relax and redistribute the moisture throughout the meat. You want those juices sinking back in, not running out!
This 15-minute rest is your moment to breathe and pour yourself a little glass of something celebratory. When you come back to carve after this critical break, every slice of your Standing Prime Rib Roast is going to be tender, juicy, and exactly what you prayed for when you started your Prime Rib for Christmas Dinner — Step-by-Step Plan.

How To Cut A Prime Rib Roast: Expert Carving Tips
Okay, the roast has rested—it’s time for the grand finale! Carving feels intimidating, but honestly, it’s just a matter of knowing where to aim your knife. If you are carving a bone-in roast, make your life easy: slide a sharp, thin knife right between the bones and the meat after you slice the first piece off. The bones basically pop right out, and then you can slice the rest of the meat off the rack!
If you have a boneless roast, or once the bones are removed, you always, always slice against the grain. Look closely at the meat grain—those little muscle fibers running in one direction—and cut perpendicular to them. This shortens those fibers, making every single bite incredibly tender.
Here are my top essential carving tips for the perfect slice. Make sure your knife is sharp; a dull knife really tears the meat! I use a long, carving knife, and a light sawing motion works much better than pushing straight down. I even keep my favorite knife sharpening stone handy before big dinners. Slice it thick—a quarter-inch is a good starting point—and watch your family enjoy that perfect medium-rare slice!

Troubleshooting Common Issues When You How To Roast Prime Rib
Don’t panic if you run into a snag while following Prime Rib for Christmas Dinner — Step-by-Step Plan! Even experienced cooks have off days, especially when dealing with something as majestic as a standing rib roast. The good news is that most problems are easy to fix with a little bit of know-how about how roast physics generally works. Here are the few things that trip people up the most, and my fixes based on years of trial and error.
The number one issue that makes me cringe is when someone says their crust just didn’t form—it stayed pale instead of getting that deep brown sear. If this happens, it almost always traces back to one thing: moisture! If the exterior of your Standing Prime Rib Roast was wet when it hit that 450°F oven, the heat just spent all its energy boiling off the water instead of browning the meat properly. Next time, pat it bone dry with paper towels, and maybe even let it sit uncovered in the fridge for a couple of hours to help the surface air-dry.
Here’s another common worry: uneven cooking, where the outer edges are way past done while the center is perfect. Usually, this means the roast wasn’t at room temperature long enough before it went in. That cold center acts like an insulator. My tip for managing this within the Prime Rib for Christmas Dinner — Step-by-Step Plan is simple: always use that thermometer correctly, making sure you’re measuring the center mass. If you see big temperature discrepancies between the outside and inside too early on, you might need to tent the roast with foil sooner than planned to shield those delicate edges from the high heat.
Finally, if your roast ends up tough even when rested, even after you followed the temperature guidelines for how to roast prime rib—it might be that you cut it wrong! Like I mentioned before, if you slice with the grain instead of against it, those long muscle fibers stay intact. Cutting against the grain basically pre-chews the meat for your guests, making even a well-done roast seem way more tender!
Remember, cooking a truly amazing holiday centerpiece is a journey. Even if your first attempt at our Prime Rib for Christmas Dinner — Step-by-Step Plan needs tweaking, you are still serving up a magnificent meal!
Frequently Asked Questions About Your Prime Rib for Christmas Dinner
I figured I’d gather some of the most common things folks ask me when they’re reading through this whole process. Don’t worry if you have a dozen other questions ticking in your head; the beauty of a holiday centerpiece is that once you nail the basics—especially that temperature control—you’re golden for years to come!
What internal temperature is best for a Standing Prime Rib Roast?
This is the million-dollar question! For a Standing Prime Rib Roast, I personally always aim for medium-rare. That means taking it out when the thermometer reads between 125°F and 130°F. Remember, it keeps cooking while it rests, so pulling it right at that mark is crucial to avoid overshooting!
If you or your family prefer a little more well-done, shoot for 135°F to 140°F, but know that anything past that starts losing some of that glorious juiciness we’re working so hard to keep in there!
Can I make the herb rub ahead of time?
Oh yes, absolutely! I mentioned this above, but I love prepping this on the day before Christmas Eve if I can manage it. Mix up that herb and spice paste—the oil, garlic, rosemary, thyme—and mix it all until it forms a thick paste. Because it has oil in it, wrap that roast tightly once you coat it and keep it chilled. Just remember the crucial step: you still need to take that cold roast out of the fridge at least an hour before it goes into the hot oven!
What is the best way to store leftover roast?
Leftovers should last about three or four days in the fridge if stored correctly. Wrap thinner slices tightly—I like to use plastic wrap first, then tuck them into a Ziploc bag—to keep the air away. It freezes really well too! If you freeze individual slices wrapped well, they should stay good for up to three months. Thawing them overnight in the fridge works perfectly.
Storage and Reheating Instructions for Leftover Prime Rib
Phew, you still have some roast left? Lucky you! Leftover prime rib might seem tricky, but it reheats beautifully if you treat it kindly. The biggest mistake people make is nuking a thick slab of meat and ending up with dry, sad leftovers.
To keep it fresh, wrap those slices tightly—I use plastic wrap snug against the meat first, then foil—and pop them in the fridge for up to four days. They freeze great too, just wrap those bundles up tight!
When it’s time to eat the next day, forget the microwave! Slice the leftover roast as thinly as you can manage, even if you have to cut against the grain again—it helps so much. Reheat those thin pieces gently in a pan over low heat with just a splash of beef broth poured over them. That little bit of moisture keeps your Standing Prime Rib Roast tasting almost as good as it did the first night!
Share Your Success with This Prime Rib for Christmas Dinner — Step-by-Step Plan
That’s it! You’ve officially made it through the whole process for creating the ultimate holiday feast. Can you believe it? You took on a massive Standing Prime Rib Roast, followed every step in the Prime Rib for Christmas Dinner — Step-by-Step Plan, and now you have a table full of happy, well-fed family members!
I truly hope this guide gave you the confidence boost you needed to tackle this magnificent meal. Seeing that perfect rosy center after all that work? There’s no feeling like it. I built this plan specifically to take the guesswork out of how to roast prime rib, so you could spend less time stressing about the oven and more time enjoying your holiday!
If you loved how easy it was to manage the timing and got rave reviews on your perfectly cooked meat, please, please let me know! Head down to the comments section below—I check it all the time, and I just love hearing about your holiday wins. Don’t forget to leave a star rating to tell future busy cooks that this Prime Rib for Christmas Dinner — Step-by-Step Plan is the real deal!
Happy holidays, and I hope this roast becomes a tradition in your family just like it did in mine!
Prime Rib for Christmas Dinner — Step-by-Step Plan
Ingredients
Equipment
Method
- Preheat your oven to 450°F (230°C). Remove the prime rib from the refrigerator about 1 hour before cooking to allow it to come to room temperature.
- In a small bowl, combine the olive oil, minced garlic, chopped rosemary, chopped thyme, coarse salt, black pepper, and smoked paprika. Mix well to create a paste.
- Pat the prime rib dry with paper towels. Rub the herb and spice paste all over the roast, ensuring it is evenly coated. If using Dijon mustard, spread it over the roast before applying the paste.
- Place the prime rib, fat-side up, in a roasting pan. If your roast is bone-in, you can rest it on the bones. If it’s boneless, you can place it directly in the pan.
- Sear the roast in the preheated oven for 15 minutes at 450°F (230°C). This helps to create a flavorful crust.
- Reduce the oven temperature to 325°F (160°C). Continue roasting for approximately 13-15 minutes per pound for medium-rare (125-130°F or 52-54°C internal temperature), or longer for your desired doneness. Use a meat thermometer inserted into the thickest part of the roast, avoiding the bone, to check the temperature.
- Once the roast reaches your desired internal temperature, remove it from the oven. Place the softened butter over the top of the roast. Tent loosely with foil and let it rest for 15 minutes before carving. This allows the juices to redistribute, resulting in a more tender and flavorful roast.
- To carve, use a sharp knife. If bone-in, you can slice between the bones. If boneless, slice against the grain into your desired thickness.
Notes
Tried this recipe?
Let us know how it was!
Certified Family Nutrition Strategist
My path into family nutrition began working with Phoenix Area Family Services, where I saw how traditional nutrition advice often ignored real-world constraints like budget limitations, time crunches, and kids who refuse to eat anything green. That experience sparked my mission to develop meal planning systems that work with family realities, not against them.
Over eight years, I’ve helped hundreds of families reduce grocery spending by 25% while dramatically improving their nutrition. My meal planning frameworks have been adopted by local wellness centers because they actually work for busy parents juggling different ages, preferences, and dietary needs in one household.
As a bilingual first-generation Mexican-American and mother of three, I personally navigate the daily challenge of feeding a family nutritiously while honoring cultural traditions and managing a household budget. My “kid-friendly low-carb” protocols show families how to gradually introduce healthier options without triggering mealtime battles or abandoning beloved family recipes.
My “realistic wellness” philosophy is straightforward: health improvements must work within existing family dynamics and financial realities to be truly sustainable. When I’m not developing meal planning systems, I’m creating portable trail snacks for our weekend family hiking adventures – because healthy eating should fuel the life you want to live.
My personal low-carb journey started after pregnancy as a way to regain energy for active parenting, and that experience continues to inform my professional commitment to making healthy eating feel supportive rather than burdensome for busy families.