
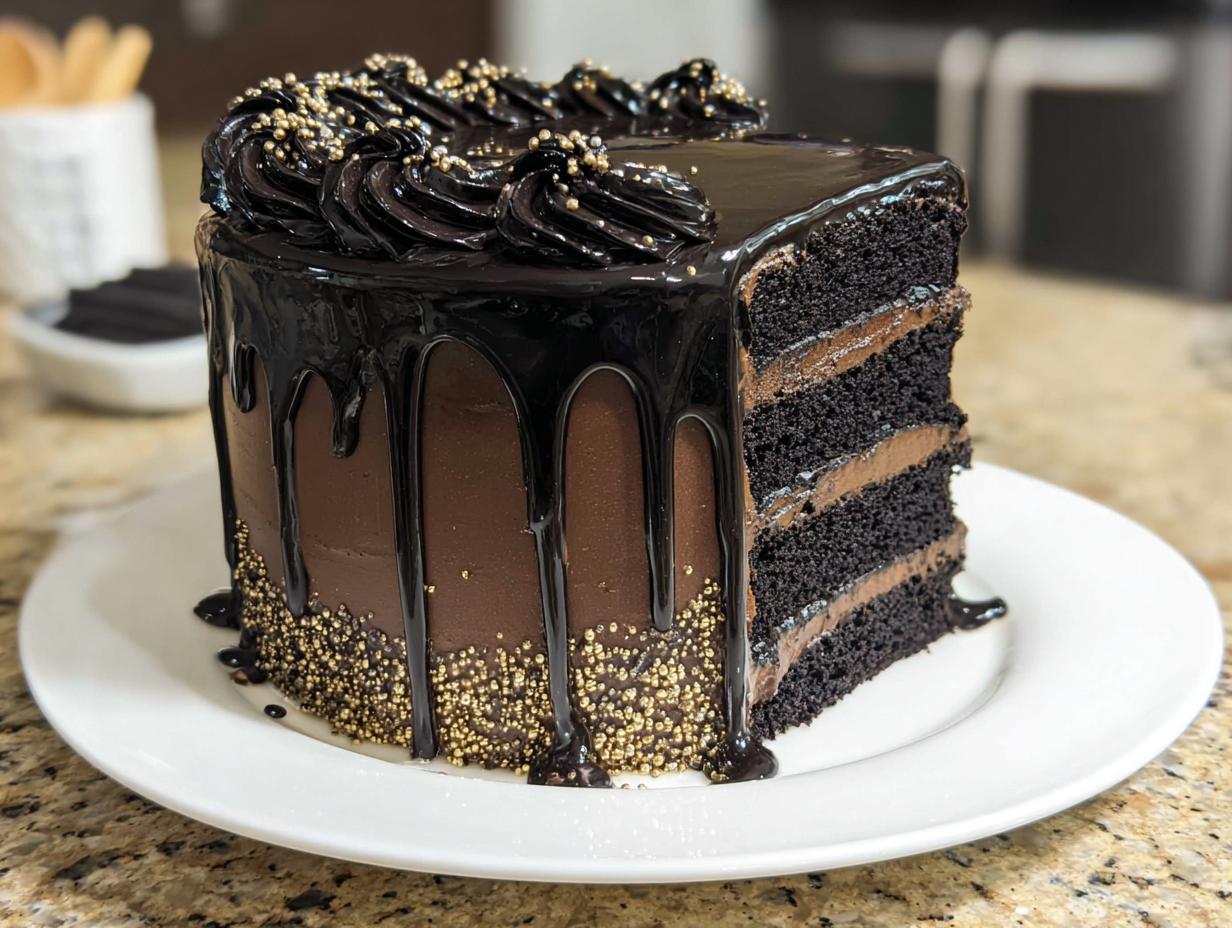
You know that feeling when you need a dessert that simply stops traffic? Something so elegant and rich it looks like it walked right off a showroom floor? Well, I felt that exact pressure when making my best friend’s birthday centerpiece, and that’s how I perfected this stunning Black and Gold Drip Cake. I remember vividly, the rich, dark chocolate cake baked up smelling heavenly, and the thought of drizzling that glossy gold over the deep black layers filled me with pure anticipation!
This recipe is my secret weapon because it balances that intense, almost luxurious visual appeal with a flavor that actually backs it up. We aren’t just splashing on color here; we are building layers of deep cocoa flavor. When I finally cut into it and saw the gasps from my excited friends, I knew I had nailed the perfect statement dessert. Trust me, this guide shows you exactly how to conquer every step and create a show-stopper!
Why This Black and Gold Drip Cake Recipe Delivers Elegance and Flavor
If you are looking for that ultimate, show-stopping dessert, you’ve found it. This isn’t just a cake; it’s the centerpiece your celebration deserves. It’s designed for people who crave both incredible flavor and jaw-dropping presentation. You’re going to feel like a pastry chef once you nail these components!
- Unforgettable Visual Impact: The stark contrast between the inky black and shimmering gold makes this cake perfect for any high-end Party Theme.
- Rich, Deep Flavor: We skip basic food coloring for black cocoa, giving you a complex, deep chocolate taste.
- Perfect Structure: The stability of the layers ensures clean lines, making those beautiful drips look flawless.
Key Features of Our Black and Gold Drip Cake
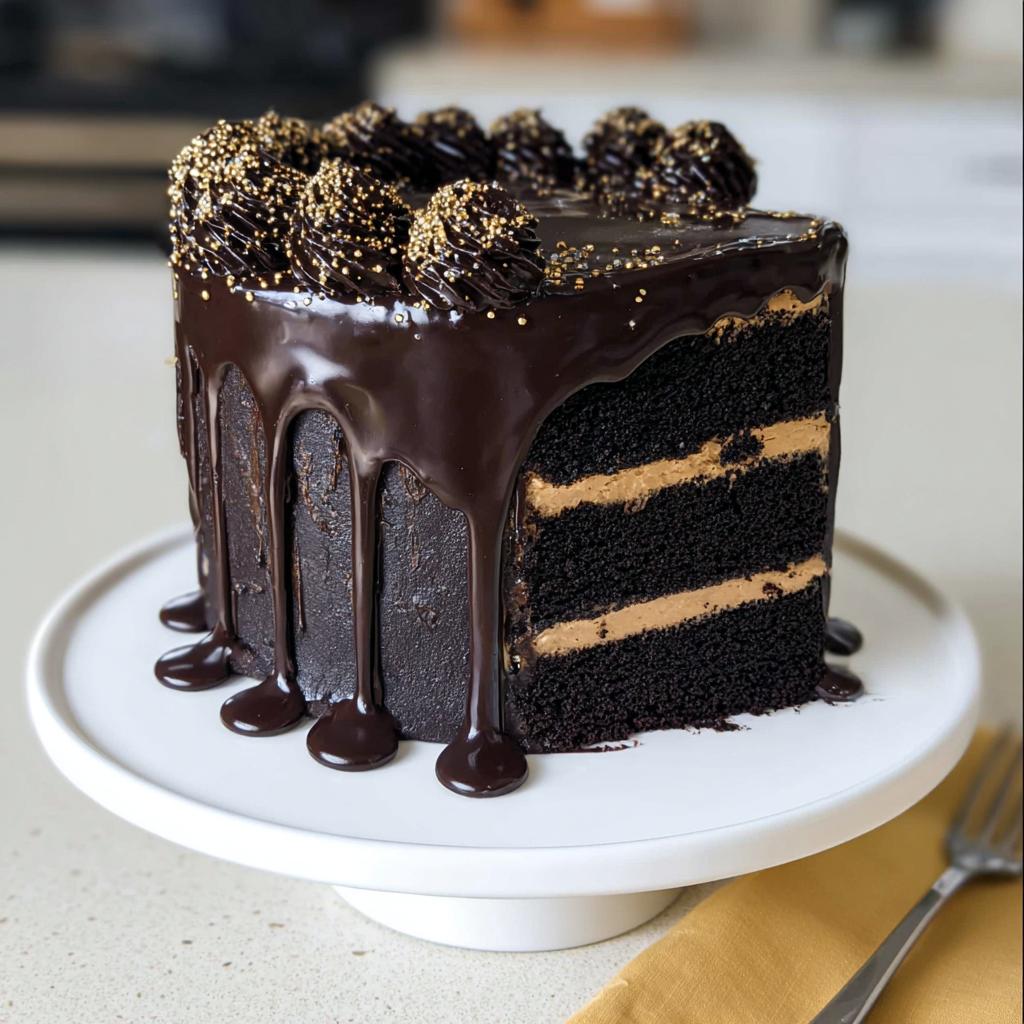
What makes this specific recipe worth your time? It’s all about starting with the best foundation. The cake itself uses black cocoa, which gives it that truly unique, dark color intensity you simply can’t get otherwise. Then we pair that with a dark chocolate buttercream that’s smooth as velvet—no grainy texture here, I promise!
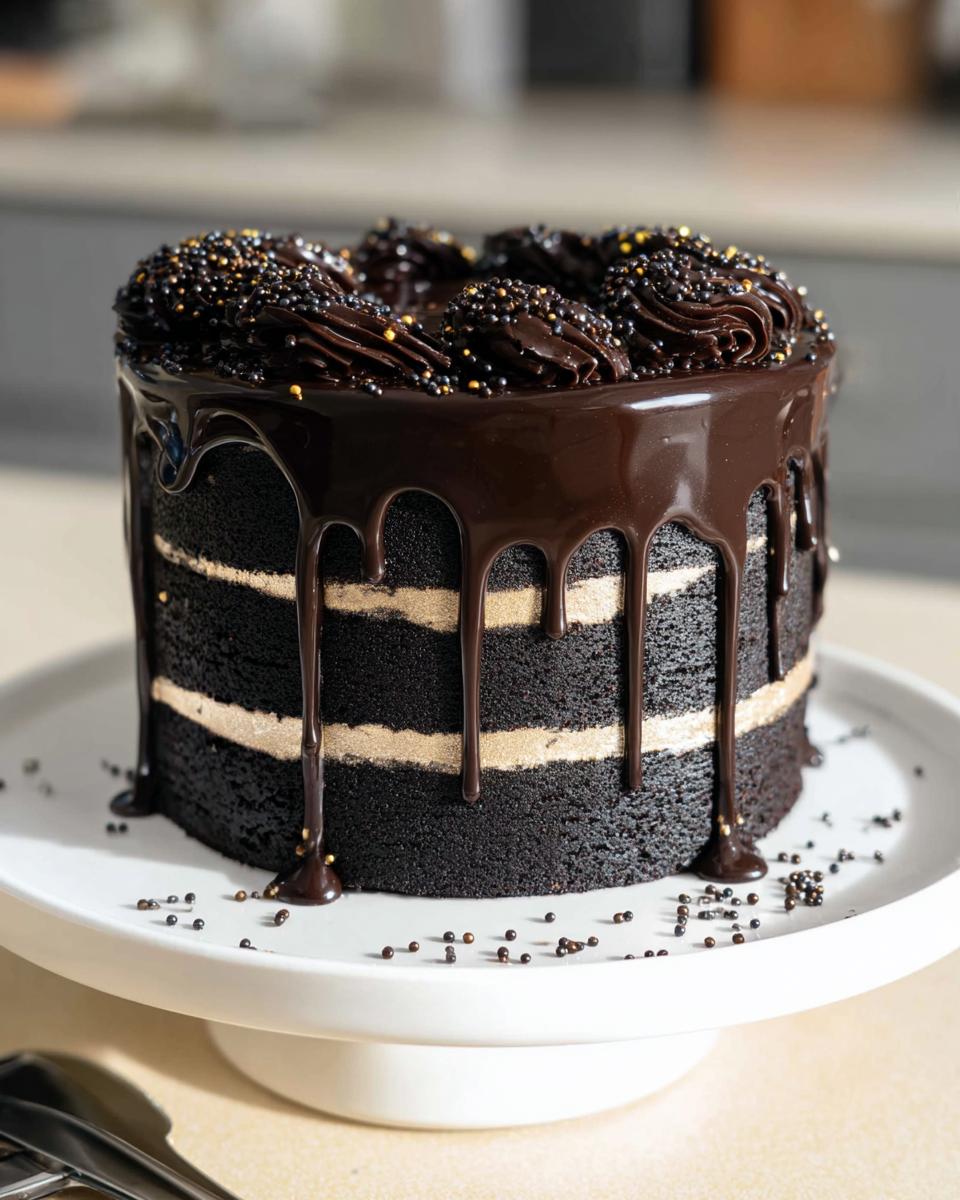
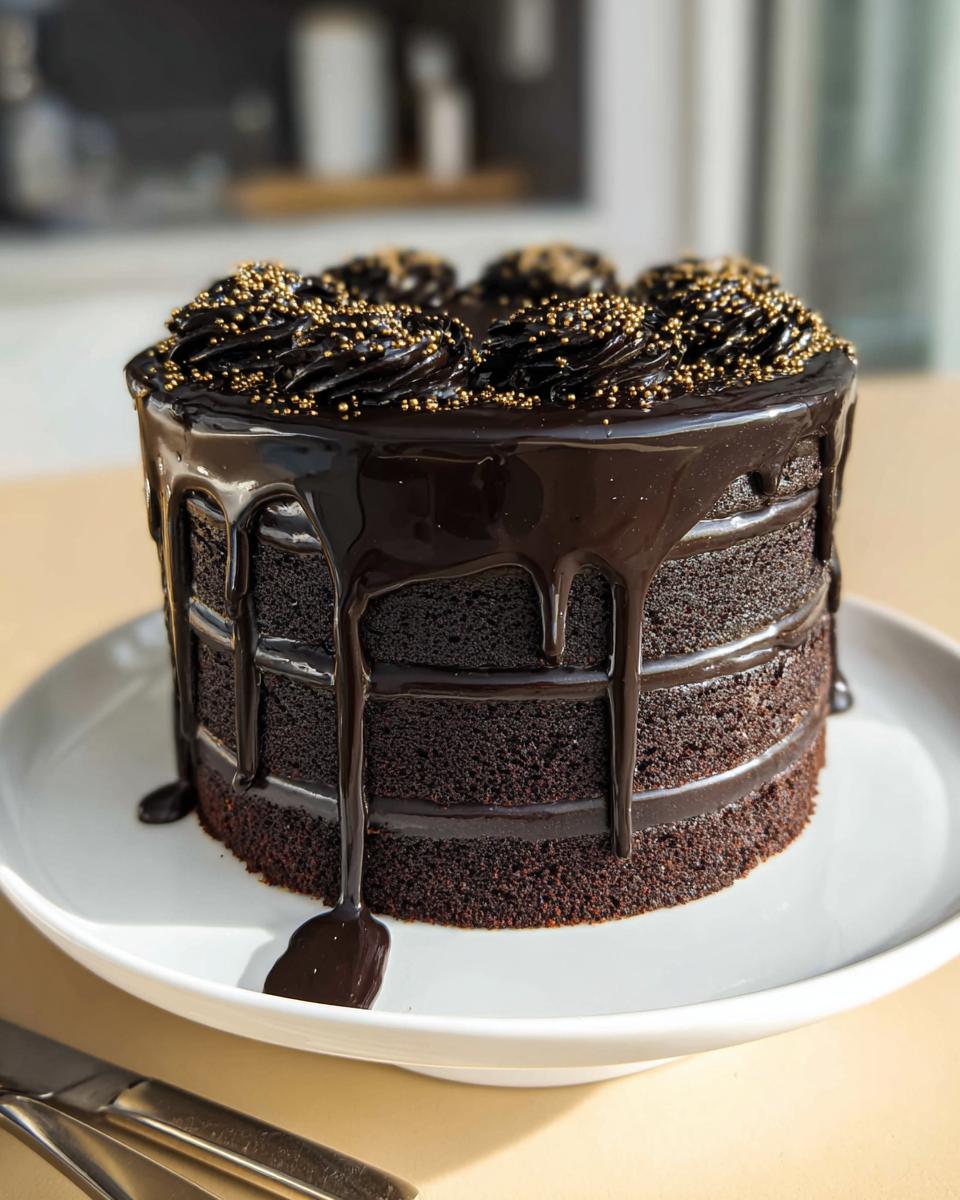
And finally, the signature element: the drip. We control the temperature and thickness so that when it cascades down the chilled sides, you get those perfectly imperfect, glossy ribbons. It’s sophisticated, it’s dramatic, and it’s totally achievable, even if you’re nervous about the drip technique!
Essential Equipment for Your Black and Gold Drip Cake
You absolutely need a few key tools to pull off this sleek, professional finish. Trying to crumb coat a tall cake without the right equipment is just setting yourself up for frustration, and trust me, we want smooth, elegant sides for this Black and Gold Drip Cake!
First, you need about three 8-inch cake pans. Having multiples means you don’t have to clean pans between batches, which saves time! But the real game-changers are the turntable—the spinning cake stand—and the bench scraper. The spinning cake stand lets you rotate the cake smoothly without touching the sides, which is crucial when applying that final coat of buttercream.
The bench scraper is how you get those incredibly sharp, vertical edges. You hold it steady against the spinning stand, creating almost architectural sides that are perfect for that dramatic drip effect. Don’t forget your electric mixer for whipping that buttercream into submission, and of course, a small piping bag and an open star tip for those elegant swirls on top!
Gathering Ingredients for the Black and Gold Drip Cake Components
Alright, this is where the alchemy starts! For a cake this dramatic, we can’t just toss things in a bowl willy-nilly. We have three main components—the cake itself, the frosting, and the shiny drip—and each needs dedicated, specific ingredients prepared just so. Seriously, the temperature of your butter and eggs makes a difference here, so don’t rush the prep!
I always lay out my ingredients clearly the night before because when you’re ready to bake, you need to move fast, especially with the black cocoa powder. You absolutely must use quality stuff if you want that deep, dramatic color. It’s the secret sauce to a true black cocoa cake, not just a dreary brown one.
Ingredients for the Black Cocoa Cake Layers
For the cake layers, remember that delicious thin batter is exactly what we want! Grab your all-purpose flour, about two cups of sugar, and that crucial black cocoa powder—don’t skimp here! You’ll also want your leaveners: baking powder and baking soda, plus some fine salt to balance all that deep chocolate flavor.
Now for the wet components. You’ll need warm water and buttermilk; the buttermilk is key for tenderness in this dark cake. Make sure you have your oil, two room-temperature eggs (cold eggs shock the batter, and we don’t want that!), and vanilla extract.
Ingredients for the Black Dark Chocolate Buttercream Frosting
This frosting has to be sturdy enough to hold up the cake and the drips, so take note! You need two full cups of unsalted butter—and I mean true, soft, room-temperature butter. If it’s coming straight from the fridge, your final Buttercream Drip won’t be smooth!
Mix that creamy butter with the sifted black cocoa powder, vanilla, and salt. Then, slowly work in the powdered sugar and heavy whipping cream. The last magical touch here is adding about one cup of semi-sweet chocolate chips that you’ve melted down and let cool off completely first. That melted chocolate is what gives the buttercream its rich body and deep color base.
Ingredients for the Black Chocolate Drip
This is the star of the show, the part that makes it a true Black and Gold Drip Cake. You only need a few components, but the proportions matter for the flow! Have your semi-sweet chocolate chips ready in a bowl.
You’ll heat up some heavy whipping cream until it’s steaming hot—you can use the microwave or stove, just watch it! Pour that over the chocolate chips, let it sit, and then this is vital: add your black gel food coloring right here. Stir it slowly until it’s silky smooth, and then you must let it cool slightly before pouring. Too hot, and it melts your buttercream; too cold, and it plops instead of drips!
Step-by-Step Instructions: Baking the Black and Gold Drip Cake Layers
Now for the fun part—getting those gorgeous dark layers ready to stack! First things first, get your oven preheated to 350 F/175 C. You need to prep your three 8-inch pans (or four 7-inch ones if you went that way!) by lining and greasing them really well. These dark cakes can sometimes stick if you get lazy with the prep, so don’t skip that step!
In one big bowl, just whisk your dry stuff together: flour, sugar, that beautiful black cocoa powder, the baking powder, soda, and salt. Keep mixing until everything looks uniform—no clumps of powder hiding anywhere!
In a separate bowl, stir together your wet ingredients: the warm water, buttermilk (make sure it’s room temp, please!), oil, your room-temperature eggs, and vanilla. Easy enough!
Here’s where we marry them! Pour those wet ingredients right into the dry mix. You’re going to mix this by hand just until everything comes together. Don’t overdo it; the batter will look surprisingly thin, almost soupy—that’s exactly what we want for our Black and Gold Drip Cake layers to stay moist!
This next tip makes such a difference for stacking: divide the batter evenly using a kitchen scale. It sounds fussy, but weighing your pans ensures they all bake up the same height! Pop them in for about 24 to 27 minutes.
Once they are done, let them chill in the pans for just 10 minutes before you flip them out onto wire racks to cool completely. If you freeze them after they cool down, they slice perfectly flat later on, which is a huge advantage when building height!
Crafting the Perfect Black Dark Chocolate Buttercream for Your Drip Cake
Now that our deep, dark cake layers are cooling off, we turn our attention to the frosting. This isn’t just any frosting; it has to be stable enough to build a tall cake and hold that gorgeous drip without sliding off. We are aiming for that silky, perfect dark chocolate buttercream that makes the final Black and Gold Drip Cake unforgettable.
First, pull out your two cups of unsalted butter and let it get soft—I mean truly room temperature soft, but not melty and greasy. Beat that butter alone on medium speed for about 30 seconds until it’s just smooth and creamy. We want to add air, but we don’t want it fluffy like a meringue, so keep that mixer moving!
Next comes the color and flavor punch. Add in your black cocoa powder, vanilla extract, and salt. Mix this on low at first, because black cocoa can turn your kitchen into a shadowy nightmare if you start too high! Mix until it’s completely incorporated into the butter.
Once that’s blended, we slowly start mixing in your four cups of sifted powdered sugar and the heavy whipping cream. You have to do this slowly on low speed until it all comes together. If you dump it all in, you’ll end up choking your mixer and getting sugar dust everywhere!
The very last step and the secret to this deep flavor is the cooled, melted semi-sweet chocolate chips. Add those in last, again mixing low. That melted chocolate helps firm up the final product, keeping your sides sharp. If you want that color *even deeper*—and honestly, for this look, you probably do—you can add a touch more black gel food coloring now. Cover the bowl flush with plastic wrap right away, pressing the wrap directly onto the surface of the frosting. This prevents that awful, hard crust from forming while your cake chills.
Honestly, a well-made, stable buttercream like this is the backbone of any great Buttercream Drip design. It handles the structure so you can focus purely on the artistry of the gold later on!
Making the Glossy Black Chocolate Drip for the Black and Gold Drip Cake
Okay, this part is my absolute favorite—the creation of the glossy black chocolate drip. If you get this right, the whole Black and Gold Drip Cake just sings! We are essentially making a beautiful, thin ganache here, but we need to coax it into the perfect consistency for those slow, gorgeous cascades.
First, take your semi-sweet chocolate chips and pop them into a heatproof bowl. They need to be ready to melt completely. Then, measure out your heavy whipping cream. You need to heat this cream until it’s steaming hot—I usually pop mine in the microwave for about 45 seconds to a minute until I see tiny bubbles forming around the edge. If you’re on the stovetop, just get it simmering gently; don’t let it boil over!
Pour that hot cream right over those chocolate chips. Here’s the rule: forget the spoon for two full minutes! Just let the heat work its magic and melt the chocolate from the inside out. Patience pays off, trust me.
After the waiting period, add your black gel food coloring. You’re going to stir this slowly, starting from the middle and working your way out until the whole mixture is smooth and that stunning inky black. If you stir too fast, you risk whipping air into it, and we want glossy, not foamy!
Now for the critical step: cooling. You cannot pour this hot straight onto your chilled buttercream cake. It will melt everything! You need to let it cool on the counter for about 10 minutes until it’s just slightly warm to the touch. Think of testing the temperature of bathwater—warm, but not hot.
If it’s too thin, pop it in the fridge for five minutes! If it feels too thick and gloppy, microwave it in 5-second bursts until it just flows easily off the spoon. Getting this consistency right is what separates an amateur drip from the professional look we’re going for on this Black and Gold Drip Cake!
Assembling and Decorating Your Masterpiece Black and Gold Drip Cake
Alright, deep breaths! This is the moment where all that hard work comes together and your Black and Gold Drip Cake transforms from a stack of layers into a true showstopper. We need to work methodically here, especially with chilling times, because rushing results in messy sides, and we want crisp perfection!
Start by placing your bottom cake layer on your 10-inch greaseproof cake board, securing it with a little dab of that dark chocolate buttercream. Then, stack with an even layer of frosting between each one. Once all layers are stacked, slather on a thin, even coating around the entire cake—this is your crumb coat. Smooth it out with your bench scraper. Don’t aim for perfection yet; we are just trapping those crumbs!
Now, we chill! Put that assembled cake in the fridge for a good 30 minutes, or if you’re impatient like me, 10 minutes in the freezer. When you bring it out, slather on that second, thicker layer of buttercream. Smooth it out again using your bench scraper while spinning the cake stand. This time, when you chill it again for another 20 minutes (or 10 in the freezer), the sides should come out firm and flawless—ready for gold!
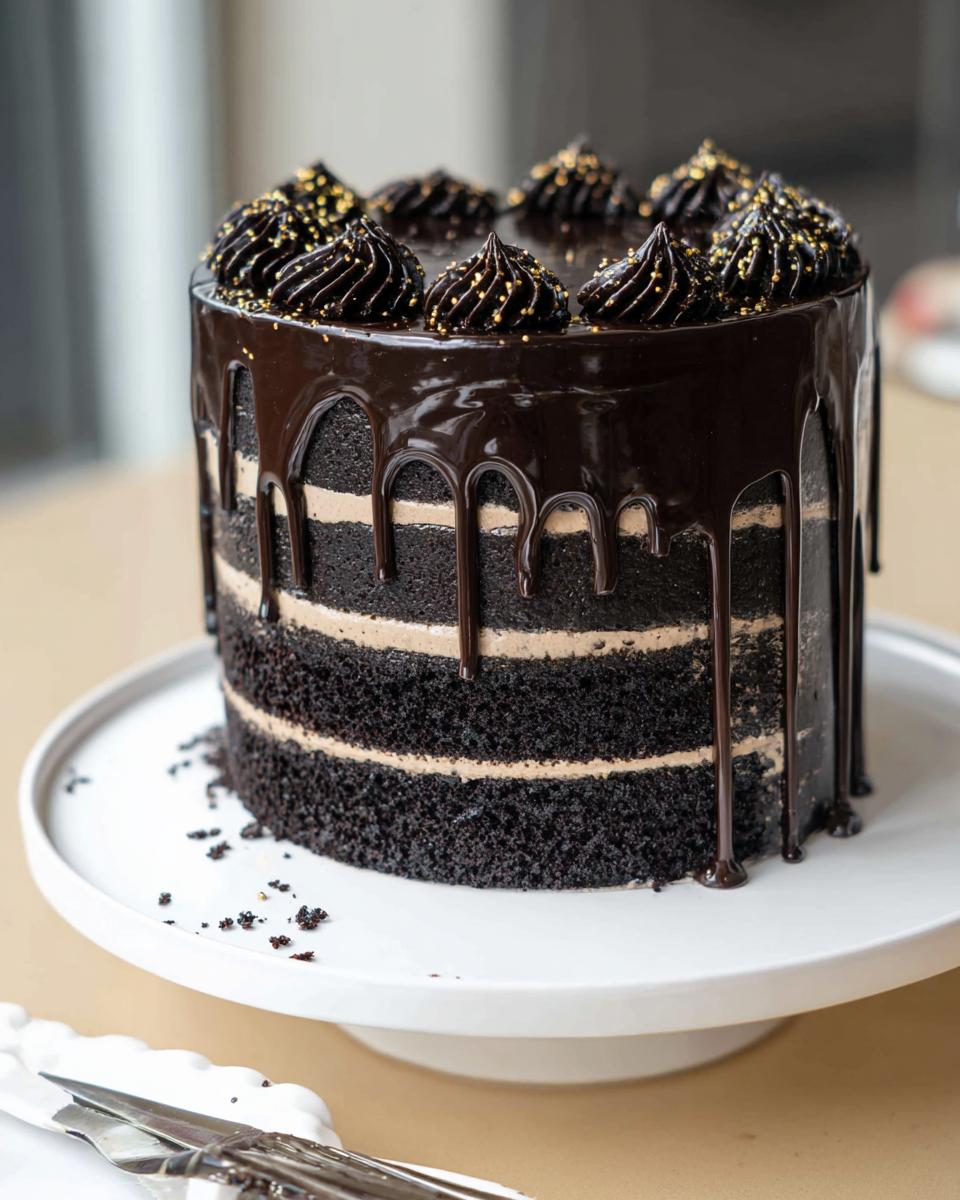
Once it’s cold and firm, it’s drip time! You can use that slightly warm drip we made earlier. After we get the drips looking just right—we’ll talk more about that below—you can move onto the fun, celebratory part. Pipe decorative swirls on the top edge using your saved buttercream and that open star tip. This is the perfect place to add some sparkle, making it an absolutely stunning choice for New Year Cake Ideas!
The final magic touch is the gold! I mix my edible gold luster dust with a tiny bit of clear extract or clear alcohol, creating a paint. Then, using a clean brush, I carefully paint dots, flecks, or even full coverage onto the buttercream swirls and sometimes let a little drip here and there catch the light. The contrast against that intense black cocoa is just breathtaking! If you want to see exactly how I mix up that gold paint for the best sheen, check out my quick tutorial on mixing edible gold paint.
Tips for Achieving the Perfect Drip on Your Black and Gold Cake
Listen closely, because the drip is where many people get nervous, but it’s actually so simple once you know the consistency. You have to trust the temperature test we talked about before. When you hold the spoon of ganache, you want it to leave a nice coating on the back of the spoon, but when you tap it gently, it should start to run slowly.
If you are using a spoon, hold it slightly over the top edge, letting the chocolate spill onto the top surface first. Gently nudge the spoon outwards so the weight of the chocolate pulls a stream over the edge. Don’t try to paint the drips on; let gravity do the work for you! You want the drip to start thick and then thin out naturally as it falls.
For more control, which I prefer for a really clean line, use a small squirt bottle or even a clean squeeze-top condiment bottle. Fill it with the slightly warm black drip. You can trace the very edge of the cake top, then squeeze firmly but briefly to start the cascade. If you squeeze longer, the drip will go all the way to the bottom; squeeze fast, and you get a lovely shorter drip. Practice on the side of a glass first if you’re nervous!
Ingredient Notes and Substitutions for Your Black and Gold Creation
I know sometimes you look at a recipe and think, “Oh shoot, I don’t have *that* one fancy thing!” Don’t panic! This amazing Black and Gold Drip Cake is flexible, even though quality matters. We want you to be able to make this masterpiece no matter what’s stocked in your local pantry.
The biggest hurdle people run into is finding black cocoa powder. It gives the cake that almost charcoal black color and a specific deep, Oreo-like flavor. If you absolutely cannot find it, don’t scrap the whole recipe! You can substitute it by using regular high-quality unsweetened dark cocoa powder. However, you might need to compensate for the color.
If you use regular dark cocoa, you will need to up your game on the black gel food coloring in both the cake batter and the buttercream. You might need an extra squirt or two to get that dramatic contrast we’re aiming for. The flavor won’t be quite as deep, but the visual impact will still be stunning!
What about the butter? My rule is clear: use real butter for the buttercream for the best texture and flavor foundation. But if you absolutely must substitute for an allergy or dietary reason, you can swap the sticks of butter for a high-quality, firm vegetable shortening. Just know that you will lose a lot of that rich dairy depth. If you do substitute, make sure your shortening is cold and work quickly, as it behaves differently when creamed than butter does.
The final thing to worry about might be the semi-sweet chips for the drip. If you only have milk chocolate, you can use those, but your drip won’t be as dark, so you’ll need to heavily load up on black food coloring to counteract the lighter color. Honestly, for the integrity of this rich cake, I always recommend trying to source the proper semi-sweet or dark chocolate!
Frequently Asked Questions About the Black and Gold Drip Cake
It’s totally normal to have questions when tackling a show-stopper like this! Baking a dramatic dessert should feel exciting, not intimidating. I’ve gathered the questions I get most often about planning, colors, and that crucial final bling factor. Let’s make sure your Black and Gold Drip Cake delivers every single time!
Can I make the Black and Gold Drip Cake ahead of time?
That’s a great planning question, especially if you’re tackling this for a big party! The absolute best way to prep is to bake and wrap your black cocoa cake layers tightly. Once they are totally cool, they freeze like a dream—seriously, frozen cake layers are much easier to handle and level. You can keep those frozen for up to two months.
I usually wait until the day before the event to assemble the cake, frost it completely, and chill it firm. You can even prepare the chocolate drip the day before, too, just store it at room temperature and gently warm it back up when you’re ready to pour. Don’t apply the actual gold dusting or luster dust until just before you plan to serve it for maximum metallic punch!
How do I keep the black color intense?
This is all about that black cocoa powder, my friend! If you used the recommended black cocoa, you should have a fantastic, deep color right out of the gate. If you had to substitute with regular dark cocoa, you’ll need to rely more heavily on a high-quality, concentrated black gel food coloring in both your batter and your buttercream. Liquid food coloring is your enemy here; it adds too much water and can ruin the texture of your Buttercream Drip.
The key is to use gel coloring, which is highly pigmented and won’t alter the volume of your frosting or batter. Mix it in slowly, covering the frosting flush with plastic wrap when done, to stop air from dulling that rich blackness.
What is the best way to achieve a clean ‘Black and Gold’ look?
This is where we channel our inner artist! Forget sprinkling; we are painting! To get that sharp, metallic pop of gold that truly makes this a stunning Black and Gold Drip Cake, you need to create an edible paint. Mix your edible gold luster dust—the really shimmery kind—with just a few drops of clear vanilla extract or even some high-proof vodka. The alcohol evaporates super fast, leaving behind pure metallic pigment!
Use a clean, slightly stiff brush. You can delicately paint stripes onto the drips, dab shimmering flecks onto your piped swirls, or even brush the tops of the cake layer edges before stacking. Because the black butterceam is so dark and matte (once chilled), the gold truly looks like it’s glowing! This technique is what separates an everyday cake from something perfect for New Year Cake Ideas.
Storage and Reheating Instructions for Leftover Black and Gold Drip Cake
So, you managed to have leftovers of this glorious creation? That’s awesome! Because of the buttercream and the chocolate drip, the best place for the finished Black and Gold Drip Cake is definitely the refrigerator. Just make sure to cover it loosely with a dome or lid so the frosting doesn’t absorb any weird fridge smells.
When you’re ready to eat a slice later, don’t serve it straight from the cold! That buttercream will be too firm. Pull your slices out about 30 to 45 minutes before serving time. Letting it sit on the counter lets the butter soften just enough, bringing back that luscious, creamy texture we worked so hard to achieve!
Share Your Stunning Black and Gold Creations
Okay, you’ve done the hard part—you’ve baked, chilled, dripped, and gilded! Now, I desperately want to see what you made! There is truly nothing more rewarding than seeing how this dramatic Black and Gold Drip Cake looks in *your* kitchen for *your* special occasion.
If you loved baking this, please take a moment and leave a star rating below. Those ratings really help other bakers feel confident in trying this show-stopper for themselves. Did you have a tricky moment with the drips? Did you find a new way to apply that gold luster dust? Don’t hide your secret knowledge!
Seriously, head over to my Instagram or Facebook page and tag me in your photos! Use the hashtag so I can easily find your gorgeous work. I love sharing reader creations to inspire the next baker. Tagging me ensures I see your beautiful swirls and those perfect, glossy black drips. Happy baking, and I can’t wait to see your stunning results!
Black and Gold Drip Cake
Ingredients
Equipment
Method
- Preheat your oven to 350 F/ 175 C. Line and grease three, eight-inch cake pans, or four, seven-inch pans.
- Combine flour, sugar, black cocoa powder, baking powder, baking soda, and salt in a large bowl. Whisk together until combined.
- In a separate, large bowl, add warm water, buttermilk, oil, eggs, and vanilla extract. Stir to combine.
- Pour the dry ingredients into the wet ingredients. Mix by hand until fully incorporated. The batter will be thin.
- Divide the batter evenly between the cake pans and bake for 24-27 minutes. Use a kitchen scale to weigh the pans for even layers.
- Remove cake layers from the oven and let them cool in the pans for 10 minutes. Loosen the edges with an offset spatula and flip onto wire racks to finish cooling.
- Once cooled, level the top of each cake layer with a serrated knife. Wrap and freeze layers if making in advance.
- Beat butter on medium speed for 30 seconds until smooth.
- Add sifted black cocoa, vanilla extract, and salt. Mix on low until fully incorporated.
- Slowly mix in powdered sugar and heavy cream on low speed until combined.
- Mix in cooled, melted semi-sweet chocolate on low speed until the desired consistency is reached.
- Add black gel food coloring if a deeper black is desired. Cover frosting flush with plastic wrap to prevent crusting.
- Place semi-sweet chocolate chips in a heatproof bowl.
- Heat heavy cream in a heatproof bowl in the microwave for 45 seconds to 1 minute until steaming. Alternatively, heat on the stove until simmering.
- Pour hot cream over the chocolate chips. Let sit for 1-2 minutes.
- Add black gel food coloring, then stir slowly until smooth.
- Set aside and cool for about 10 minutes, until slightly warm to the touch.
- Stack and frost the cake layers on a cake board, using a dab of frosting to secure the first layer.
- Add an even layer of buttercream between each cake layer with a large offset spatula.
- Spread a thin coat of frosting around the cake, covering all layers. Smooth with a bench scraper.
- Chill the cake in the fridge for 30 minutes or freezer for 10 minutes until the frosting is firm.
- Add a second, thicker layer of frosting and smooth with a bench scraper.
- Chill the cake again for 20 minutes in the fridge or 10 minutes in the freezer until firm.
- Test the ganache consistency; heat briefly in the microwave if needed.
- Add drips to the chilled cake using a squirt bottle or spoon.
- Decorate as desired. Pipe swirls on top with an open star tip, and add edible gold paint or a luster dust mixture.
Notes
Tried this recipe?
Let us know how it was!
Master of Global Fusion Innovation
My culinary adventure reflects my Lebanese-Italian heritage and a decade spent in the dynamic fusion restaurant scenes of Miami and Barcelona. I’ve made it my mission to prove that beloved global comfort foods can be successfully adapted for low-carb living without losing their soul, their cultural authenticity, or their ability to comfort.
With advanced training in molecular gastronomy and experience spanning Mediterranean, Middle Eastern, and Latin American traditions, I’ve developed what I call “respectful innovation” – culinary creativity that honors traditional cooking wisdom rather than replacing it. My alternative ingredient substitution systems are now taught in specialty diet cooking schools throughout the region.
Drawing from my trilingual upbringing, I understand how deeply food connects to identity and memory. That’s why my flavor-bridging techniques allow classic dishes from around the world to maintain their comforting, familiar qualities while meeting contemporary nutritional standards. I regularly share these techniques at international culinary symposiums and innovation events.
When I’m not experimenting in my Miami fusion kitchen laboratory, you’ll find me at local salsa dance venues – the rhythm and improvisation skills translate directly to my creative cooking process! My role as a foster parent to rescue rabbits has unexpectedly inspired some of my most creative plant-based low-carb innovations.
My personal low-carb journey began as a way to maintain energy for my active lifestyle, but it’s evolved into a professional mission of proving that healthy eating can be globally adventurous rather than restrictively limiting. Every recipe I create is a passport to culinary adventure, transforming kitchens into laboratories for exploring healthy versions of the world’s most beloved comfort foods.