
You know those desserts that just stop a conversation dead when you bring them into the room? That’s what we’re after today! I’m absolutely obsessed with making food that looks incredibly complicated but is secretly totally manageable, and this gorgeous Gold-Dusted Bundt Cake is the perfect example. We are taking a deep, rich Devil’s Food Cake, layering it with the most delicate Champagne Buttercream, and yes, adding a whisper of edible gold. It’s just so fancy!
I still remember the first time I made a Bundt cake for a family gathering. It was a simple recipe, but I decided to elevate it by adding a touch of edible gold dust for an extra wow factor. As I pulled the cake out of the oven, the aroma filled the kitchen, and I felt a mix of excitement and nervousness about how it would be received. When I finally presented the Gold-Dusted Bundt Cake to my family, their faces lit up with delight, and the cake was gone in moments. That experience taught me that sometimes, a little sparkle goes a long way in making moments unforgettable, and it inspired me to keep experimenting with fun, decorative touches in my baking.
Trust me, this cake is going to be your new go-to for impressing everyone, whether you are serving it for a major holiday or just feeling fabulous on a Tuesday night. Grab your pan, because we’re putting the sparkle on this!
Why This Gold-Dusted Bundt Cake Stands Out
I know what you might be thinking—a cake that looks this stunning must take all day, right? Wrong! This recipe proves you can achieve that incredibly Easy Elegant look without spending your entire weekend in the kitchen. It’s truly the perfect candidate for any big celebration or Holiday Dessert.
- It yields perfectly clean, moist layers that stack beautifully in that iconic Bundt shape.
- The Champagne Buttercream is light, airy, and has just the right amount of refined flavor complexity.
- It transports well, making it ideal for potlucks or dinners at someone else’s house!
Flavor Profile and Texture
Seriously, the contrast here is what sells it. You get this deep, dark, rich Devil’s Food Cake base, which means it has this wonderful density without ever feeling heavy. Then you introduce that Champagne Buttercream—it’s so light and almost foamy. It melts in your mouth way faster than a standard sugary frosting. It’s just quality, start to finish.
Achieving an Elegant Presentation
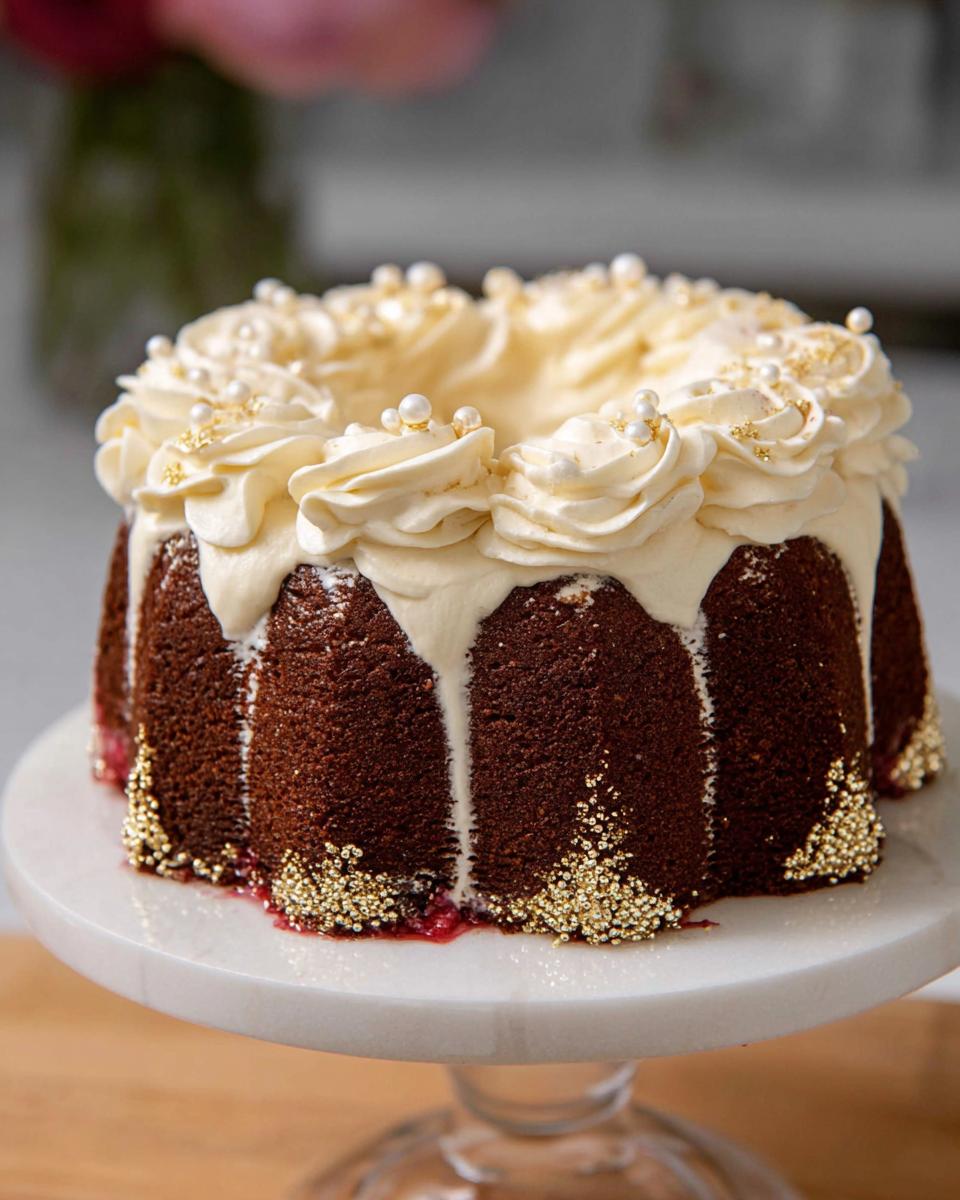
The Bundt shape is classic, but the decor is what takes it over the top. We aren’t relying on tons of piping skills here. The secret weapon is layering those beautiful buttercream roses and then adding that final shimmer of edible gold dust. That touch of gold makes this look like something prepared by a pastry chef. You’ll feel like a superstar when you present it!
Essential Components for Your Gold-Dusted Bundt Cake
Okay, so putting a beautiful cake together like this takes a little planning, but it’s worth it for this flavor combination. Before we even touch the oven, we need to make sure our pantry is stocked properly because the quality of these components really makes the difference in the final presentation. This isn’t just any chocolate cake; it’s designed to hold up to filling and heavy icing. We’ve divided everything into three major parts: the rich base, the bubbly frosting, and, of course, the sparkly touches!
Ingredients for the Devil’s Food Cake Base
This is a super straightforward cake base, but pay close attention to the liquids—they create that perfect thin batter we need for moist results. You’ll need:
- 1 tablespoon unsalted butter (just for greasing the pans, trust me, grease it well!)
- 1 1/2 cups granulated sugar (that’s 300g)
- 1 1/2 cups all-purpose flour (150g)
- 1/2 cup Dutch-processed cocoa powder, sifted, plus extra for dusting the pans
- 1 1/4 teaspoons baking soda
- 3/4 teaspoon kosher salt
- 1 large egg
- 3/4 cup buttermilk (180ml)
- 1/3 cup mild-flavored oil, like vegetable oil (80ml)
- 1 teaspoon pure vanilla extract
- 1/2 cup hot coffee (120ml)—yes, hot!
- 1/4 cup rum or brandy (60ml)—this flavor is subtle but adds so much depth!
Ingredients for the Champagne Buttercream
This buttercream relies on a Swiss Meringue base, which means we heat the whites and sugar first. Here is the crucial tip: your butter needs to be truly room temperature—soft enough to press a finger into easily, but not warm or greasy! Cold butter will make this whole thing look curdled, and we don’t want that headache!
- 2 cups granulated sugar (400g)
- 1 cup egg whites
- 3 cups unsalted butter (680g)
- 1 teaspoon pure vanilla extract
- 5 drops champagne extract
- 1 pinch kosher salt
Ingredients for Filling and Decorating the Gold-Dusted Bundt Cake
Time for the fun stuff! For the cherry filling, we’re just mixing preserves into some of the prepared buttercream, which is much easier than making a separate jam layer. For the sparkle, you must use true edible luster dust—not just glitter! That’s how we get that gorgeous, safe finish on our Gold-Dusted Bundt Cake.
- 1/4 cup cherry preserves
- Optional: Pink gel-paste food coloring
- Optional: Edible luster dust (this is your gold!)
- Optional: Decorating pearls
Baking Techniques for a Perfect Devil’s Food Bundt Cake
Alright, this part is where we build the foundation for our stunning final presentation. Getting the cake layers right is crucial, especially since we are stacking them—we need structure! For this Devil’s Food base, the key to that clean release from those intricate Bundt pan walls is preparation. I use a technique I learned ages ago: buttering heavily, dusting with cocoa powder instead of flour, and adding a parchment circle on the bottom if I’m working with extra-deep pans.
Don’t skip the hot coffee or the rum, either! I know it sounds strange to put hot liquid and alcohol into cake batter, but it truly blooms the chocolate flavor in the cocoa powder. Yes, I referenced an amazing guide on this very combo when I first tried it, which you can check out here. The resulting batter is going to look way thinner than you’re probably used to—almost like soup. Do not panic! That thin batter is what guarantees the moistness in your final Gold-Dusted Bundt Cake layers.
Preparing the Pans and Mixing the Batter
First things first: Oven goes to 350°F (175°C). Now, take some butter and make sure every nook and cranny of your pans is coated, then dust generously with cocoa powder—this prevents any white streaks on your dark chocolate cake. In a big bowl, whisk your dry stuff: sugar, flour, sifted cocoa, baking powder, and salt. Don’t rush this part; get it evenly blended.
In another bowl, mix the egg, buttermilk, oil, and vanilla. Dump that into the dry mixture and mix until it’s just smooth. Then, slowly pour in that hot coffee and rum while whisking gently. Keep mixing just until everything is incorporated and silky smooth. Remember, that thin batter is exactly what we want for a tender crumb!
Baking and Cooling the Gold-Dusted Bundt Cake Layers
Divide that thin batter evenly across your prepared pans. We are baking these for about 35 minutes—you want the center to be set and a toothpick to come out with just moist crumbs attached, not wet batter. Once they come out, and this is vital, let them cool in those pans for a good 15 minutes. Taking them out too soon guarantees a break or a tear. After that initial rest, carefully invert them onto a cooling rack. They must, and I mean *must*, be completely cool to the touch before you even think about trying to fill or frost them. Patience here pays off huge!
Crafting the Champagne Buttercream for Your Gold-Dusted Bundt Cake
This is where the *elegance* really comes in, my friends! I used to be terrified of Swiss Meringue Buttercream, but once you understand the temperature game, it’s actually less fussy than some American buttercreams. We are gently heating the egg whites and sugar over hot water—a double boiler setup—to create a fluffy, stable meringue. You have to stir it constantly until that sugar totally vanishes. Pinch a little mixture between your thumb and forefinger; if it feels granular at all, keep heating it!
The absolute most important thing here is cooling. Once it’s smooth and glossy, when you whip it up in the mixer, it needs to cool down almost completely before the butter goes in. If that meringue is too warm, the butter melts instantly, and what you get is soup, not frosting. We want everything cool enough so the final product is this stunning, glossy, pipeable frosting.
Whipping the Meringue to Temperature
So, sugar and whites go into your heatproof bowl over simmering water—not boiling, just simmering! Keep stirring gently with a rubber spatula until you can’t feel any grit left. Then, wipe down the sides of the bowl with a damp pastry brush if necessary, just to make sure no stray sugar crystals are hanging around. Pop that bowl onto your stand mixer with the whisk attachment immediately. Whip that mixture harder than you’ve ever whipped anything until it’s stiff, glossy, and you can hold your hand on the outside of the bowl without flinching. That’s your cue that it’s cool enough to transition to butter.
Incorporating Butter and Flavorings
Start adding your softened butter, just a little bit at a time, while the mixer is running around medium speed. I promise you, around the halfway or two-thirds mark, your buttercream is going to look absolutely horrifying. It will separate, turn soupy, maybe even look like cottage cheese—this is completely normal! Don’t stop! Just keep beating it. As you incorporate the last bit of butter and let it beat for another minute or two, like magic, everything will come together into this perfect, creamy cloud. Then drop in your vanilla, the champagne extract, and salt. Seriously, just trust the process here, chef!
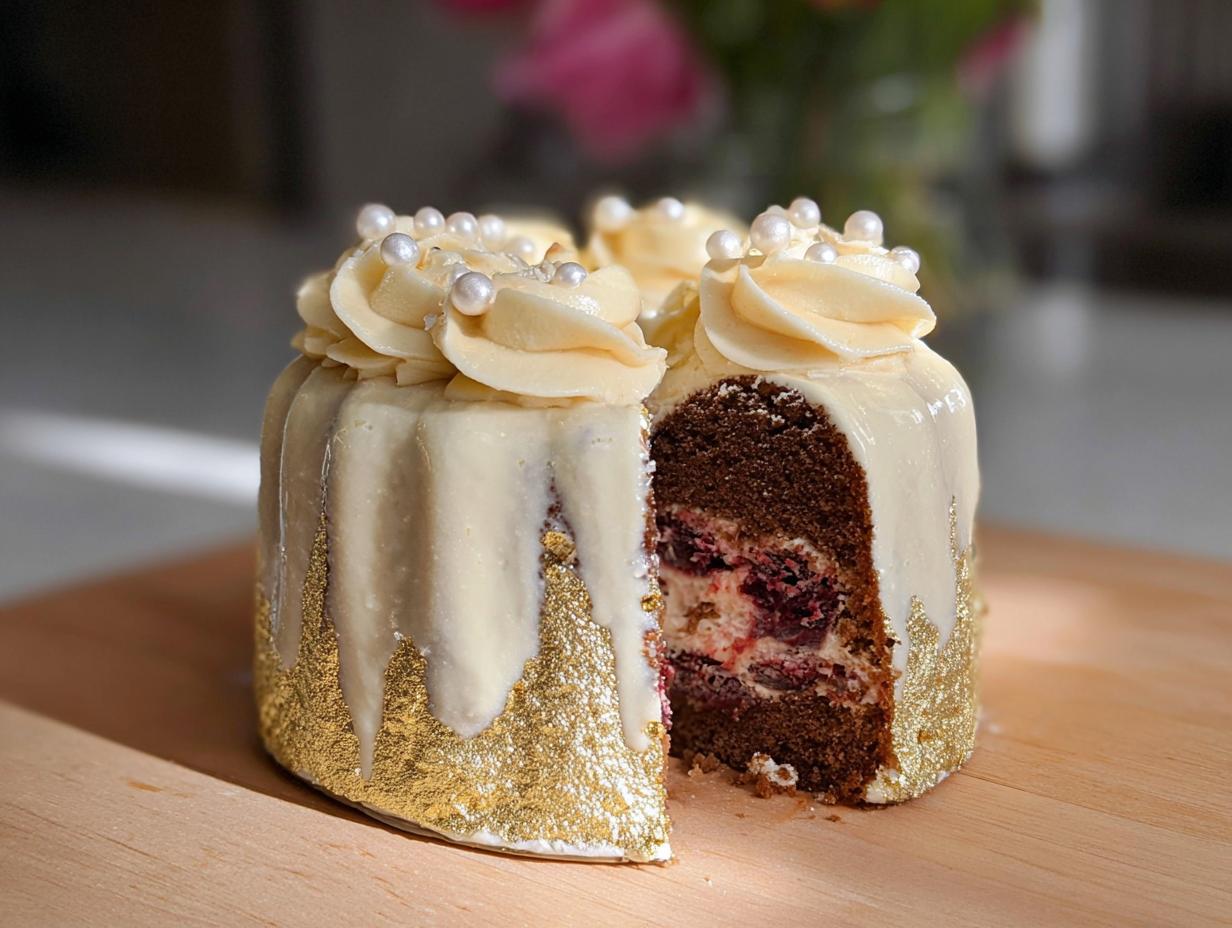
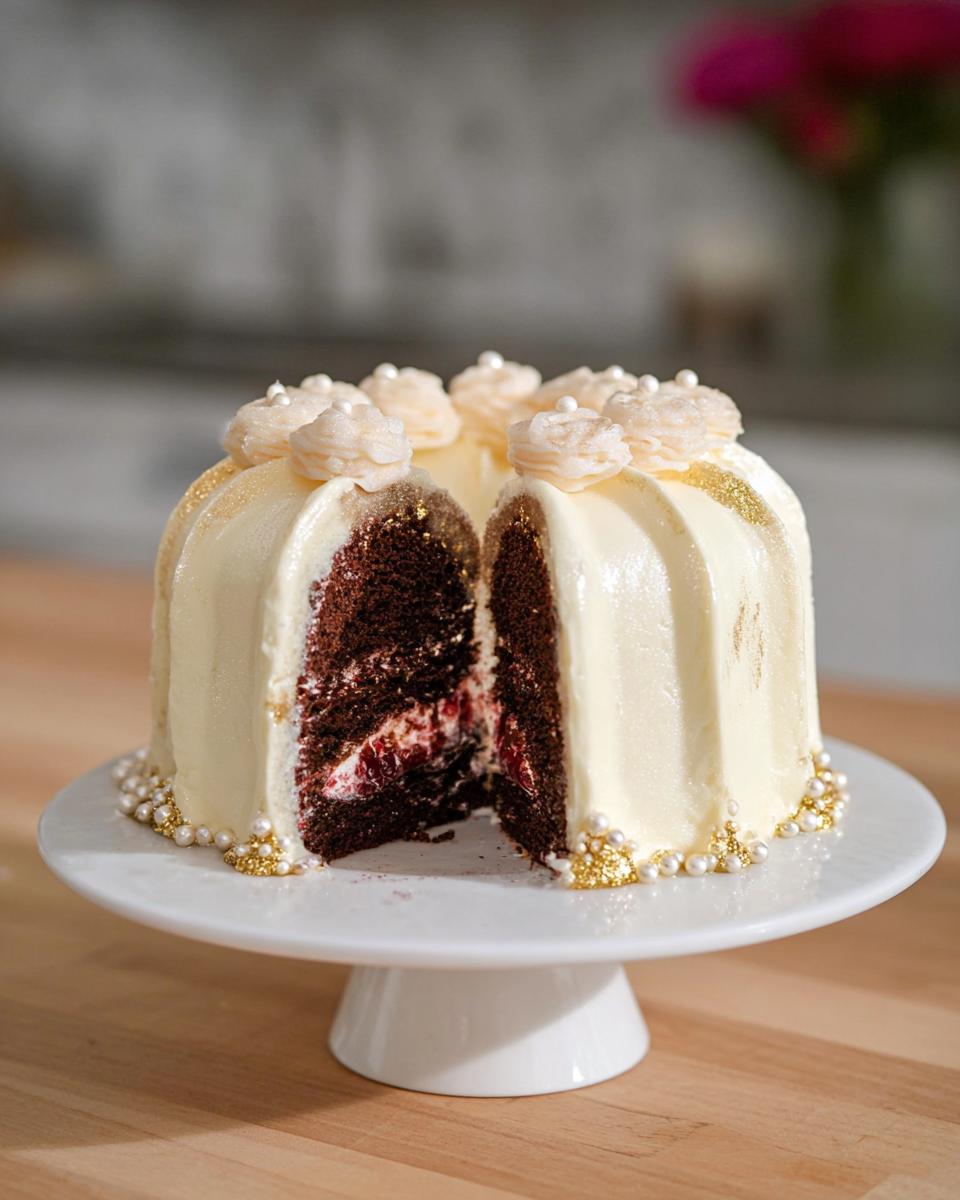
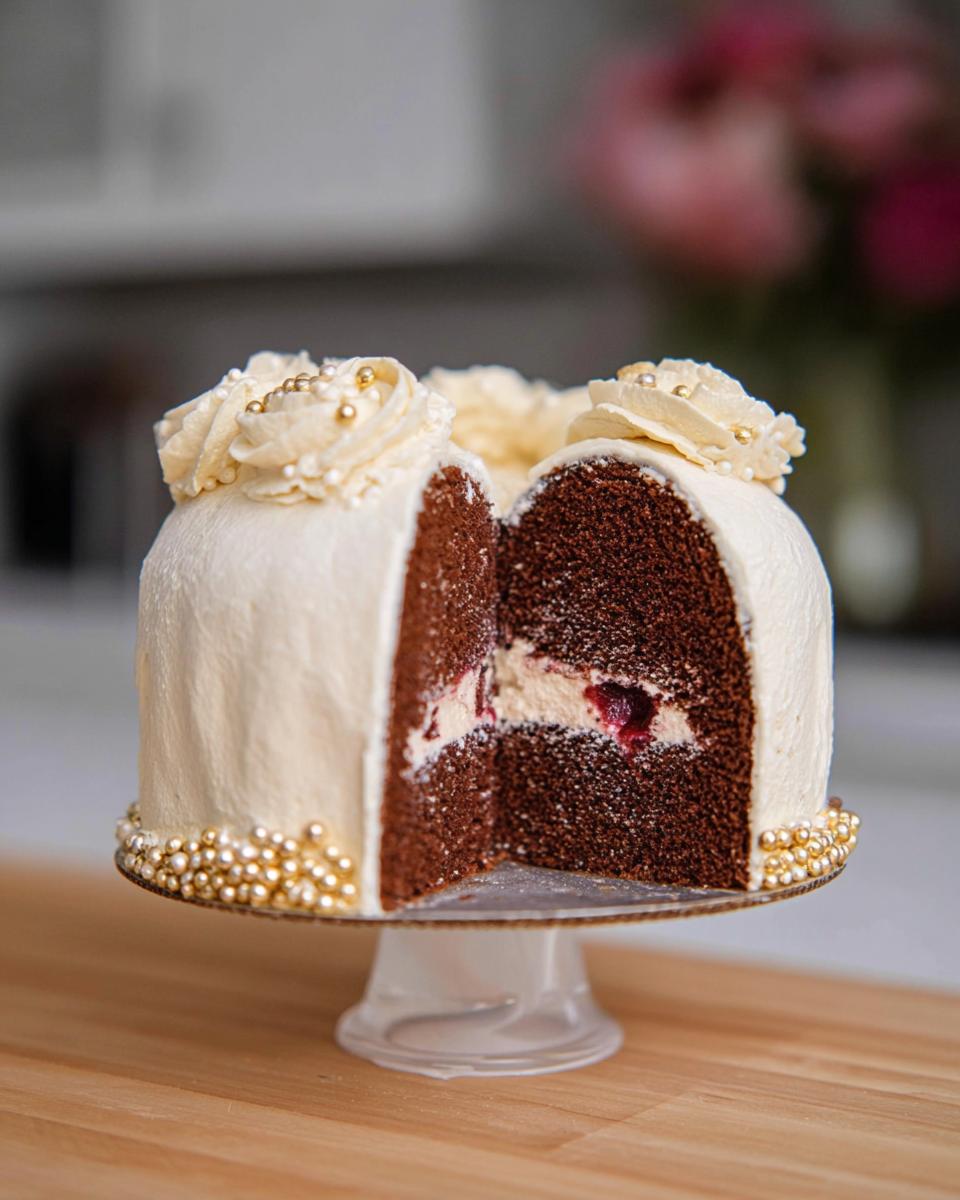
Assembling and Decorating the Gold-Dusted Bundt Cake
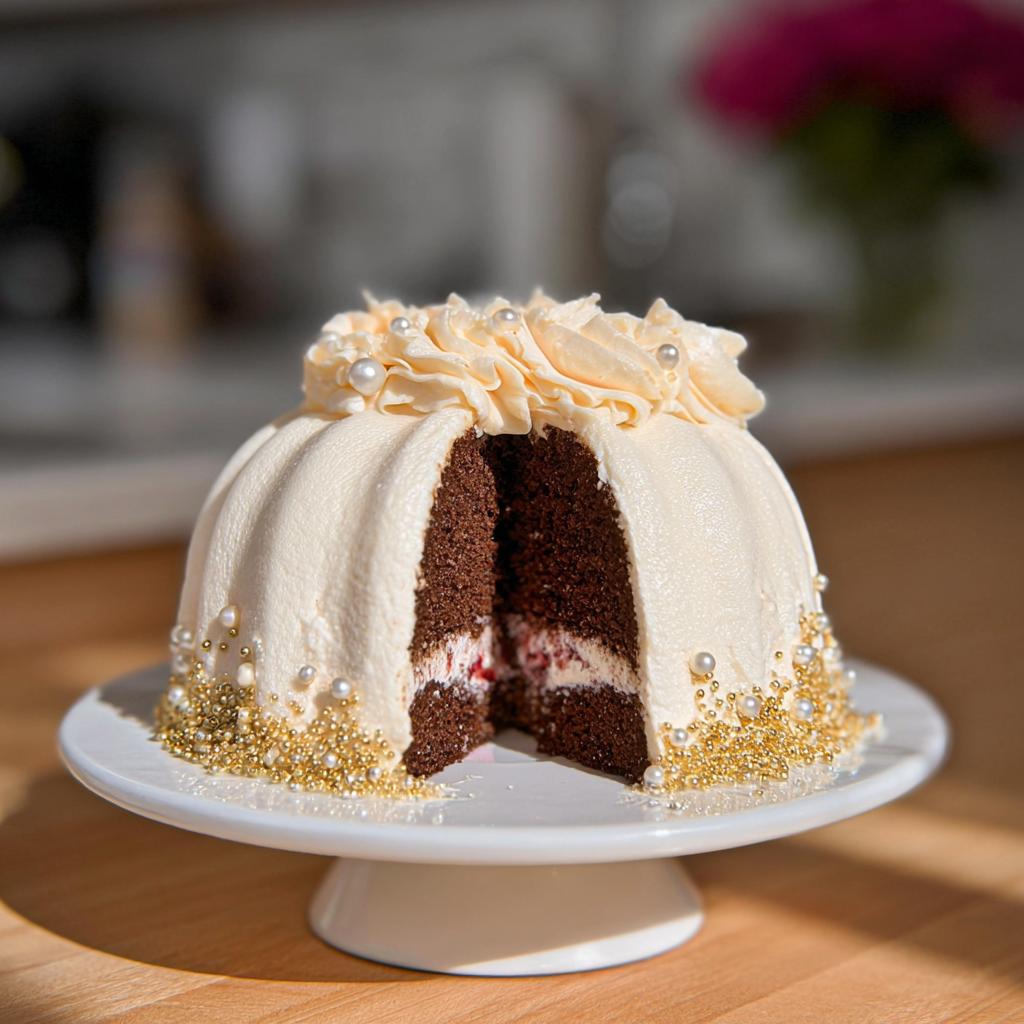
Now for the part that ties this whole beautiful creation together! We are moving from baking the layers to engineering a stunning presentation layer by layer. Since we have those three perfectly cooled chocolate cake rounds ready to go, we can start stacking. Remember, we’ve made two batches of buttercream: the vanilla kind for the outside and the cherry mix for the inside flavor burst. Make sure you’ve got that cake turntable close by; it’s going to save your arms!
The first step that always makes me feel like a professional baker is the crumb coat. This thin layer of plain vanilla frosting traps any loose chocolate crumbs so they don’t ruin our final, perfect coat. After that thin layer goes on, you absolutely must put it in the freezer for about 20 minutes. That chilly time firms up the whole structure, making the final icing job a total dream!
Layering the Cake and Cherry Preserve Filling
Take your first cake layer and set it on your cardboard round. We’re building flavor here! Spread about a quarter-inch thick layer of that cherry buttercream—the stuff mixed with the preserves—right on top. Don’t go all the way to the edge; leave a small border. Then top it with the next chocolate layer. Repeat that exact process: cake layer, then cherry filling buttercream. Finish with the final cake layer on top.
Once stacked, grab your offset spatula and give the entire cake—top and sides—a very thin layer of the plain, vanilla Champagne Buttercream. This is your crumb coat! Slap that chilled cake on the turntable and pop it in the freezer for about 20 minutes until it’s firm. This step is mandatory if you want that super smooth finish we are aiming for.
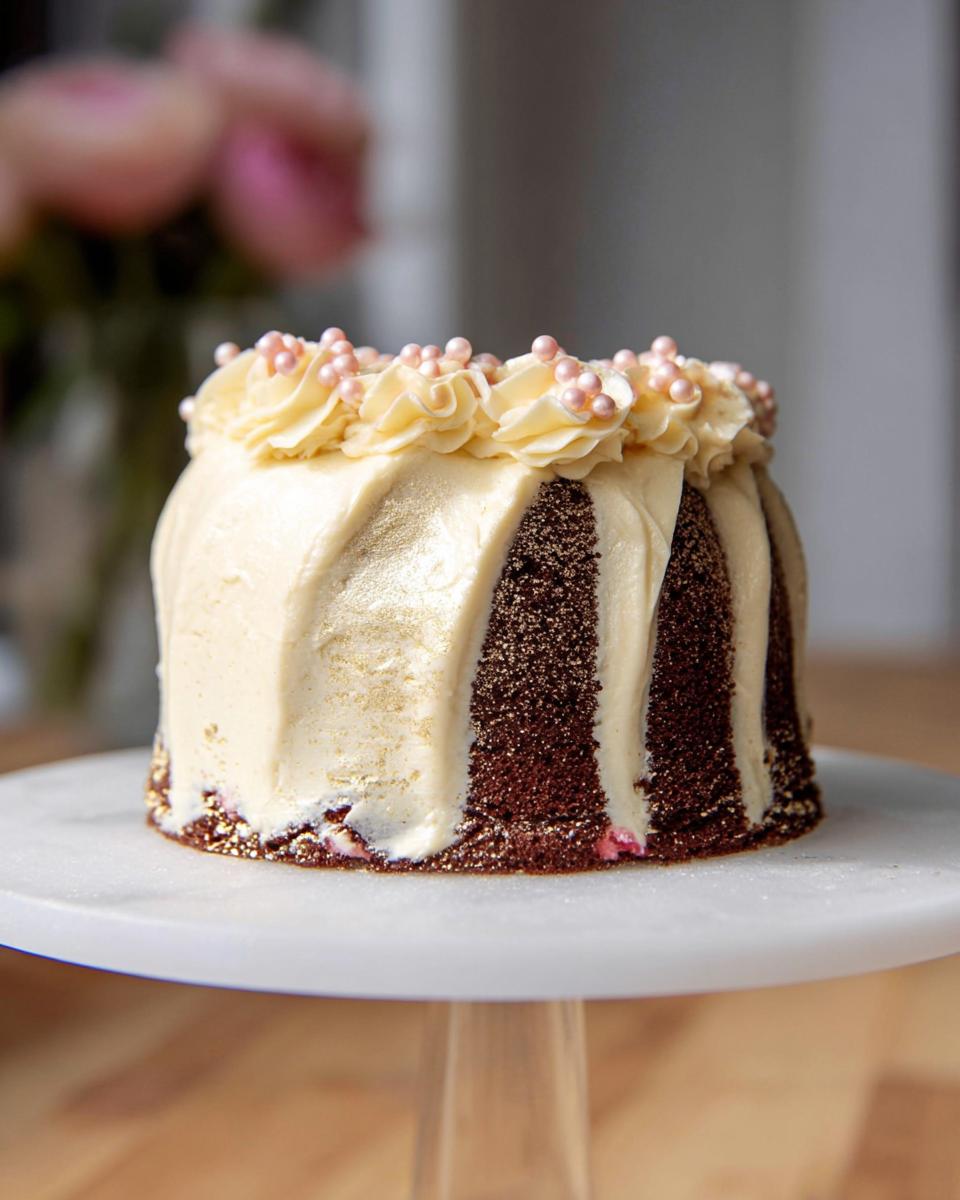
Applying the Final Frosting and Edible Gold Dust
After the chill time, you can give it that thick, gorgeous final coat of vanilla buttercream. Make it as smooth as you like! My favorite detail here is using a star tip in a pastry bag to pipe a border around the very top edge. It gives it that finished, professional look right away.
Now for the showstopper: the roses! You color just a little bit of leftover frosting pink, slide it down the inside of the bag fitted with a rose tip, and then fill the rest with white. Pipe those roses right onto the top. Finally, take a small, clean, fine paintbrush—dedicated only to food, of course!—dip it into your edible luster dust, and gently tap it over the side of the cake. That fine dusting is what gives you that incredible, sophisticated shimmer. A few sugar pearls around the base, and you’ve done it!
Tips for Success with Your Gold-Dusted Bundt Cake
Even with a great recipe, sometimes things go a little sideways in the kitchen, right? Don’t sweat it! This recipe is designed to be resilient, but I want to make sure you know how to handle the little gremlins that pop up. Handling a complex cake like this, with layers and delicate frosting, means being ready with a quick fix or two.
Troubleshooting Common Issues
If your cake layers stick, which can happen even with careful pan prep, don’t pull! Flip the pan upside down onto a wire rack. If it still won’t budge after 10 minutes of cooling, gently warm the bottom of the pan with a warm, damp towel for just a minute or two. That little bit of gentle heat usually coaxes it right out.
Now, about that Champagne Buttercream—if it looks soupy after you add all the butter, I know it’s alarming! Just keep beating it slowly. Seriously, keep the mixer going at medium speed for a few minutes longer. It sounds crazy, but the friction and mixing time will usually force the emulsion to stabilize, and suddenly, it snaps back into creamy perfection. That’s the sign of a true baker knowing when to push through the weird stage!
Serving Suggestions for This Elegant Dessert
Once you have this showstopper sitting perfectly frosted and glittering on the counter, the next big question is: what do we serve *with* it? Because this Gold-Dusted Bundt Cake is so rich from the Devil’s Food base and so light from the Champagne Buttercream, you want pairings that enhance, not overwhelm. It stands beautifully on its own, but a few simple additions can turn dessert into an experience!
Honestly, my favorite way to cut the richness of dark chocolate is with a very strong, dark roast coffee. The bitterness of the coffee is just the perfect counterpoint to the sweet icing. If you’re serving this for an evening party, a nice glass of slightly chilled Prosecco or even a soft Moscato works wonders. The bubbles and light fruit notes play incredibly well with that hint of champagne flavor we built into the buttercream.
Now, if you happen to have leftovers, or if you just think the roses need a little something extra dripping down the side, you could always whip up a quick drizzle. It won’t be the official main frosting, but it helps. It’s a very simple alternative Glaze: just mix 1 cup of powdered sugar with 2 tablespoons of warm milk and just a tiny splash—maybe 1/2 teaspoon—of vanilla. It’s thin, easily pourable, and adds an extra layer of sweetness without taking away from the piped artistry on top. Drizzle that on serving plates, not over the roses, okay? We don’t want to wash off our beautiful gold!
For true elegance, keep the plate clean. A small dusting of cocoa powder on the side of the plate alongside the slice is all the garnish you need. Let that shimmering cake do all the talking!
Storage and Reheating Instructions
This stunning Gold-Dusted Bundt Cake is highly decorated, which means it needs a little special care once the party is over! Because we used real butter in that beautiful Champagne Buttercream, temperature control is key if you want to keep those roses looking perfect and that gold dust shimmering.
You absolutely must refrigerate the finished cake. Buttercream melts fairly easily, and we don’t want any messy sliding or collapsing structure, especially with those delicate piped roses! Store the cake uncovered for the first hour or so while the frosting sets up in the cold, and then gently cover it. If you can use a cake dome that doesn’t touch the icing, that’s great. If not, just loosely tent some foil over the top without letting it press onto the decoration.
When you want to serve it again—maybe for leftovers the next day—you can’t just pull it straight from the fridge. That cold temperature makes the cake layers taste dense and the buttercream feels hard and less flavorful. That’s no way to treat a masterpiece!
Bringing Your Cake Back to Delicious
Take the cake out of the refrigerator about two to three hours before you plan to eat it. This resting time is crucial! It lets the butter soften up just enough at room temperature to revert back to that soft, melt-in-your-mouth texture we love. The cake layers will soften right back up, and the champagne flavor in the frosting will really come forward again.
If you are dealing with only a slice or two, you can sometimes let it sit on the counter for just an hour, but always watch the weather! If your kitchen is naturally warm, you might want to keep the bulk of the cake chilled, or the buttercream will start weeping. I always try to use up any leftovers within three or four days—the chocolate flavor is always best when it’s fresh, even when chilled!
Frequently Asked Questions About This Bundt Cake
Can I use a different cake flavor instead of Devil’s Food?
Oh, you certainly can play around! While this recipe is perfectly balanced with the rich Devil’s Food flavor complementing the Champagne Buttercream, you could try a high-quality vanilla pound cake recipe or even a light red velvet base in your Bundt Cake pan. Just remember that the darker chocolate really makes the light buttercream shine, so the flavor profile will change a bit!
Where can I find edible gold for my Gold-Dusted Bundt Cake?
You don’t need to hunt too hard for the bling! Look for “edible luster dust” or “edible gold flakes” online at large baking supply retailers. Make sure the label clearly states it is food-grade—we don’t want any craft glitter anywhere near our beautiful desserts. A tiny container of that Edible Gold goes a long way, trust me!
How far in advance can I make the Champagne Buttercream?
The buttercream is actually quite sturdy! If you make it and store it tightly covered in the fridge, it should hold up perfectly for about five days—maybe longer. Just know that when you take it out, you’ll need to let it sit at room temperature for a long time, maybe an hour or two, and then briefly re-whip it when you’re ready to frost. This brings back that lovely, fluffy structure.
Sharing Your Gold-Dusted Bundt Cake Creation
Well, you did it! You tackled the Devil’s Food layers, you mastered the Champagne Buttercream, and now you have this spectacular, glittering creation sitting on your counter. That is something to be so proud of!
Honestly, the best part of baking something this visually stunning is seeing everyone’s reaction when you finally present it. Did your roses come out perfectly? Did the gold dust catch the light just right? I absolutely need to know!
Please take a moment and come back here to leave a star rating for the recipe—it really helps other bakers see how successful this Gold-Dusted Bundt Cake turned out for you. And if you share photos on Instagram or Pinterest, please tag me! I love seeing your stunning finishes and hearing how you celebrated with this Easy Elegant dessert.
Baking is so much more fun when we share the results, so don’t be shy! Can’t wait to see your sparkle!
Gold-Dusted Bundt Cake
Ingredients
Equipment
Method
- Preheat your oven to 350°F (175°C). Butter three 6-inch round cake pans and line each with a parchment paper round.
- In a large bowl, combine the granulated sugar, all-purpose flour, sifted Dutch-processed cocoa powder, baking soda, and kosher salt. Whisk together until combined. Set aside.
- In a separate bowl, whisk together the egg, buttermilk, oil, and vanilla extract until well combined. Add this egg mixture to the dry ingredients and mix until smooth. Slowly add the hot coffee and rum to the batter and whisk until totally blended and smooth, about 2 minutes. The batter will be quite thin.
- Dust the prepared pans with cocoa powder. Divide the batter evenly into the prepared pans. Spread evenly using an offset spatula. Bake until a tester inserted into the center comes out clean, about 35 minutes. Allow to cool completely in the pans. Keep covered until ready to fill and frost.
- Remove the cakes from the pans and invert onto 6-inch cardboard cake rounds.
- For the Champagne Buttercream: In the bowl of a stand mixer, combine the granulated sugar and egg whites. It will be very thick and grainy.
- Place the mixer bowl over a double boiler and stir the mixture with a rubber spatula until the sugar is completely melted. Brush down the sides of the bowl with the spatula to ensure all sugar is melted. Feel the mixture between your fingers to check for graininess. Once it is completely smooth, place the bowl on the stand mixer. Beat with the whisk attachment on medium-high speed until the mixture is light, fluffy, and glossy, and the bowl feels just about room temperature. If the egg whites are not cooled sufficiently, they will melt the butter when you add it.
- Once the egg whites are whipped and cooled, add the butter, 2 tablespoons at a time, beating on medium speed to combine. The mixture may look curdled and runny after adding about half the butter; this is normal. Continue adding the rest of the butter. Once all butter is added and mixed on medium speed for about a minute, the buttercream will be creamy and glossy.
- Add the vanilla extract, champagne extract, and salt. Mix until combined.
- For the Filling: Place about 2 cups of the buttercream in a mixing bowl. Stir in the cherry preserves. Reserve the remaining buttercream for the exterior coat.
- For Assembly: Place one cake layer in the center of a cake turntable. Cover the first layer with a 1/4-inch-thick layer of the cherry buttercream. Repeat this with the other layers of cake and buttercream, stacking them on the first layer and ending with cake.
- For the crumb coat, spread a thin layer of vanilla buttercream over the top and sides of the cake. Freeze the cake for about 20 minutes.
- Place the cake back on the turntable. Ice the cake with a thick layer of buttercream. Then, using a metal spatula or cake comb, smooth out the sides and top of the cake.
- For Decoration: Using a pastry bag fitted with a star tip, create a border around the top of the cake.
- To decorate the center of the cake with buttercream roses: Place about 2 tablespoons of the buttercream in a small bowl. Add a few drops of pink food coloring, if using. Fit a pastry bag with a rose tip. Use a fine paintbrush to paint a line of the colored buttercream down the seam inside the bag (for pink details on the roses). Fill the pastry bag with plain white buttercream. Form each buttercream rose on a rose nail, then use kitchen shears to transfer it to the top of the cake. Repeat, creating as many roses as you like.
- If using, finish the cake with a little luster dust and a ring of edible sugar pearls around the base.
Notes
Tried this recipe?
Let us know how it was!
Master of Culinary Visual Arts
My culinary journey started in the fast-paced kitchens of boutique coastal restaurants throughout Southern California, where I learned that beautiful food doesn’t have to be complicated. After nine years of professional cooking, I’ve made it my mission to prove that sophisticated, nutritionally sound meals can be accessible to busy home cooks who refuse to compromise on flavor or visual appeal.
What changed everything for me was watching talented home cooks feel intimidated by healthy cooking. That’s when I transitioned to private instruction, teaching busy professionals and families how to create restaurant-quality meals using simple techniques and ingredients they can actually find at their local grocery store. My “15-minute meal” frameworks are now used by several regional cooking schools!
As a third-generation Mexican-American, I love weaving vibrant Latin flavors into low-carb creations – proving that healthy eating can be both culturally authentic and visually spectacular. My “effortless elegance” philosophy is simple: nutritious food should look as stunning as it tastes, without requiring professional chef skills or expensive equipment.
When I’m not developing recipes in my San Diego coastal kitchen, you’ll find me surfing the local breaks with my Golden Retriever mix, Mango, who’s both my kitchen companion and unofficial taste-testing assistant. My personal low-carb lifestyle started as a way to maintain energy for my active coastal life, and it’s become the foundation for proving that healthy eating enhances rather than restricts life’s pleasures.