
There is nothing quite as enchanting as a truly classic Italian dessert, that smooth texture that just melts on your tongue. When I first tasted panna cotta at a family gathering in Italy, it was pure magic. But when I started focusing on lighter preparations, I knew I had to capture that essence without all the heaviness. That’s how I finally perfected my **Classic Vanilla Bean Panna Cotta with Berries**—it honors that creamy memory but fits my modern way of eating. Trust me, as Simo Mimo, Master of Global Fusion Innovation, I’ve tested this a thousand times to get just the right wobble!
My grandmother served panna cotta constantly, and wanting to recreate that nostalgic feeling inspired this whole journey. It took ages of tinkering in my kitchen to find the balance that made it light but still undeniably rich. The first time I served this version to friends, I almost cried because it tasted exactly like childhood but felt so beautifully updated. It’s the perfect creamy vanilla sweet for any occasion.

Why This Classic Vanilla Bean Panna Cotta with Berries Stands Out
You want elegance without the effort, right? That’s the beauty of this panna cotta. It’s a total showstopper, but honestly, most of the work is just waiting for it in the fridge! It sets up beautifully, making it one of my favorite make ahead desserts.
- It delivers that unmistakable creamy vanilla sweet flavor without being overly heavy.
- The look when you unmold it? Stunning.
- It relies on high-quality ingredients, which my family always insisted upon.
Perfect for Elegant Dinner Party Ideas
If you need impressive elegant dinner party ideas, this is it! The pristine white against bright berries looks amazing, and the flavor is so refined. It tells your guests you care about quality, even though it took almost no active time to prepare right before serving.
Simple Technique, Luxurious Results
Don’t let the Italian name scare you off! This panna cotta recipe is shockingly simple. With only about 15 minutes of active prep time, you get a dessert that seems like it came from a fancy patisserie. It’s all about managing the heating and the setting time.
Essential Equipment for Your Classic Vanilla Bean Panna Cotta with Berries
The beauty of this dessert is you don’t need a huge arsenal of gadgets. Mostly, you just need sturdy basics that handle gentle heating. Trust me, having these ready means your whole process runs smoothly, which is key when dealing with gelatin!
You absolutely must have these items on hand for your dessert:
- A small saucepan—nothing too big; we don’t want to burn the bottom layer of cream!
- A reliable whisk to make sure that gelatin dissolves perfectly.
- Four lovely ramekins or small serving glasses. I prefer glass so you can see the creamy white against the berries later on.
Gathering Ingredients for Classic Vanilla Bean Panna Cotta with Berries
Okay, for the magic to happen with our Classic Vanilla Bean Panna Cotta with Berries, we need quality players. The star here is undeniably the vanilla bean—it gives that speckled, authentic look and aroma that extract just can’t replicate. If you’ve ever seen a recipe call for it, you know it means serious flavor!
Panna Cotta Base Ingredients
For the creamy base that sets up just right, you’ll need one full quart of heavy cream—don’t try to skimp here, that’s where the richness comes from! We pair that with half a cup of sugar to sweeten things nicely. The essential piece is that one vanilla bean, which you’ll need to carefully split lengthwise so you can scrape every last bit of those beautiful seeds out. Then, for structure, we use 2 and 3/4 teaspoons of unflavored powdered gelatin, which needs to “bloom” in 3 tablespoons of water before we even turn on the stove. Make sure those measurements for the gelatin are spot on!
Serving Components
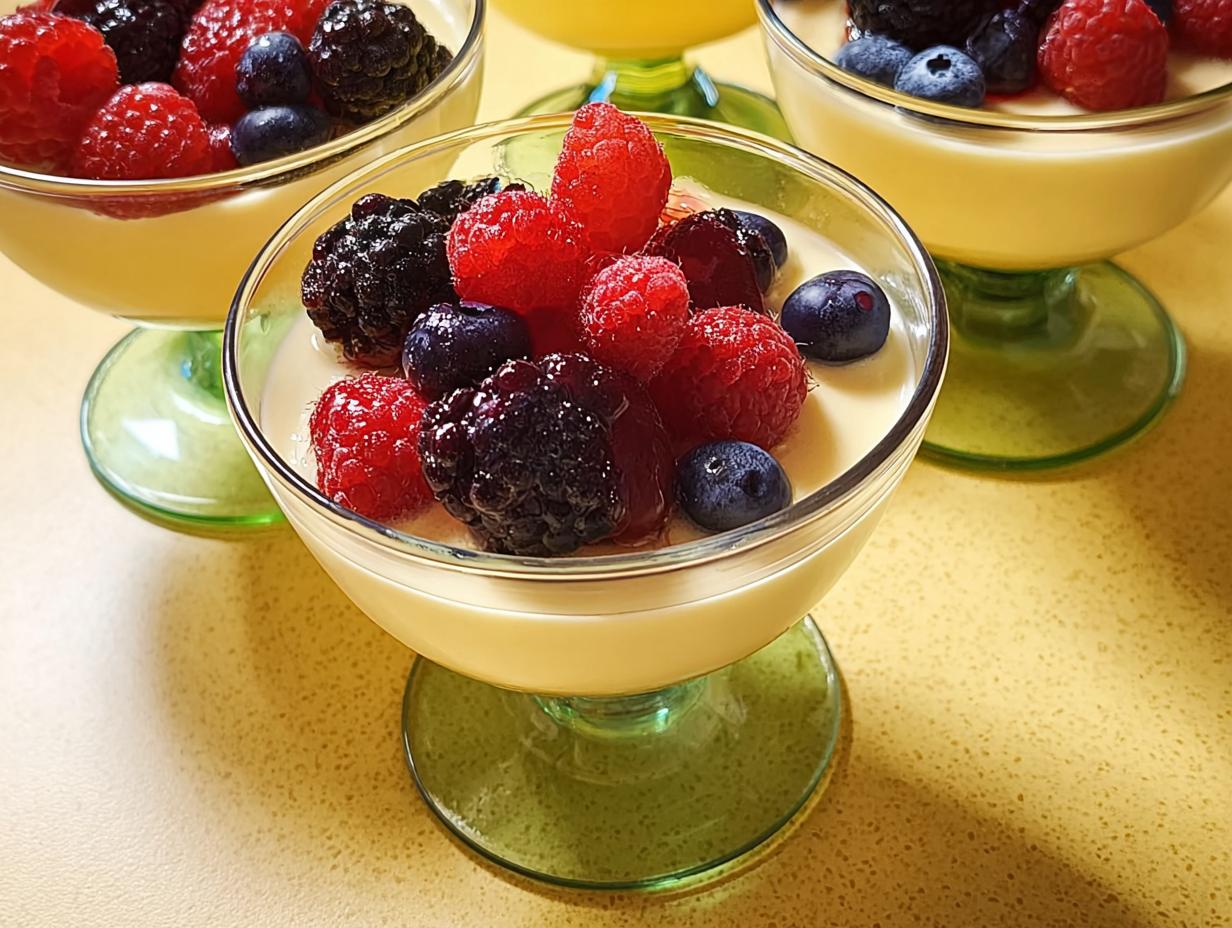
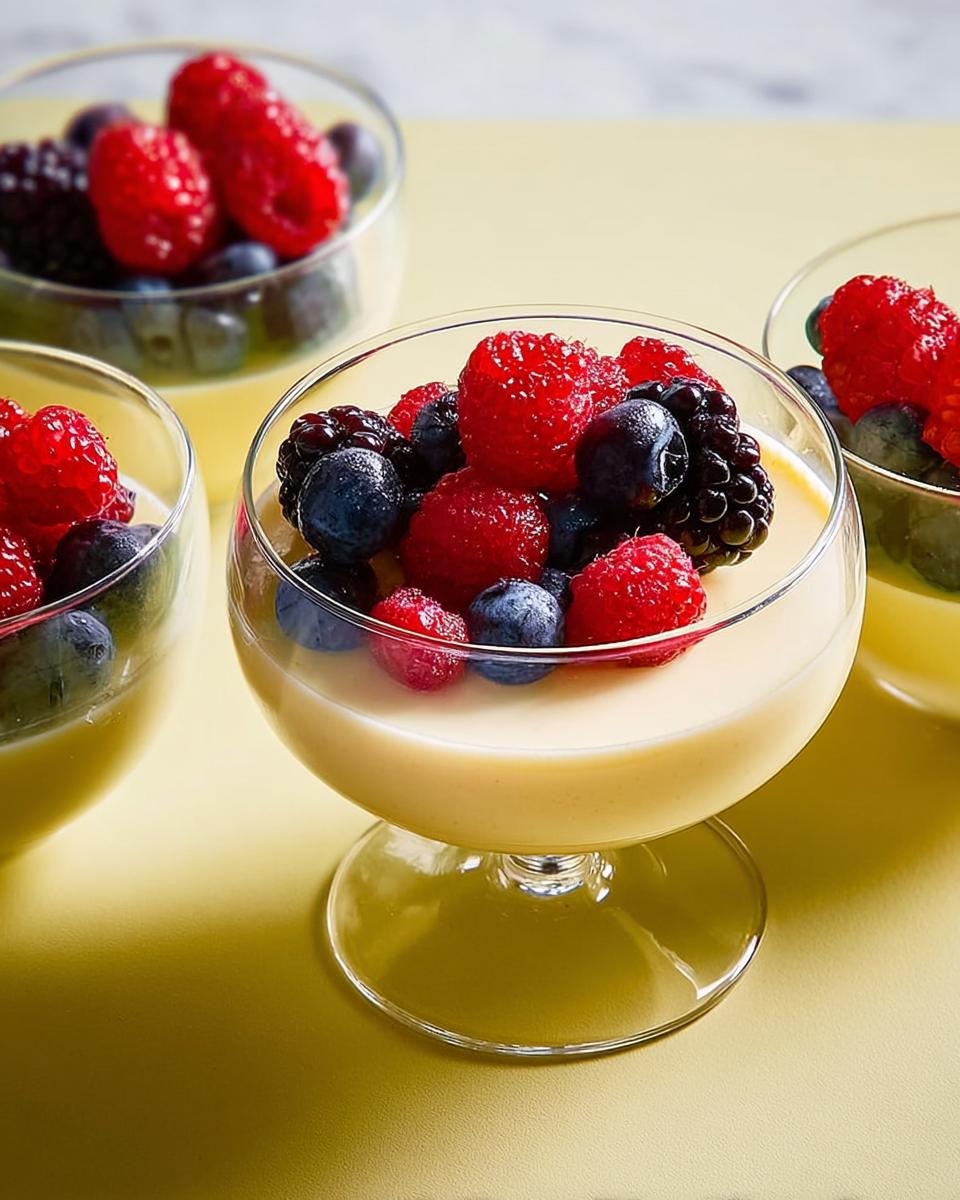
Once it’s chilled and perfect, all that’s left is the topping. You just need your favorite mixed berries ready to go. I usually grab whatever looks plumpest and brightest that week. They add that necessary pop of tartness against the sweet, creamy panna cotta recipe base.

Step-by-Step Instructions for the panna cotta recipe
This is where the magic happens, but don’t rush it! The gentleness of the heat is key to getting that unbelievable silky texture in your Classic Vanilla Bean Panna Cotta with Berries. We take our time in these first few minutes.
Preparing the Gelatin and Infusing the Cream
First things first: we need to wake up that gelatin. Sprinkle your 2 and 1/4 teaspoons of gelatin over just 3 tablespoons of cool water in a small bowl. Let it sit there happily for about 5 to 10 minutes—that’s called blooming, and it’s super important! While that’s happening, pour your heavy cream, sugar, and the scraped vanilla bean seeds (pod and all!) into your saucepan. Heat that mixture over medium heat. You want it steaming hot so all that sugar dissolves, but listen to me: DO NOT let it boil! A rolling boil messes up the cream. As soon as it’s steaming, take it right off the heat immediately.
Setting the Classic Vanilla Bean Panna Cotta with Berries
Now, ditch that vanilla bean pod—we got all the flavor we need! Take your bloomed gelatin and whisk it right into that warm cream mixture until you can’t see a single granule anymore. That’s the trick to a smooth set! Gently divide that liquid gold evenly into your four prepared ramekins or glasses. Cover them up with plastic wrap—no peeking!—and they need to chill for a minimum of four hours. Honestly, overnight is when they really become part of the best make ahead desserts you’ve ever created.
Final Presentation
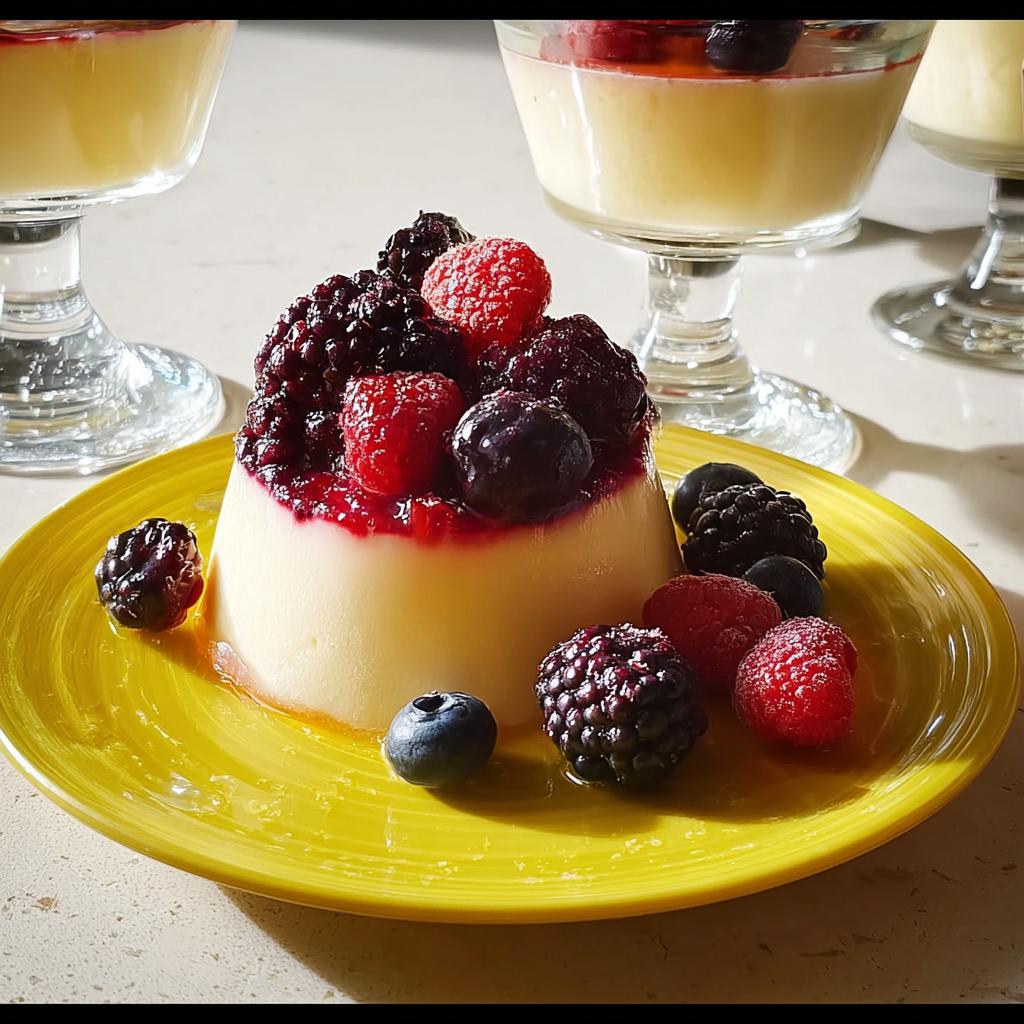
When you’re ready to serve this beautiful panna cotta recipe, you have two choices. If you want them molded out onto a plate, dip the bottom of the ramekin in a bowl of hot water for just a quick second, then invert it onto your serving dish. Now, top them off with those gorgeous mixed berries we talked about! They look amazing sitting right on top.
Ingredient Notes and Vanilla Bean Substitute Guidance
One of the biggest questions I get about this Classic Vanilla Bean Panna Cotta with Berries is about substitutions, and that’s totally fair! We all run out of things sometimes, right? While the vanilla bean is irreplaceable for that speckle and deep flavor that makes this such an elegant dinner party idea, you certainly can swap out the beans if you’re stuck.
If you don’t have that beautiful bean on hand, go ahead and use 1 teaspoon of really high-quality vanilla extract. But listen to me: add it *after* you take the hot cream off the stove, just before you whisk in the gelatin. If you heat the extract, its flavor structure changes, and we don’t want that when making these creamy vanilla sweets!
Selecting the Best Cream for Creamy Vanilla Sweets
For that signature wobble and melt-in-your-mouth texture that makes this a perfect panna cotta recipe, you must use heavy cream—or what some call heavy whipping cream. It holds the highest fat content, and that fat is what gives the panna cotta its structure and that wonderful, velvety mouthfeel. Skimping on the fat content, like using milk or half-and-half, means your gelatin won’t set correctly, and you’ll end up with a liquidy mess instead of a perfect moldable sweet!
Tips for Success Making Classic Vanilla Bean Panna Cotta with Berries
Getting this creamy vanilla sweet just right is all about paying attention in those few minutes on the stove. I have two little secrets that take my **Classic Vanilla Bean Panna Cotta with Berries** from good to absolutely unforgettable. First, after you dissolve the gelatin, let the whole mixture rest for maybe five minutes off the heat before pouring. This helps stabilize the mixture—don’t skip this tiny pause!
Second, when you’re whisking in the bloomed gelatin, whisk gently! We are dissolving it, not whipping air into it. Over-whisking at this stage incorporates tiny, unwanted air bubbles that look like foam when it sets. We want pure, unblemished silkiness for this panna cotta recipe.
Finally, don’t judge how set it is when you pull it out of the fridge after four hours. It really thickens up beautifully overnight. Always aim for that overnight chill for the best texture!
Berry Pairing Ideas for Your Dessert
While a simple bowl of mixed berries is glorious on top of your **Classic Vanilla Bean Panna Cotta with Berries**, I love shaking things up for different seasons or moods. When you’re serving this for your next gathering, try one of these inspired combinations instead. It’s a simple swap, but it makes the whole dessert feel brand new!
For a little burst of unexpected elegance, you have to try slicing some fresh strawberries and drizzling them with just a teeny tiny bit of good quality balsamic glaze. I know, it sounds weird, but the sweetness and acidity are just heavenly against that creamy vanilla background. It really elevates the whole dish to high-end dessert territory.
Another winner, especially if you love a little zing, is fresh raspberries combined with a sprinkle of finely chopped mint leaves. The mint brightens everything up—it’s super refreshing! Or, for something a little richer, try blackberries warmed slightly with a tablespoon of maple syrup. That deep, earthy flavor marries beautifully with the vanilla, creating an incredible contrast to the pale, delicate set structure of this panna cotta recipe.

Make Ahead Desserts: Storing and Serving Your Classic Vanilla Bean Panna Cotta with Berries
Now, this is where the Classic Vanilla Bean Panna Cotta with Berries truly shines as one of the best make ahead desserts available. Knowing you can finish dessert on the day of your party is a lifesaver! Once the panna cotta is completely set—and I mean *rock solid* set—cover those ramekins tightly with plastic wrap.
They last beautifully in the refrigerator for up to three days. Honestly, the texture only seems to improve by day two. Just be sure you keep them covered so they don’t absorb any funky fridge smells! That’s the secret to keeping them fresh for your guests.
When it’s showtime, the serving is equally simple. If you decided to keep them in their glasses, just pull them out about 15 minutes before you plan to serve so they aren’t painfully cold. If you unmolded them, put them on a pretty plate right before you top them with the fresh berries. Don’t add the fruit until the absolute last minute, though; we want those berries looking bright and fresh, not soggy!
Frequently Asked Questions About This Panna Cotta Recipe
I’ve gathered a few of the questions that always pop up when folks try this delightful recipe for the first time. It’s so easy to get fantastic results with this panna cotta recipe once you know these little tricks!
Can I make this panna cotta recipe without dairy cream?
That’s a really common question, especially for those trying to lighten things up even further! You totally can substitute the heavy cream, but you need to know you’ll change the texture significantly. Full-fat coconut cream works surprisingly well as a swap. However, because coconut cream has a different structure than dairy fat, your finished panna cotta will be a tiny bit firmer and will absolutely taste like coconut—which might be a fun flavor twist!
How long does the panna cotta need to chill before serving?
You need a minimum of four hours for the gelatin to do its job and set this dessert firmly enough to hold its shape in the ramekin. But I always, *always* push for overnight chilling if you can manage it. When you let it sit longer, the texture seems to relax and meld; it becomes smoother and more silky. These make ahead desserts are truly best when given that extra fridge time!
Is this considered one of the best elegant dinner party ideas?
Oh, absolutely! If I’m hosting, this ends up on my table nearly every time because it ticks every box. It looks sophisticated, the vanilla flavor is pure elegance, and you can prepare it completely a day or two ahead of time. When your guests swoon over the finished presentation of your **Classic Vanilla Bean Panna Cotta with Berries**, you’ll know why this is one of my favorite elegant dinner party ideas.
Sharing Your Experience with Classic Vanilla Bean Panna Cotta with Berries
I put my heart into sharing this recipe for **Classic Vanilla Bean Panna Cotta with Berries**, hoping it brings that same touch of Italian sunshine to your table that it brings to mine!
Now that you’ve made this luxurious dessert, I just have to know how it turned out for you. Did you use the balsamic-glazed strawberries? Or did you stick with the classic raspberries?
Please take a moment to leave a rating below—five stars for that perfect creamy swirl, I hope! And if you snapped a picture of your gorgeous set panna cotta topped with fresh fruit, tag me on social media! Seeing your beautiful results truly makes all the recipe testing worth it. I love building this baking community with all of you!
Classic Vanilla Bean Panna Cotta with Berries
Ingredients
Equipment
Method
- In a small bowl, sprinkle the gelatin over the 3 tablespoons of water. Let it sit for 5 to 10 minutes to bloom.
- Combine the heavy cream, sugar, and the scraped vanilla bean seeds (and the pod) in a small saucepan. Heat over medium heat, stirring occasionally, until the sugar dissolves and the mixture is steaming, but do not let it boil.
- Remove the saucepan from the heat. Remove and discard the vanilla bean pod.
- Add the bloomed gelatin mixture to the warm cream. Whisk gently until the gelatin is completely dissolved and no granules remain.
- Pour the mixture evenly into four small ramekins or serving glasses.
- Cover the ramekins with plastic wrap and refrigerate for at least 4 hours, or preferably overnight, until the panna cotta is fully set.
- Before serving, top each panna cotta with fresh mixed berries.
Notes
Tried this recipe?
Let us know how it was!
Master of Global Fusion Innovation
My culinary adventure reflects my Lebanese-Italian heritage and a decade spent in the dynamic fusion restaurant scenes of Miami and Barcelona. I’ve made it my mission to prove that beloved global comfort foods can be successfully adapted for low-carb living without losing their soul, their cultural authenticity, or their ability to comfort.
With advanced training in molecular gastronomy and experience spanning Mediterranean, Middle Eastern, and Latin American traditions, I’ve developed what I call “respectful innovation” – culinary creativity that honors traditional cooking wisdom rather than replacing it. My alternative ingredient substitution systems are now taught in specialty diet cooking schools throughout the region.
Drawing from my trilingual upbringing, I understand how deeply food connects to identity and memory. That’s why my flavor-bridging techniques allow classic dishes from around the world to maintain their comforting, familiar qualities while meeting contemporary nutritional standards. I regularly share these techniques at international culinary symposiums and innovation events.
When I’m not experimenting in my Miami fusion kitchen laboratory, you’ll find me at local salsa dance venues – the rhythm and improvisation skills translate directly to my creative cooking process! My role as a foster parent to rescue rabbits has unexpectedly inspired some of my most creative plant-based low-carb innovations.
My personal low-carb journey began as a way to maintain energy for my active lifestyle, but it’s evolved into a professional mission of proving that healthy eating can be globally adventurous rather than restrictively limiting. Every recipe I create is a passport to culinary adventure, transforming kitchens into laboratories for exploring healthy versions of the world’s most beloved comfort foods.