
If you’re anything like me, you live for that moment when you bring a dessert to the table and everyone just stops talking—you know, the one that looks way more complicated than it actually is? That’s exactly what this Chocolate Marble Cheesecake delivers! It’s my specialty, blending rich decadence with playful visuals, which is probably why, as a Master of Culinary Visual Arts, I adore how easy it is to teach. I remember the first time I attempted this for a family gathering—it was late one evening, and I was just craving something gooey and decadent. I was chatting away on the phone with my sister while swirling the chocolate batter in, and she totally laughed at my intensity! But seeing those gorgeous, unexpected swirls come together? That’s pure kitchen magic. If you’re after a recipe that screams “showstopper” without demanding all day, this is the one for you.
Why This Chocolate Marble Cheesecake is a Potluck Favorite
Listen, when you bring a dessert to a party, you want two things: it has to taste out-of-this-world, and it better look like you spent three days perfecting it. This one checks both boxes beautifully, which is why it’s constantly requested for potlucks! It’s sturdy enough to travel well, and honestly, it just looks impressive sitting next to the Jell-O molds.
- It travels like a champ once it’s completely chilled—no messy drips!
- It serves 12 happy people easily, so you don’t have to make two batches.
- The flavor combination is a total crowd-pleaser; who doesn’t love chocolate and cream cheese?
Visual Appeal: Creating Stunning Showstopper Cakes
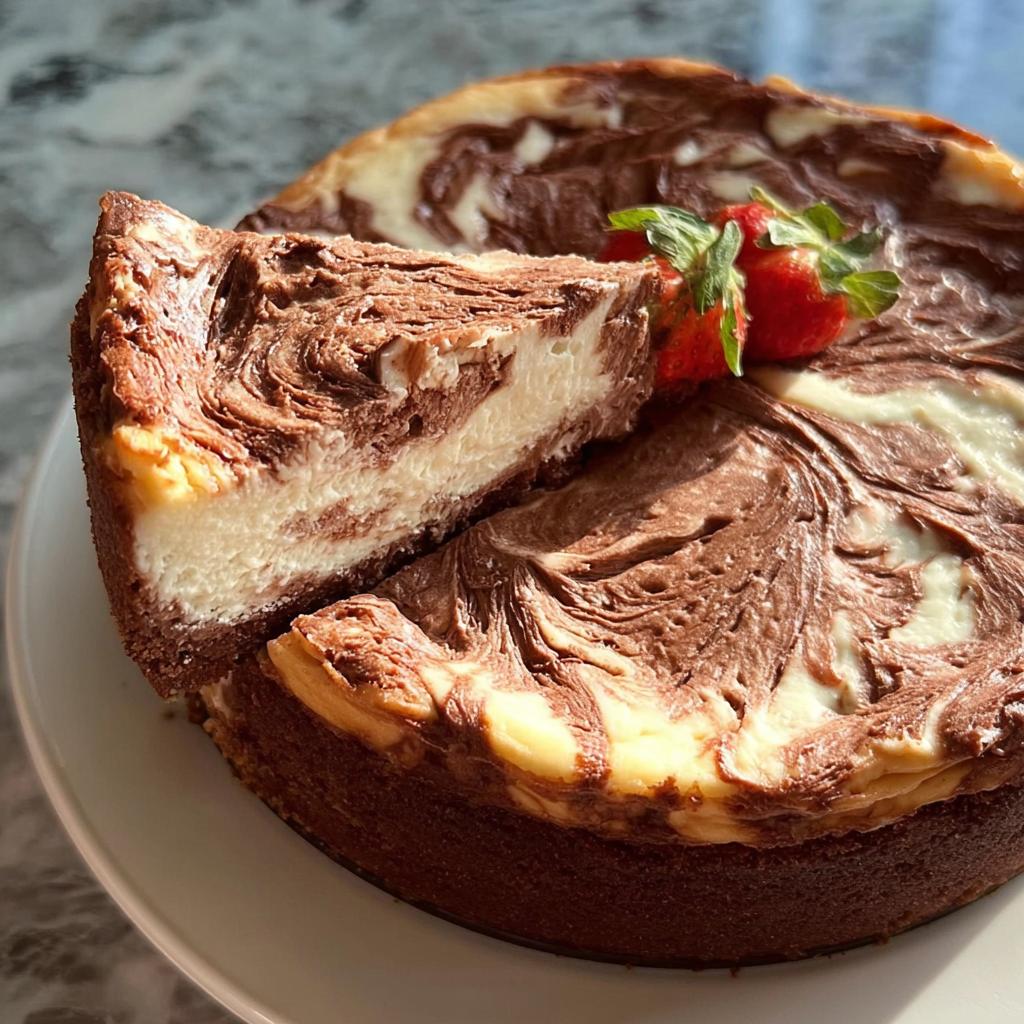
This is where we lean into those showstopper cakes! The beauty of marbling is that it looks incredibly intricate—like you used specialized tools and spent hours fussing with the pattern. But trust me, achieving that gorgeous swirl is super simple. You just drizzle one batter over the other and give it a quick, easy wiggle with a knife. It’s proof that you don’t need ten different pastry bags to make something truly memorable. You’ve got this, even if you think piping bags are terrifying!
Flavor Balance in Every Slice of Chocolate Marble Cheesecake
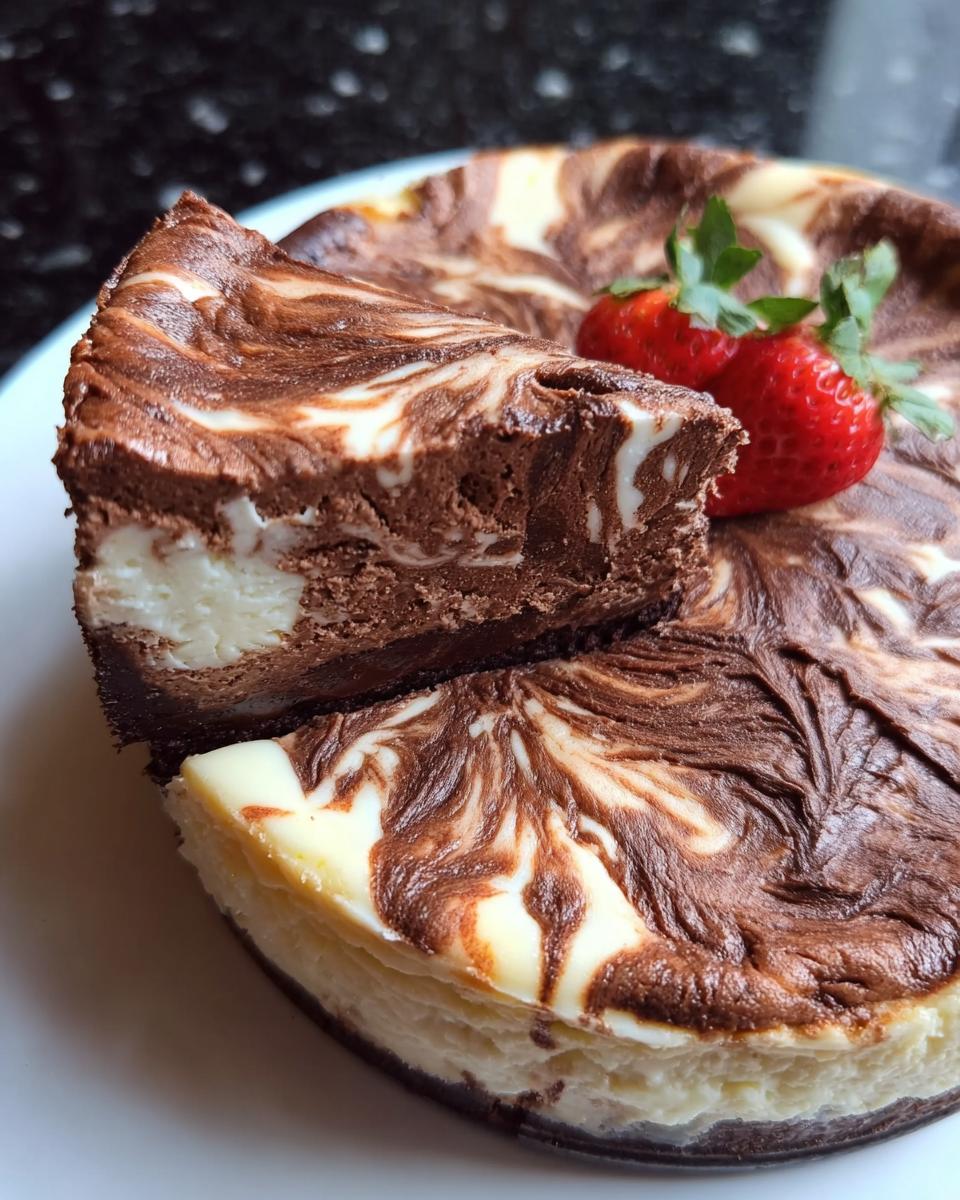
The taste experience here is everything I want in a fancy treat. You start with that deep, slightly salty crunch from the chocolate graham cracker crust—it’s the perfect anchor. Then, you hit that creamy, light vanilla cheesecake body, followed immediately by the burst of rich, bittersweet melted chocolate. That balance between the earthy crust, the sweet cream, and the dark swirl is what makes the Chocolate Marble Cheesecake so addictive. It’s rich, but it’s not heavy, if that makes sense!
Essential Equipment for Your Chocolate Marble Cheesecake
Okay, let’s talk tools! You don’t need a million fancy gadgets for this dessert, which is part of why I love it so much. Having the right gear just makes the process smooth, so you aren’t scrambling mid-bake.
You absolutely need your trusty 9-inch springform pan—that’s non-negotiable for easy release later on. Beyond that, grab a medium bowl for the crust, a large bowl when you mix up the main batter, and one microwave-safe bowl specifically for melting that gorgeous chocolate.
That’s honestly it! Simple setup means less cleaning later, which is always a win in my book.
Gathering Ingredients for the Perfect Chocolate Marble Cheesecake
Getting the ingredients right is the first huge step toward nailing this Chocolate Marble Cheesecake. Remember, cream cheese needs to be fully softened—it’s crucial for avoiding lumps that ruin the smooth look. Seriously, take your cream cheese and butter out at least an hour before you plan to start! It makes the mixing go so much easier, and nobody wants a lumpy cheesecake, right?
We split the recipe into two parts: the crust and the filling, where we create those beautiful marble dessert recipes swirls. When you’re working with the chocolate, make sure whatever chocolate you use is actually chopped up small; it melts so much faster that way!
For the Chocolate Graham Cracker Crust
We keep this crust really simple and dark for contrast against the filling. You need 1.5 cups of crushed chocolate graham crackers mixed with only 6 tablespoons of softened butter. That butter has to be soft enough to easily incorporate without having to overwork the crumbs; we want that crust to hold together perfectly when we slice it!
For the Creamy Cheesecake Filling and Chocolate Swirl
For the majority of the texture, grab two 8-ounce packages of cream cheese—remember, these need to be at room temperature. We sweeten it up with 1/2 cup of white sugar and 1/2 teaspoon of vanilla extract. Then we bring in the binders: two whole eggs, added one at a time, which is why getting the texture right early on is so important. Oh, and don’t forget the 2 ounces of semisweet chocolate, chopped, that we melt down later to make that rich swirl! If you want to know more about handling cream cheese properly, always check out my guide on handling cream cheese.
Step-by-Step Instructions for Making Chocolate Marble Cheesecake
Alright, time to put that organized kitchen adventure to work! Making this Chocolate Marble Cheesecake is so rewarding because the steps are logical and build on each other perfectly. Just follow along, and before you know it, you’ll have a masterpiece ready for the oven. I always find that reading the whole set of instructions helps, so check out my general baking tips before we start mixing, too!
Preparing and Pre-Baking the Crust
First things first: get that oven warmed up to 325 degrees F (165 degrees C). While it’s heating, mix your graham cracker crumbs and softened butter until it feels like wet sand. Press that mixture firmly into the bottom of your 9-inch springform pan. You need to pre-bake this bad boy for exactly 10 minutes. This quick bake seals the deal and keeps the crust from getting soggy when the wet filling goes in. Once those 10 minutes are up, just pull it out and let it cool down a bit while you move on.
Creating the Plain and Chocolate Cheesecake Batters
Now for the creamy part! In your big bowl, beat that softened cream cheese, sugar, and vanilla until it is gloriously smooth—no lumps allowed here, please! Remember to add the two eggs one at a time, mixing just until they disappear. This is the plain batter base. Next, melt those 2 ounces of chopped semisweet chocolate. Take about 1 cup of your plain batter—just eyeball it—and gently mix it together with that melted chocolate in a separate bowl. That chocolate section is what creates the swirl!
Achieving the Perfect Chocolate Swirl Cheesecake Look
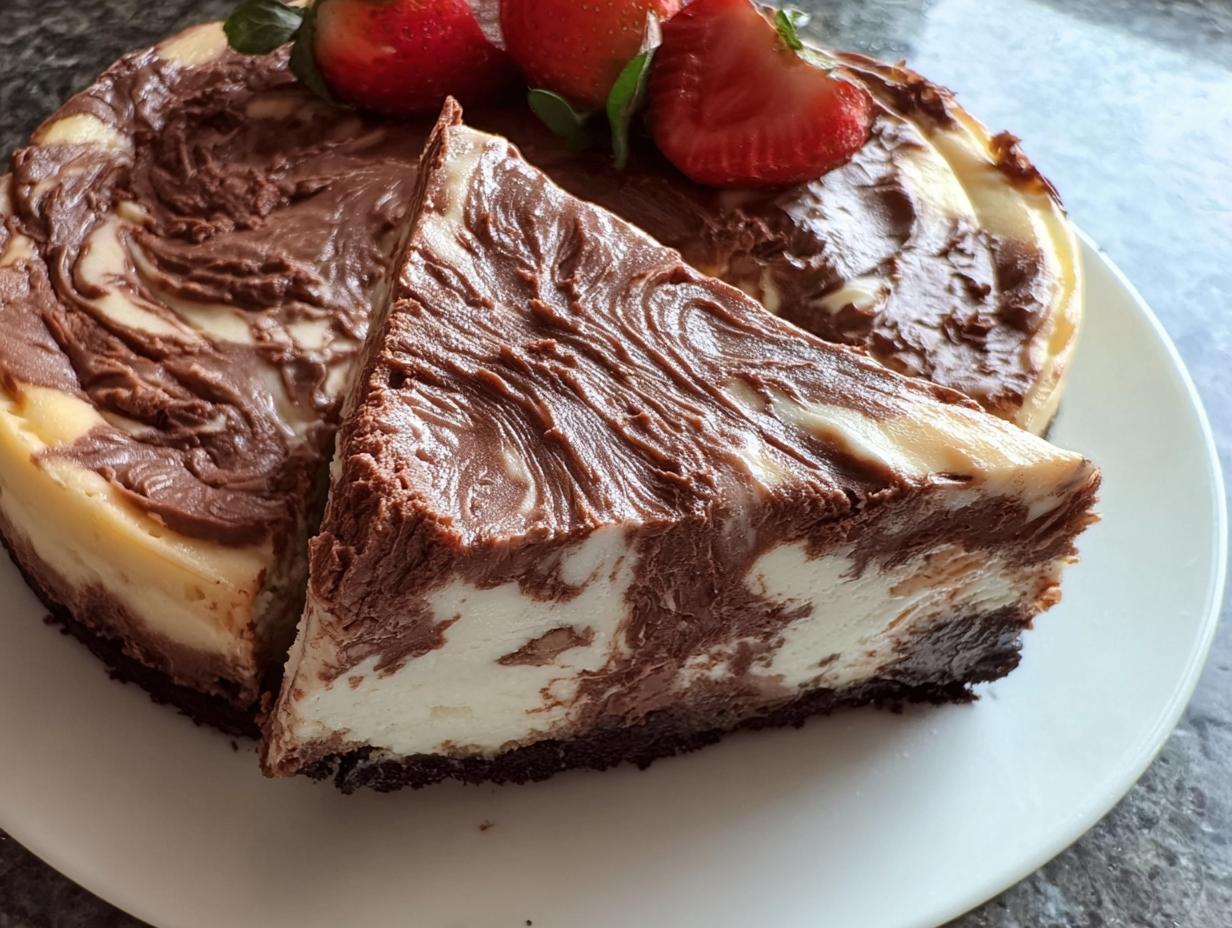
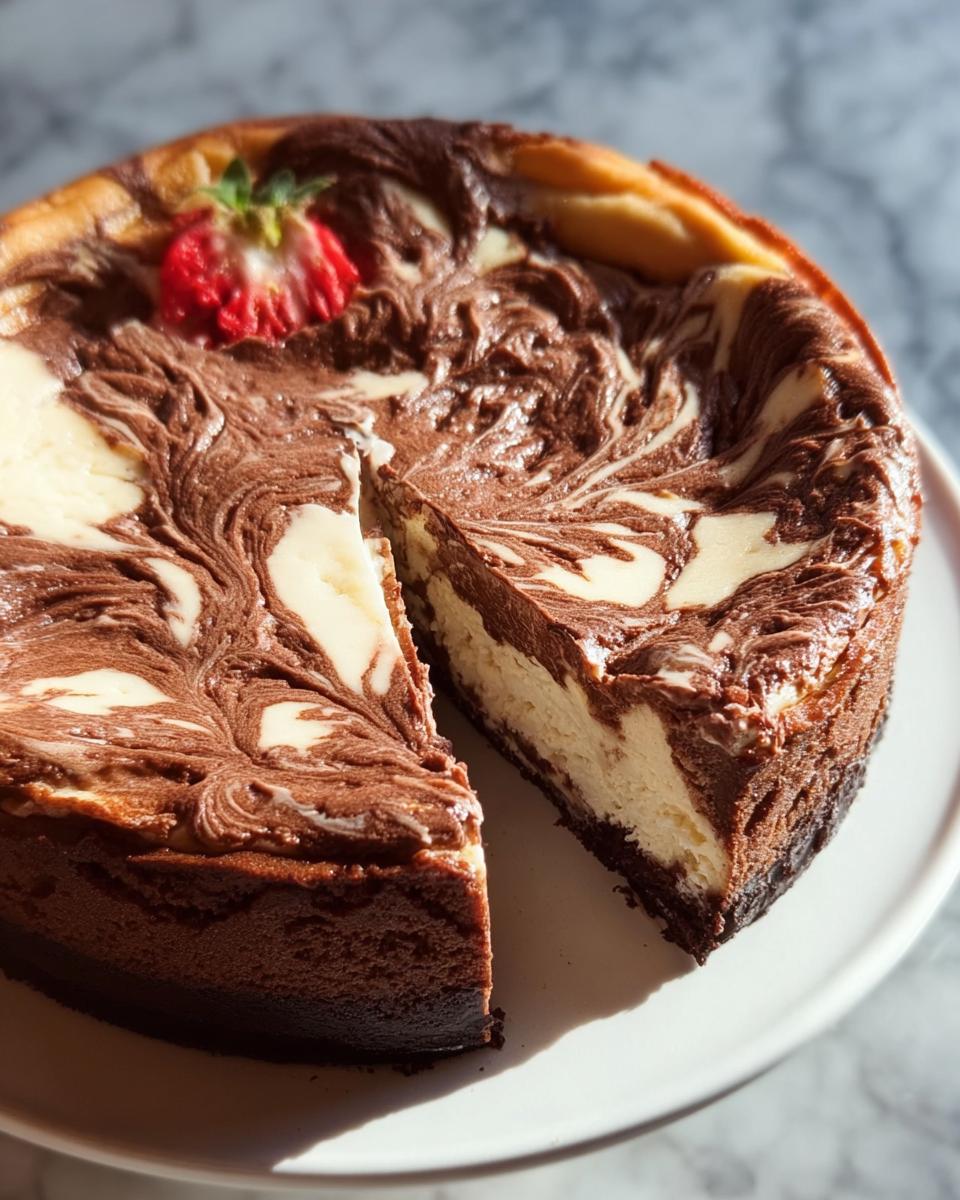
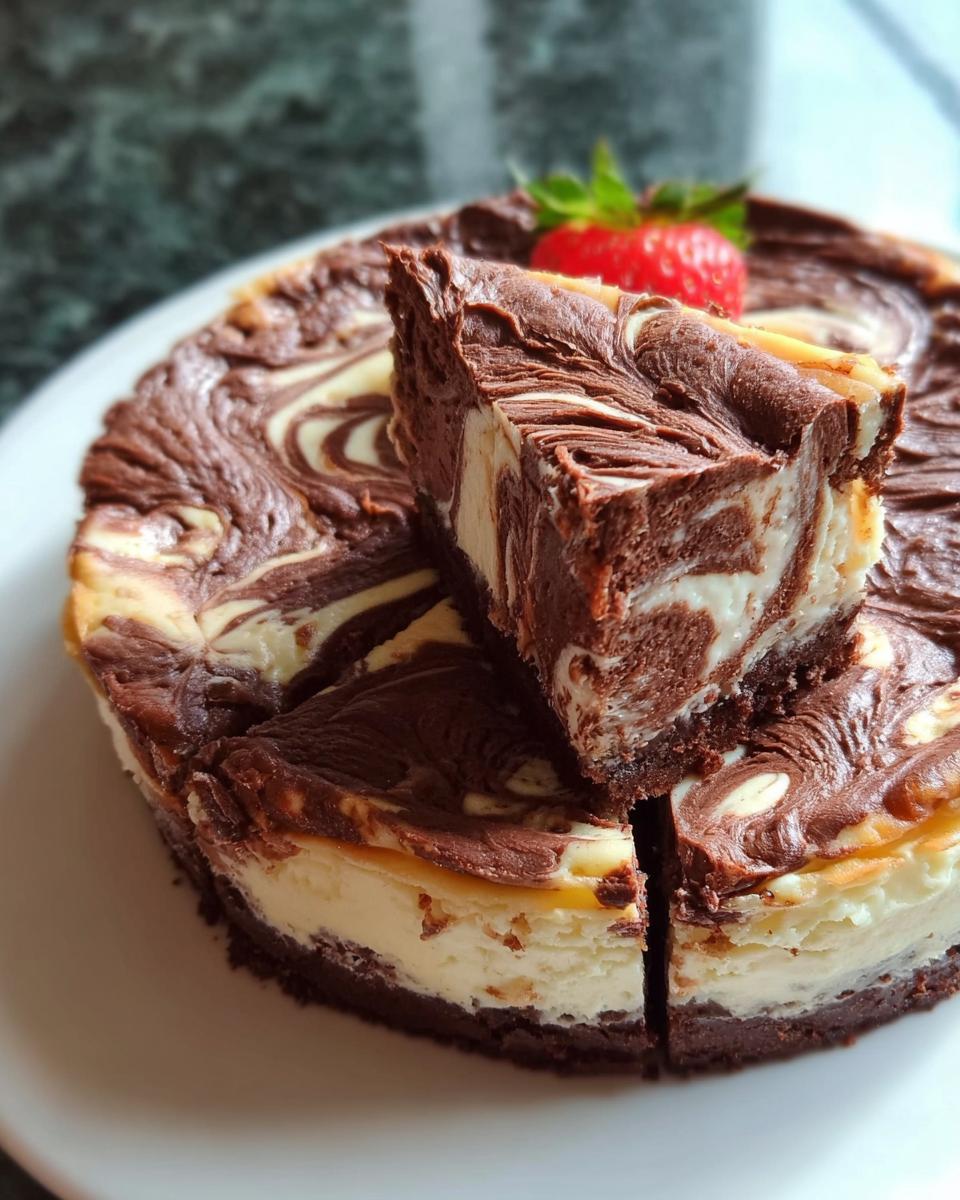
This is the fun, artistic part that makes it a genuine chocolate swirl cheesecake! Pour the bulk of your plain batter into that slightly cooled crust. Then, drop spoonfuls of the chocolate batter randomly over the top. Don’t try to cover the surface! Once the dollops are placed, take the tip of a clean knife and gently drag it across the top. You only need a few figure-eights or deep swirls to mix things up. Stop immediately! Over-swirling turns everything brown, and we want that stunning marble effect, not mud. I found a brilliant technique over at Allrecipes, too, that really helps with this pattern, if you want to peek at their approach.

Expert Tips for a Flawless Chocolate Marble Cheesecake
We’ve done the hard part—mixing and swirling—but trust me on this one: the final steps are what separate a good cheesecake from an absolutely legendary one. Cooling is everything! In all my years, I’ve learned that rapid temperature changes cause cracks, and nobody wants sad, cracked tops on their beautiful Chocolate Marble Cheesecake. Another pro move, even though we didn’t bake this one in a water bath, is still to keep it away from drafts and sudden cold air as it starts cooling down on the counter.
The biggest secret for presentation and slicing perfection, however, is patience. Once it comes out of the oven looking wonderfully jiggly, don’t touch it for at least an hour while it comes to room temperature slowly. Then, it hits the fridge!
The Critical Role of Chilling Time
This is where we honor that 180 minutes they call for in the recipe notes—but honestly, overnight is always better for flavor development anyway! That extended chilling time is non-negotiable. If you try to slice that cheesecake after just an hour or two, you’ll end up with a gorgeous slab of vanilla and chocolate mush on your knife. The chilling allows the starches and proteins to fully set up. When it’s properly cold, you get those clean, sharp edges when you slice it, showcasing that beautiful marbling perfectly. Seriously, the wait is part of the process!
Serving Suggestions for Your Marble Dessert Recipes
Now that you have this stunning, swirled creation in hand, how do you make the presentation even better? This is perhaps the best part of mastering these kinds of marble dessert recipes—the finishing touches! While the cheesecake is perfect naked, a little something extra piled on top or served alongside always elevates the experience for your guests.
I always try to complement the richness of the chocolate and the tang of the cream cheese without overpowering them. A light dusting is usually my top choice, but if you’re feeling extra fancy, here are a few flavor boosters that pair amazingly well.
If you need some inspiration on what to drizzle or sprinkle, I put together a whole list of my favorite additions over in my topping ideas section. Take a look!
Here are my go-to ways to serve this luxurious treat:
- Fresh Berries: A handful of bright red raspberries or sliced strawberries provides a wonderful, tart contrast to the deep bittersweet chocolate. It also adds a splash of color that looks lovely against the pale and dark swirls.
- Simple Dusting: Honestly, sometimes less is more. A very light dusting of high-quality powdered sugar right before serving lets the marbling do all the talking. Just use a fine-mesh sieve for an even coat!
- Whipped Cream Rosettes: Instead of covering the whole thing, pipe a few small dollops of lightly sweetened fresh whipped cream around the edge. Use a star tip for that professional look. A tiny sprinkle of very dark cocoa powder on top of the whipped cream is divine.
- Chocolate Ganache Drizzle: If you want to double down on the chocolate goodness, thin out a small amount of chocolate ganache until it’s very runny, and drizzle it across the slices right before serving. Keep it light so it doesn’t weigh down the slice!
Storage and Reheating Instructions for Chocolate Marble Cheesecake
So, you managed to have leftovers? That’s a genuine accomplishment because this Chocolate Marble Cheesecake disappears fast! Storing it is super easy, but you have to be gentle. After it’s fully chilled, cover the pan loosely—or better yet, transfer slices to an airtight container—so the cold air doesn’t dry out those creamy edges. It stays fantastic in the fridge for about four or five days; the flavor actually seems to deepen a bit!
Now, here’s the thing about cheesecake: we generally don’t reheat it! That lovely, dense, cool texture is ruined by warming it up. If you absolutely must eat it warm for some reason (which I highly discourage!), try warming just a single slice in the microwave for about 10 seconds on a very low setting, but be prepared for it to lose its structure. Stick to enjoying it cold; trust me on this one!
Frequently Asked Questions About Chocolate Marble Cheesecake
Can I use dark chocolate instead of semisweet in this recipe?
Oh, you absolutely can! If you’re a true dark chocolate fiend, feel free to swap that 2 ounces of semisweet for a higher percentage dark bar, like 60% or even 70%. Just be prepared: that swirl is going to be much deeper in color, and the overall taste will be less sweet, which is fantastic if you prefer a richer, slightly more intense flavor in your marble dessert recipes. If you use very dark chocolate, you might even want to slightly bump up the sugar in the plain batter just to keep that perfect balance.
How can I prevent my cheesecake from cracking?
Preventing cracks is the eternal struggle, isn’t it? The two biggest things you can do, even beyond what’s in the basic steps, relate to temperature. First, make sure your oven temperature is accurate; if it runs hot, it cooks too fast! Second, and this is the big one: cool it slowly! Don’t run straight to the fridge. Let the cheesecake cool on the counter for a solid hour after baking before you even think about taking it out of the oven. That gradual temperature decrease saves you from unsightly cracks and keeps that beautiful marbled pattern intact.
Is this Chocolate Marble Cheesecake suitable for large potlucks?
Definitely! This is one of my favorite potluck favorites for a reason. The recipe easily yields 12 generous servings, which is a great number for most gatherings. Because it comes out of the springform pan so nicely and needs to be kept thoroughly chilled anyway, it transports really well. Just make sure you keep it well-covered in a cooler with ice packs if you have a long drive. It holds its shape beautifully once it’s firm!
Share Your Perfect Chocolate Marble Cheesecake Creation
Now that you have all the secrets to creating this stunning and delicious dessert, I really want to see what you come up with! Honestly, seeing your beautiful swirls and hearing how much your family loved this is the best part of sharing these treasured recipes with you all.
Did it come out perfectly straight away, or did you have a little oopsie that turned into a new way to swirl things? Don’t keep that knowledge to yourself!
Take a snap of your finished Chocolate Marble Cheesecake—especially if the marbling turned out amazing—and share it! Drop a rating below letting me know how smooth the batter was and how long you decided to chill it for. Every comment and rating helps other bakers feel confident tackling this showstopper. Happy swirling, friends!
Chocolate Marble Cheesecake
Ingredients
Equipment
Method
- Preheat your oven to 325 degrees F (165 degrees C).
- Combine graham cracker crumbs and butter in a medium bowl. Mix well. Press the mixture into the bottom of a 9-inch springform pan.
- Bake the crust in the preheated oven for 10 minutes. Set the crust aside to cool slightly.
- Place the chopped chocolate in a microwave-safe bowl. Heat it in the microwave until melted, stirring occasionally until the chocolate is smooth.
- Beat the softened cream cheese, sugar, and vanilla in a large bowl until the mixture is creamy and smooth. Blend in the eggs, adding them one at a time. Remove 1 cup of the plain cream cheese mixture and mix it with the melted chocolate.
- Spread the plain batter into the baked crust. Drop the chocolate batter randomly over the top of the plain batter. Swirl the batters with the tip of a knife to create a marbled effect.
- Bake in the preheated oven until the center is set, which takes 30 to 35 minutes. Cool the cheesecake to room temperature, then refrigerate it for 3 hours or overnight before you serve it.
Notes
Tried this recipe?
Let us know how it was!
Master of Culinary Visual Arts
My culinary journey started in the fast-paced kitchens of boutique coastal restaurants throughout Southern California, where I learned that beautiful food doesn’t have to be complicated. After nine years of professional cooking, I’ve made it my mission to prove that sophisticated, nutritionally sound meals can be accessible to busy home cooks who refuse to compromise on flavor or visual appeal.
What changed everything for me was watching talented home cooks feel intimidated by healthy cooking. That’s when I transitioned to private instruction, teaching busy professionals and families how to create restaurant-quality meals using simple techniques and ingredients they can actually find at their local grocery store. My “15-minute meal” frameworks are now used by several regional cooking schools!
As a third-generation Mexican-American, I love weaving vibrant Latin flavors into low-carb creations – proving that healthy eating can be both culturally authentic and visually spectacular. My “effortless elegance” philosophy is simple: nutritious food should look as stunning as it tastes, without requiring professional chef skills or expensive equipment.
When I’m not developing recipes in my San Diego coastal kitchen, you’ll find me surfing the local breaks with my Golden Retriever mix, Mango, who’s both my kitchen companion and unofficial taste-testing assistant. My personal low-carb lifestyle started as a way to maintain energy for my active coastal life, and it’s become the foundation for proving that healthy eating enhances rather than restricts life’s pleasures.