
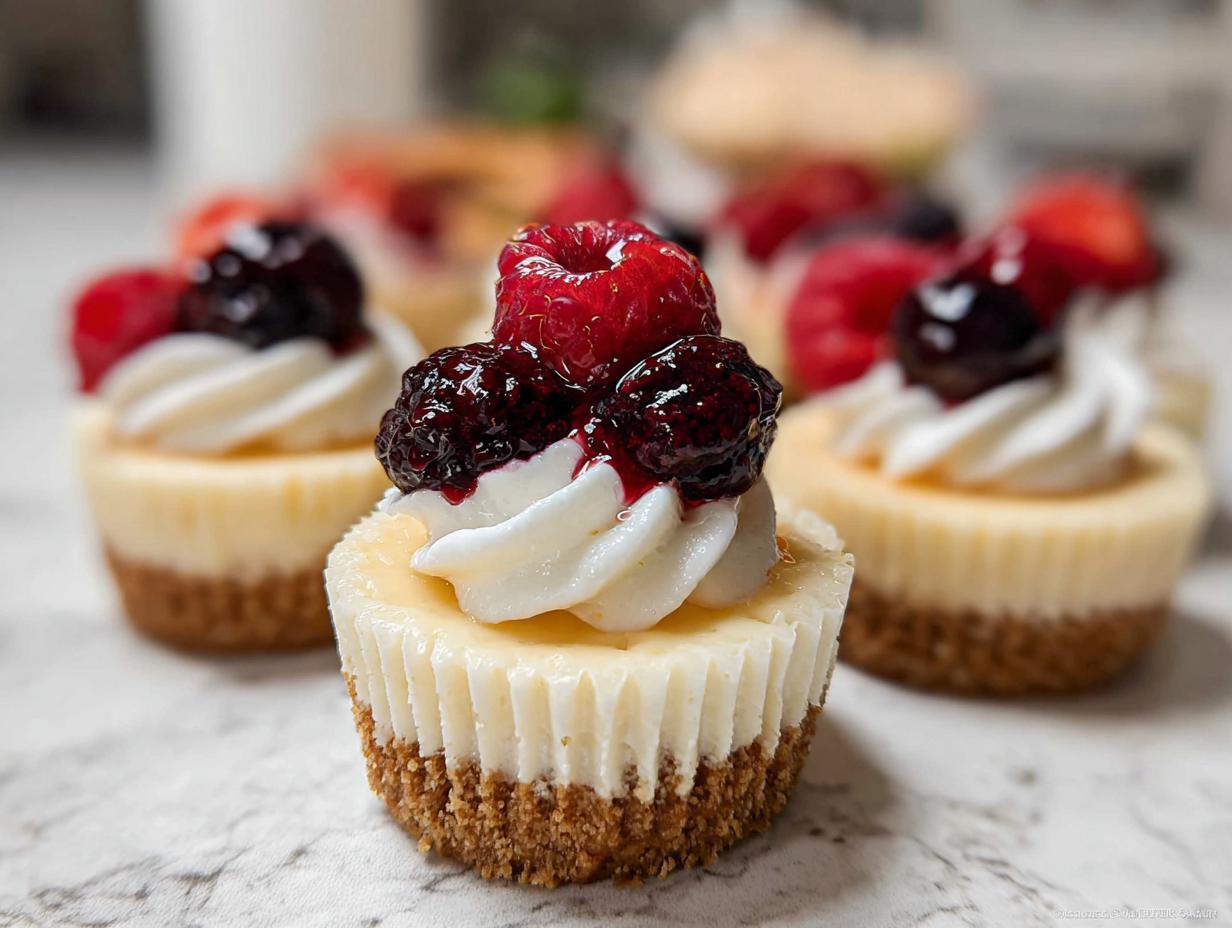
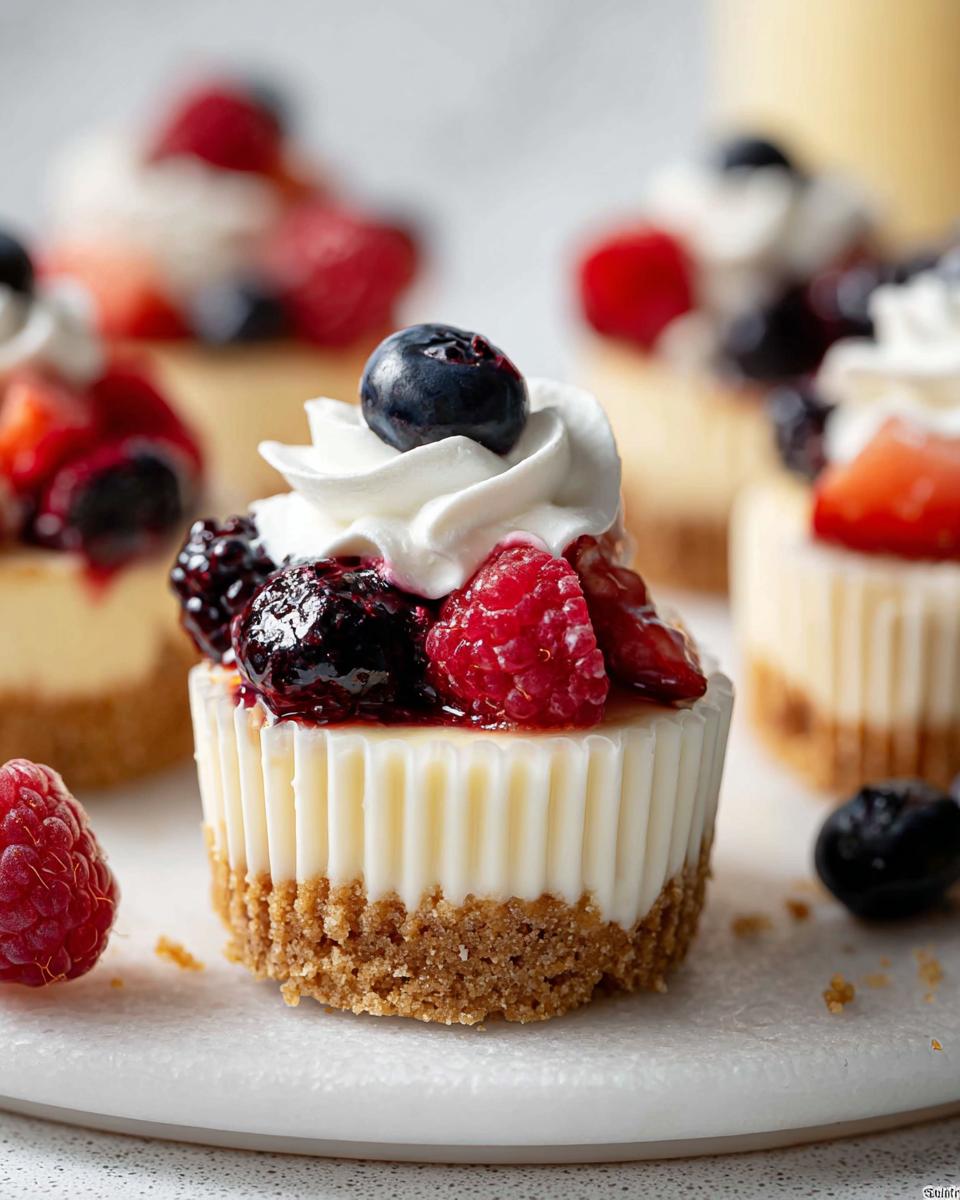
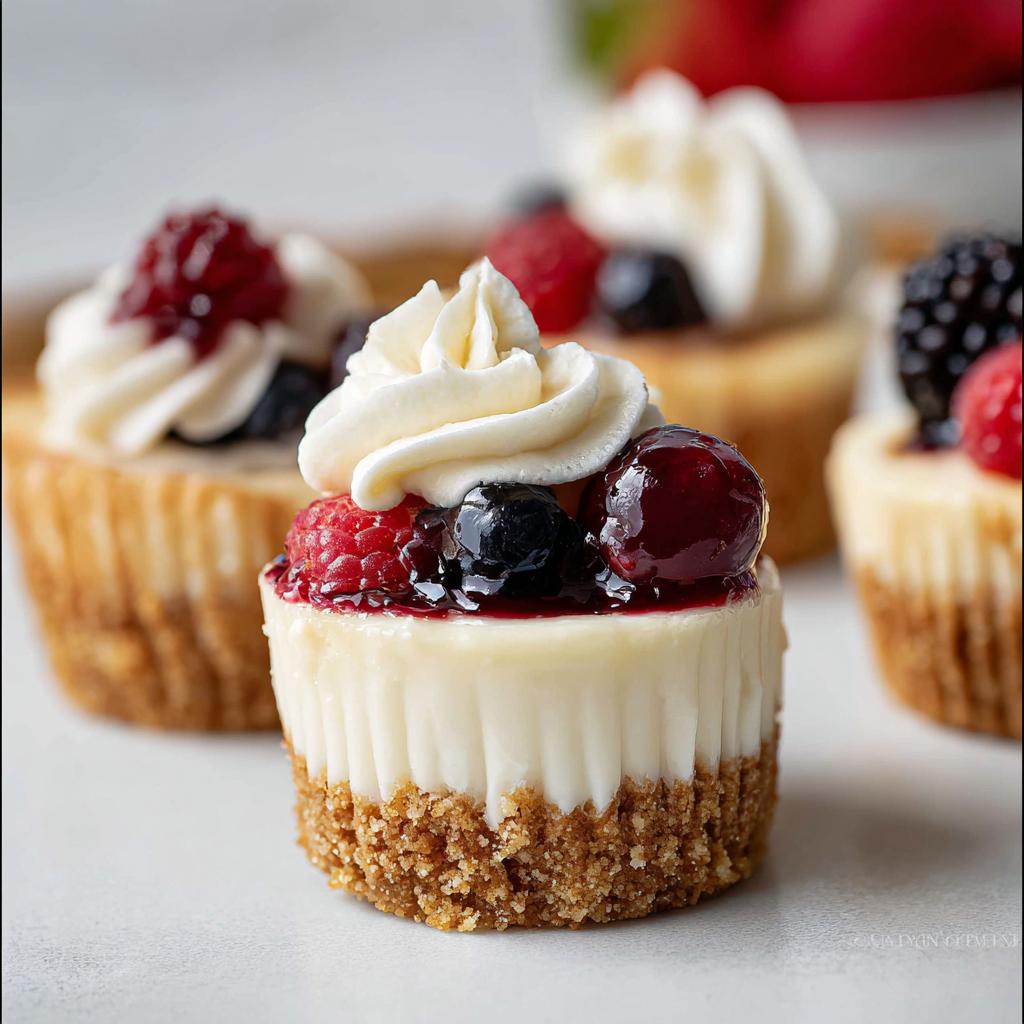
Oh, let’s talk about desserts that just make people light up! Sometimes you want the rich, decadent creaminess of a full cheesecake, but you absolutely *do not* want the hassle of slicing and serving a giant one at a party. That’s where these Mini Cheesecake Bites with Berry Topping come in—they are the perfect solution for individual indulgence!
I still remember the first time I made these for a summer gathering. I had a group of friends over, and I wanted to create a dessert that was not only delicious but also easy to serve. As I prepared the creamy cheesecake filling and topped each bite with vibrant, fresh berries, I could feel the anticipation in the air. When I finally served them, the delighted smiles and satisfied murmurs confirmed my instincts; they were a hit! That day cemented my belief in the magic of mini desserts—they bring people together around shared flavors and joy, proving that a little bite can create a big moment.
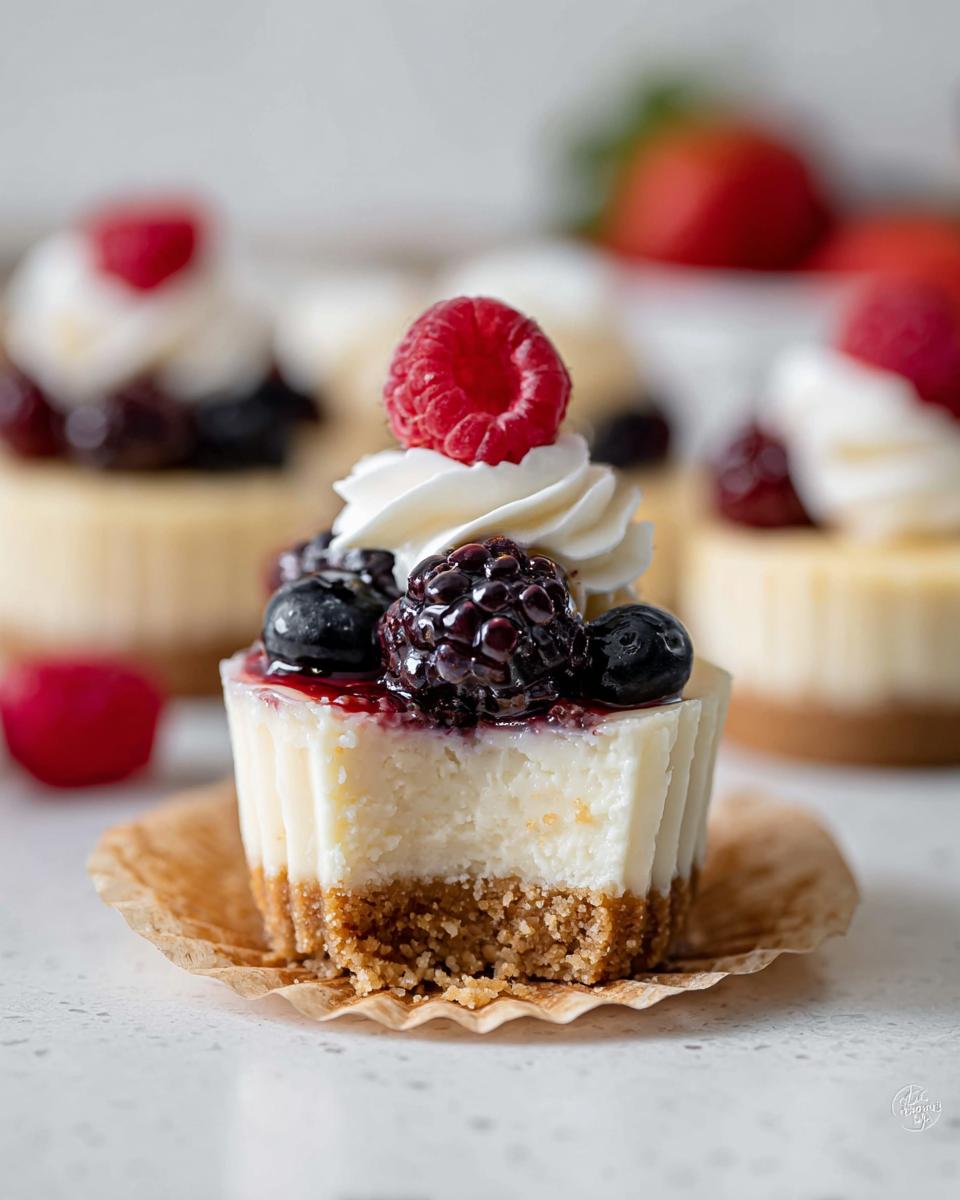
These little cups capture everything we love about cheesecake—that smooth, slightly tangy center and the buttery crust—but in a format that’s just heaven to grab. Trust me, these are going to be your new go-to for every party platter you ever plan!
Why You Will Love These Mini Cheesecake Bites with Berry Topping
Honestly, these little treats solve so many dessert dilemmas! You get all the glorious flavor without any of the slicing stress. I just love how tidy they are when everything is plated up.
- They are the ultimate bite sized desserts. No forks necessary, no messy edges, just pure, perfect cheesecake waiting for you.
- Perfect for party dessert platters! Since they are already individually portioned, setup and cleanup are a breeze when you’re entertaining.
- Portion control? What portion control? (Kidding!) But seriously, having a pre-set serving size means you can sample one without feeling guilty about cutting that huge slice.
- The contrast between the crisp, buttery graham cracker crust and that unbelievably smooth, creamy filling is just divine. It’s classic flavor in a fun new shell.
- They are fantastic make-ahead stars! You can get them baked and chilled the day before your event, which saves you so much stress on party day.
Essential Ingredients for Perfect Mini Cheesecake Bites with Berry Topping
This recipe is straightforward, but it totally hinges on using the right stuff, especially when we’re aiming for that silky smooth, crack-free filling. You need to treat your ingredients right before they even hit the mixer! I always lay everything out that needs to be soft or warm about an hour before I start.
For the Graham Cracker Crust
The crust is the snappy little foundation for our creamy topping. It’s so easy, but don’t skimp on pressing it firmly into those liners—that’s what keeps everything together!
- 1 cup graham cracker crumbs (That’s about 8 full sheet crackers, ground up finely!)
- 2 Tablespoons granulated sugar
- 3 Tablespoons unsalted butter, melted
For the Creamy Cheesecake Filling
This is where the magic happens, and using room temperature ingredients here is non-negotiable, my friends. If your cream cheese is cold, you’ll end up with little lumps, and nobody wants a lumpy little bite, right? Same goes for the eggs—they need to be able to incorporate evenly!
- 16 ounces full-fat brick cream cheese (This *has* to be softened—like super soft—to room temperature. It’s the key to smooth mixing!)
- 1/2 cup granulated sugar
- 1/4 cup full-fat sour cream (Make sure this is also at room temperature!)
- 1 teaspoon pure vanilla extract
- 1 teaspoon freshly squeezed lemon juice (Just a hint of brightness to cut the richness!)
- 2 large eggs (Added one at a time once everything else is mixed in.)
For the Berry Topping and Garnish
This is the fun part where we dress up those beautiful Mini Cheesecake Bites with Berry Topping! You can go simple or get fancy here, but fresh berries are always the way to go for that vibrant pop of color and flavor right before serving.
- Fresh berries of your choice (Strawberries, blueberries, raspberries—use what looks best at the market!)
- Optional: A swirl of store-bought or homemade whipped cream for extra height and luxury.

Step-by-Step Instructions for Mini Cheesecake Bites with Berry Topping
Okay, let’s get baking! You’ll need about 20 minutes of active work time before these go into the oven, plus that essential chilling time. We start by setting up our bases and getting that oven nice and hot to 350°F (177°C). Remember to line your 12-count muffin pan first—those liners really help when you’re pulling out these individual treats!
Preparing the Crust and Pre-Baking
In a simple bowl, mix your graham cracker crumbs, sugar, and the melted butter until everything looks sandy and just starts sticking together. Don’t use too much butter, or it gets oily!
Take a heaping tablespoon of that mixture and press it down *really* firmly into the bottom of each cupcake liner. We need a strong base for the creamy filling! Pop that pan into the oven for a quick 6 minutes. This sets the crust so it doesn’t turn soggy later. Then, pull it out and get ready for the filling!
Mixing the Smooth Cheesecake Filling
Grab your mixer! Beat that softened cream cheese with the sugar until it’s completely smooth—I mean absolutely no lumps showing whatsoever. That usually takes me about 2 minutes on medium-high. Scrape down the sides often!
Next, mix in your sour cream, vanilla, and lemon juice until they are just combined. Now, for the most important part to avoid cracks: add the eggs one at a time, beating only until blended after each addition. If you mix the eggs too much, you whip in too much air, and that leads to sinking. Keep the mixer speed low here!
Baking and Cooling Your Mini Cheesecake Bites with Berry Topping
Fill those warm crusts almost to the top—don’t be shy! If you want the absolute smoothest texture, this is where you might want to try a water bath. I’ll often place my muffin tin in a larger roasting pan and pour in about an inch of boiling water before it goes in the oven. Bake these darlings for about 20 minutes.
They are done when the edges look set, but the very center still has a tiny tiny wobble. Turn the oven off, prop the door open slightly, and let them sit inside for 15 minutes. Then, move them to a cooling rack to chill for 45 minutes at room temperature. After that, they have to go into the fridge for a minimum of 2 hours of chilling time. This long chill is what firms them up perfectly for their mini cheesecakes transformation!
Expert Baking Tips for Flawless Mini Cheesecake Bites with Berry Topping
I’ve learned a few tricks over the years to make sure these mini cheesecakes come out looking picture-perfect every single time. The biggest secret? Temperature control, temperature control, temperature control!
You absolutely must use ingredients—especially the cream cheese and eggs—at room temperature. If they are cold, they won’t blend, and you end up beating the mixture way too long trying to force them smooth. Over-beating those eggs is the ultimate invitation for cracks to appear later on!
And don’t forget that slow cooling! Pulling them straight out of the hot oven environment stresses the cheesecake dramatically, causing that dreaded sinking and cracking. That slow transition on the cooling rack is your friend. Following these steps ensures your bite sized desserts are creamy, not crumbly!
Ingredient Notes and Smart Substitutions
Sometimes we run out of something crucial, or maybe you need an adaptation for allergies—I totally get it! The beauty of these bite sized desserts is that the core flavor comes from that creamy cheese base, so we can be a little flexible with the supporting cast as long as we keep the ratios sensible.
When it comes to the graham cracker crust, if you don’t have those classic crumbs? No panic! You can totally switch the base out. Vanilla wafers or even gingersnap cookies make amazing alternatives. Just crush them up the same way and use the same amounts of sugar and melted butter. The flavor profile changes slightly, but the buttery texture stays perfect.
Crust Swaps for Variety
If you’re gluten-free, you’re in luck! Just grab your favorite gluten-free graham cracker crumbs or even some crushed gluten-free shortbread cookies. You might need to add just a tiny bit more melted butter to help it bind since GF crumbs can be drier, so watch the texture!
Handling the Sour Cream Swap
The sour cream works to add that signature, subtle tang that keeps the cheesecake from tasting too sweet, plus it adds richness from the fat content. If you don’t have it, my best suggestion is using plain Greek yogurt, but make sure it’s full-fat. You’ll want to drain any excess liquid off the Greek yogurt first, just so you don’t thin out the filling too much before mixing!
The eggs have to stay eggs, though—we need those for structure in these mini cheesecakes! But for the main event, the cream cheese? Stick to the brick style, full-fat only. The tub stuff is whipped and has too much water, which will absolutely collapse your beautiful little tops!
Presentation Ideas for Your Party Dessert Platters
Once these Mini Cheesecake Bites with Berry Topping are perfectly chilled, it’s time for the grand finale—making them look spectacular on your dessert table! These truly shine when they are displayed beautifully, turning simple individual treats into something stunning for your guests.
Remember, never top them until right before you serve them, unless you plan on eating them within an hour or two. If the topping sits too long, the juices from the berries can start to bleed into the cheesecake surface, and we want that crisp color contrast!
Mastering the Berry Combination
Don’t just reach for one berry! The best presentation involves variety in both color and size. I usually create a little mound right in the center of the cheesecake cup.
- Start with a base layer of sliced strawberries—they lay flat nicely.
- Tuck a few smaller blueberries or raspberries around the strawberries to add depth.
- If you have tiny, gorgeous wild strawberries or perfect blackberries, let those sit right on top as the focal point!
Mixing colors makes the platter look so much more vibrant and expensive, even though we used simple ingredients!
Adding Zest and Drizzle for Pop
This is where you take your bite sized desserts from lovely to show-stopping. A little bit of bright color on top of the berries really wakes things up.
Citrus zest is your best friend. Lemon, lime, or even orange zest scraped right over the berries adds a gorgeous, fine green or yellow texture and an incredible scent. Just use a microplane, and be careful not to get any of the bitter white pith!
If you are going for the optional whipped cream swirl, use a piping bag for that professional look. After piping the cream, dust it very lightly with cocoa powder or shaved dark chocolate. If you want a sweet drizzle, melted white chocolate works beautifully, but keep the lines thin and artistic, not like you’re flooding the whole thing!
Arranging for Maximum Impact on Party Dessert Platters
How you place them matters almost as much as how they taste! If you are arranging these on a large platter, use height if you can. If you have tiered serving trays, put them on the upper levels so their vibrant color catches the eye.
Don’t line them up like soldiers! Cluster them loosely, maybe alternating a plain berry-topped one with one that has a drizzle, or place them next to a small bowl of extra fresh mint leaves you can just stick into the top of one every so often. The goal for your party dessert platters is abundance and variety!
Storage and Reheating Instructions for Mini Cheesecake Bites with Berry Topping
The great news about these Mini Cheesecake Bites with Berry Topping? They are totally fantastic make-aheads, which lifts so much pressure off hosting duties! While they are best enjoyed within a day or two for that peak berry sharpness, you can absolutely store the baked bites for longer.
The chilling time specified in the recipe—at least 2 hours—is really the minimum. If you are preparing far in advance, give them that full chill time, cover them up tightly, and pop them in the fridge.
Prep Ahead: Base vs. Topping
If you are planning more than 12 hours ahead, I strongly recommend keeping the crust and filling separate from the berry topping. The moisture from the berries and any whipped cream will start softening the cheesecake surface if they sit together for too long.
Bake those bases, let them chill completely, and keep them covered in the fridge. Trust me, that extra step keeps everything looking crisp and professional!
Covering Your Individual Treats Safely
When it comes to storing the plain, chilled cheesecakes (without the topping), you just need good coverage. I use plastic wrap laid directly over the surface of the cheesecakes first. This prevents them from absorbing any weird fridge smells. Then, I’ll cover the whole muffin tin loosely with foil or use a larger container with a tight lid.
They hold up beautifully like this in the refrigerator for up to five days. I like to pull them out about 30 minutes before I plan to serve them if they’ve been in there for several days; that just takes the chill off the cream cheese slightly, making them taste richer.
When to Add the Berry Topping
Only apply the whipped cream, fresh berries, or any powdered sugar dusting right when you are ready to plate them up for your party dessert platters. If you’re putting them out on a buffet, try topping only what you think you’ll serve in the first hour. They taste phenomenal fresh, and that bright berry color is at its best when it hasn’t been sitting!
If you do need to freeze them (and you absolutely can!), the plain, un-topped individual treats freeze wonderfully for up to a month. Transfer them into an airtight container with some parchment paper between layers, and thaw them overnight in the fridge before you put your beautiful berry topping on!
Frequently Asked Questions About Mini Cheesecake Bites with Berry Topping
I always get so many great questions once people start trying out this recipe! It’s fun to see what little tweaks everyone wants to make to these adorable mini cheesecakes. Here are some of the things I hear most often when folks are whipping up their own batches.
Can I skip the water bath entirely?
Oh, that’s the big question, isn’t it? You totally *can* skip the water bath if you’re pressed for time, but I highly recommend using it, especially for individual treats like this. The steam it creates keeps the oven temperature even and humid, which is what prevents those unsightly cracks on the surface. If you skip it, watch them very closely at the end—they might bake faster!
If you do skip it, make sure you let them cool slowly in the oven, just like I mentioned in the instructions (cooling off with the door propped open). This slow transition is the next best defense against cracking!
Why are my mini cheesecakes sinking in the middle?
This usually comes down to one of two things! First, you might have over-mixed the eggs. Over-mixing incorporates too much air, and when that air tries to escape during cooling, the center drops, leaving you with a dip. Second, they might not have chilled long enough. These bite sized desserts need that quality time in the fridge—at least two hours—to fully set and firm up. If they are warm or slightly under-baked in the center when you chill them, they collapse.
Can I use store-bought graham cracker crusts instead of making my own?
Sure you can, and I won’t tell anyone! If you want to speed things up even more, you can definitely buy pre-made graham cracker crusts. However, you’ll need to adjust for the size. If you buy a standard 9-inch pie crust, you’ll need to use a cookie cutter to punch out circles that fit your cupcake liners. You’ll probably need about two full crusts to fill up your 12-count muffin tin, depending on how thick you press them.
How far ahead of time can I prepare these party dessert platters?
For the best flavor and texture, I aim to bake them the day before I serve them. They need that time in the fridge to firm up properly. If you bake them one day, chill them overnight, and then add your beautiful berry topping the next morning, they will be absolutely perfect for your party dessert platters!
What if I don’t have sour cream?
I touched on this, but it’s worth repeating! Sour cream brings a necessary tang and richness to the filling that balances the sweetness of the sugar. If you absolutely must substitute, plain Greek yogurt is the closest replacement, but try to use the thickest, full-fat kind you can find. If it looks runny, drain it in a fine-mesh sieve lined with cheesecloth for about 30 minutes before using to get rid of excess moisture.
Share Your Mini Cheesecake Bites with Berry Topping Creations
Look, I know you’re going to nail these! Once you’ve got these creamy, dazzling bites cooling down and looking gorgeous on your table, I really, truly want to see them! Sharing your success just makes the whole baking process feel even sweeter.
These aren’t just desserts; they are little projects built out of care, and seeing how you’ve styled yours—the colors of berries you picked, or how you arranged them on your party dessert platters—is the best reward for all that careful mixing and chilling!
Rate Your Masterpiece
If you loved how these turned out, please drop a rating for the recipe right down below! A quick five-star rating tells me immediately that these Mini Cheesecake Bites with Berry Topping are doing their job bringing joy to your house. It helps other bakers know that this recipe is a keeper, too.
Show Off Your Style
Did you experiment with a lemon zest drizzle? Did you use blackberries instead of raspberries in your topping? I am always looking for new inspiration! If you have pictures, tag me on social media, or better yet, upload a photo right here in the comments section.
Seriously, there’s nothing better than seeing proof that these individual treats have made it from my kitchen to yours, ready to wow a crowd. Get ready for the compliments—you absolutely deserve them!
Happy baking, everyone! I can’t wait to see those beautiful little creations!
Mini Cheesecake Bites with Berry Topping
Ingredients
Equipment
Method
- Preheat your oven to 350°F (177°C). Line a standard 12-count muffin pan with cupcake liners.
- Combine all of the crust ingredients in a medium bowl. The mixture will look sandy. Firmly press a heaping Tablespoon of the crust mixture into each liner.
- Bake the crusts for 6 minutes.
- Beat the cream cheese and granulated sugar together on medium-high speed in a large bowl until the mixture is completely smooth and creamy, about 2 minutes. Use a handheld or stand mixer fitted with a paddle or whisk attachment.
- Add the sour cream, lemon juice, and vanilla extract. Beat until fully combined.
- With the mixer running on medium speed, add the eggs one at a time. Beat just until each egg is combined before adding the next. Do not over-mix.
- Divide the batter among the liners, filling each one to the top. It is fine if the crust is still warm.
- Prepare an optional water bath to prevent excess sinking: Boil a pot of water. Place a large metal baking or roasting pan, about 1 inch deep with water, on the bottom oven rack. Place the muffin pan on the center rack. Close the oven door to trap the steam.
- Bake until the edges are set and the centers slightly jiggle when you tap the pan, about 20 minutes.
- Set the pan on a cooling rack and allow the cheesecakes to cool at room temperature for 45 minutes. Then, transfer them to the refrigerator and chill for at least 2 hours or up to 24 hours. You can freeze them for 1 hour to speed up the chilling process.
- Top the cheesecakes. You can pipe whipped cream onto the mini cheesecakes and garnish with berries, mint, or other toppings.
- Refrigerate decorated cheesecakes until you are ready to serve them.
- Cover and store leftover cheesecakes in the refrigerator for up to 5 days.
Notes
Tried this recipe?
Let us know how it was!
Master of Global Fusion Innovation
My culinary adventure reflects my Lebanese-Italian heritage and a decade spent in the dynamic fusion restaurant scenes of Miami and Barcelona. I’ve made it my mission to prove that beloved global comfort foods can be successfully adapted for low-carb living without losing their soul, their cultural authenticity, or their ability to comfort.
With advanced training in molecular gastronomy and experience spanning Mediterranean, Middle Eastern, and Latin American traditions, I’ve developed what I call “respectful innovation” – culinary creativity that honors traditional cooking wisdom rather than replacing it. My alternative ingredient substitution systems are now taught in specialty diet cooking schools throughout the region.
Drawing from my trilingual upbringing, I understand how deeply food connects to identity and memory. That’s why my flavor-bridging techniques allow classic dishes from around the world to maintain their comforting, familiar qualities while meeting contemporary nutritional standards. I regularly share these techniques at international culinary symposiums and innovation events.
When I’m not experimenting in my Miami fusion kitchen laboratory, you’ll find me at local salsa dance venues – the rhythm and improvisation skills translate directly to my creative cooking process! My role as a foster parent to rescue rabbits has unexpectedly inspired some of my most creative plant-based low-carb innovations.
My personal low-carb journey began as a way to maintain energy for my active lifestyle, but it’s evolved into a professional mission of proving that healthy eating can be globally adventurous rather than restrictively limiting. Every recipe I create is a passport to culinary adventure, transforming kitchens into laboratories for exploring healthy versions of the world’s most beloved comfort foods.