

You know, dinner time with kids can be downright chaotic, right? I remember those evenings so clearly—the picky eaters, the dinnertime drama, and me, frantically trying to whip up something everyone would actually *eat*. It felt like a constant battle! But then, I discovered rice bowls, and honestly, it was a total game-changer for my family. It’s such a simple yet brilliant way to get healthy food on the table without the fuss. These bowls are incredibly versatile, and getting kids involved in customizing their own meals makes all the difference. So, whether you’re a seasoned cook or just starting out, welcome to The Ultimate Rice Bowls Recipes Guide for Beginners! As a Certified Family Nutrition Strategist, I’ve seen firsthand how these bowls can simplify life and bring families together around the dinner table, minus the veggies complaining!
Why You’ll Love The Ultimate Rice Bowls Recipes Guide for Beginners
Seriously, if you’re looking for a meal that’s a total breeze but still feels *fancy* and super healthy, you’ve come to the right place! This guide is your new best friend for a few reasons:
- Super Easy for Beginners: No complicated techniques here, I promise! Everything is super straightforward.
- Speedy Weeknight Dinners: We’re talking about getting a delicious meal on the table without spending hours in the kitchen.
- Healthy & Wholesome: Packed with good-for-you ingredients that taste amazing.
- Totally Customizable: The best part! Everyone can build their own bowl, so it’s a win-win for picky eaters and adventurous ones alike.
Essential Ingredients for Your First Rice Bowls
Alright, let’s get down to business! Building your first perfect rice bowl is all about grabbing the right stuff. Here’s what you’ll need for these super simple, delicious bowls:
- For the Bowls:
- 2 cups frozen shelled edamame beans
- 4 cups cooked brown rice (make sure it’s cooled a bit!)
- 4 Persian cucumbers, sliced into neat rounds
- 3 ripe avocados, peeled and sliced
- 2 handfuls of fresh baby spinach leaves
- 1 splash of extra-virgin olive oil to finish
- 1 tablespoon sesame seeds (white, black, or a mix!), toasted
- 4 sheets of nori seaweed, toasted and cut into thin strips
- 1 pinch of sea salt
- 1 pinch of black pepper
- For the Sesame-Miso Dressing:
- 3 tablespoons miso paste (white or yellow works great for beginners!)
- 1 tablespoon toasted sesame oil (this stuff is magic!)
- 1 tablespoon mirin (a sweet Japanese rice wine)
- 1 teaspoon sugar (just a touch to balance things out)
- 1 teaspoon toasted sesame seeds (yes, more seeds!)
Step-by-Step Guide to Crafting The Ultimate Rice Bowls Recipes
Okay, let’s get this deliciousness made! Crafting these ultimate rice bowls is honestly super simple, and I’ll walk you through every step. It’s all about building flavor and putting it all together beautifully. Don’t worry if you’ve never done this before; you’ve got this! If you’re looking for other grain bowl ideas, check out this vegetable quinoa fried rice recipe for more inspiration.
Toasting Sesame Seeds: A Quick Flavor Boost
First things first, let’s get those sesame seeds toasty! Pop them in a dry skillet over medium heat. Just a few minutes, keep them moving so they don’t burn. You’ll know they’re ready when they smell amazing and are a little golden. This tiny step makes a *huge* difference!
Whipping Up the Sesame-Miso Dressing
Now for the magic sauce! Grab a little bowl and whisk together your miso paste, that glorious toasted sesame oil, the mirin (it’s got a lovely sweetness!), a teaspoon of sugar, and yet more toasted sesame seeds. Whisk it all up until it’s wonderfully smooth and creamy. Taste it – maybe you want a touch more sweetness or brininess? You’re the boss!
Assembling Your Perfect Rice Bowl
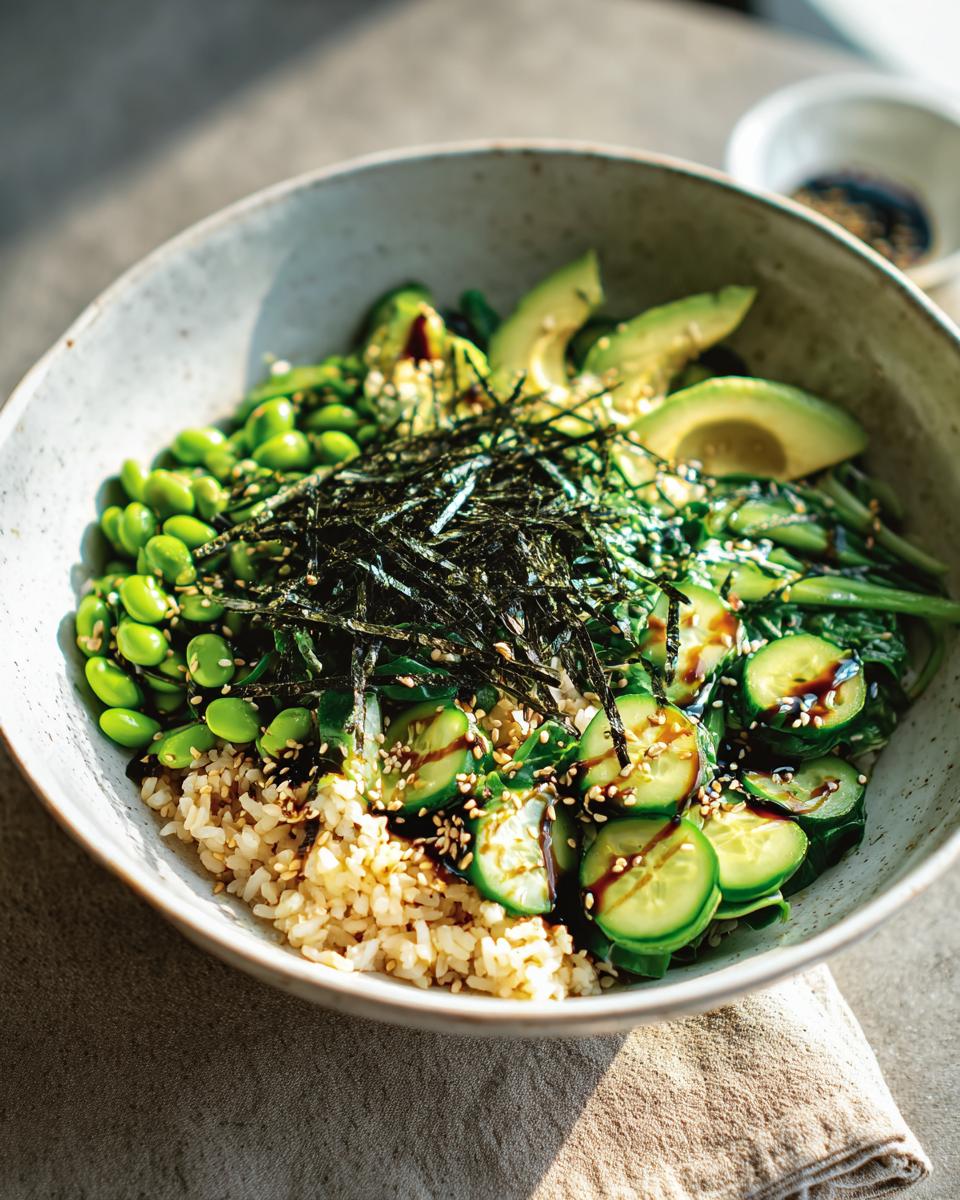
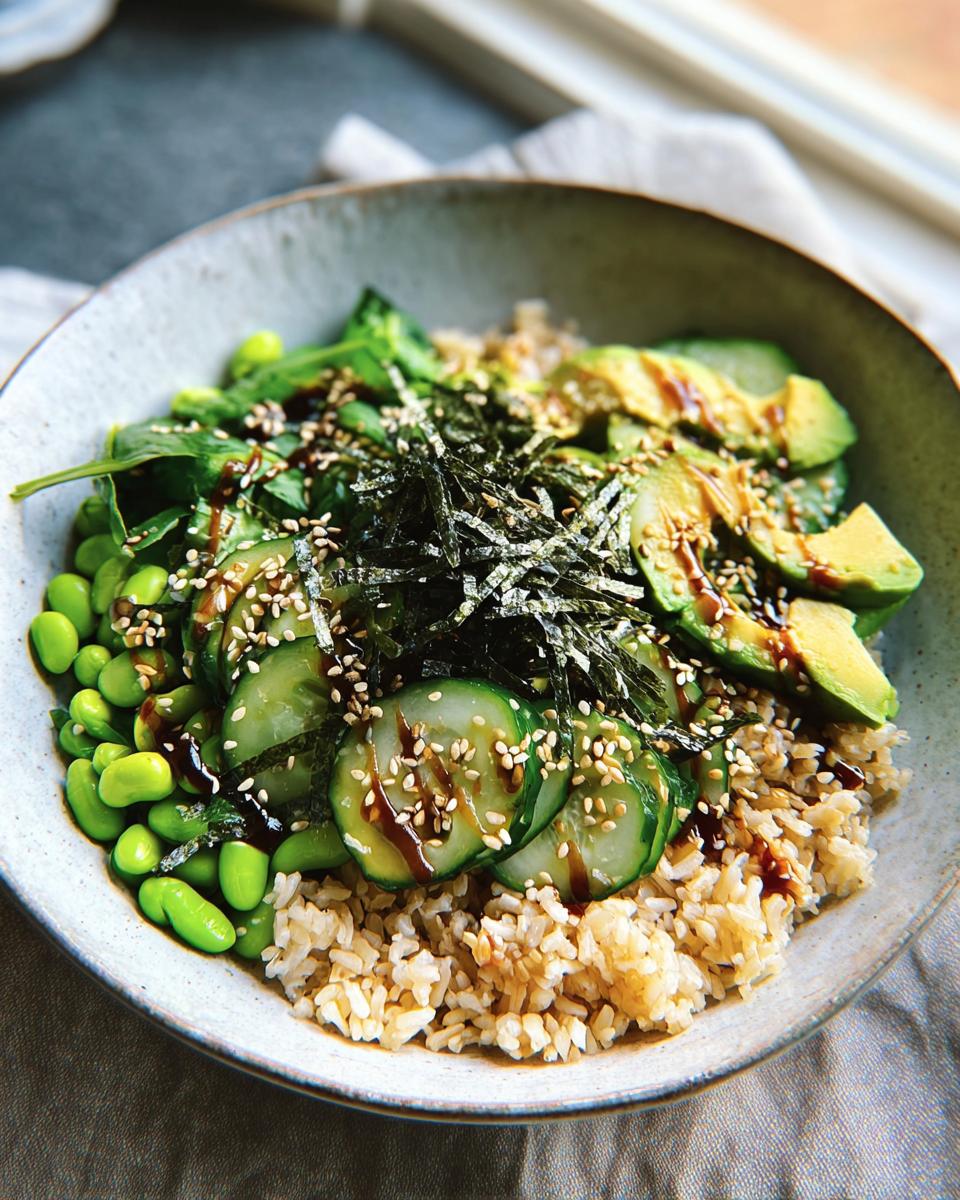
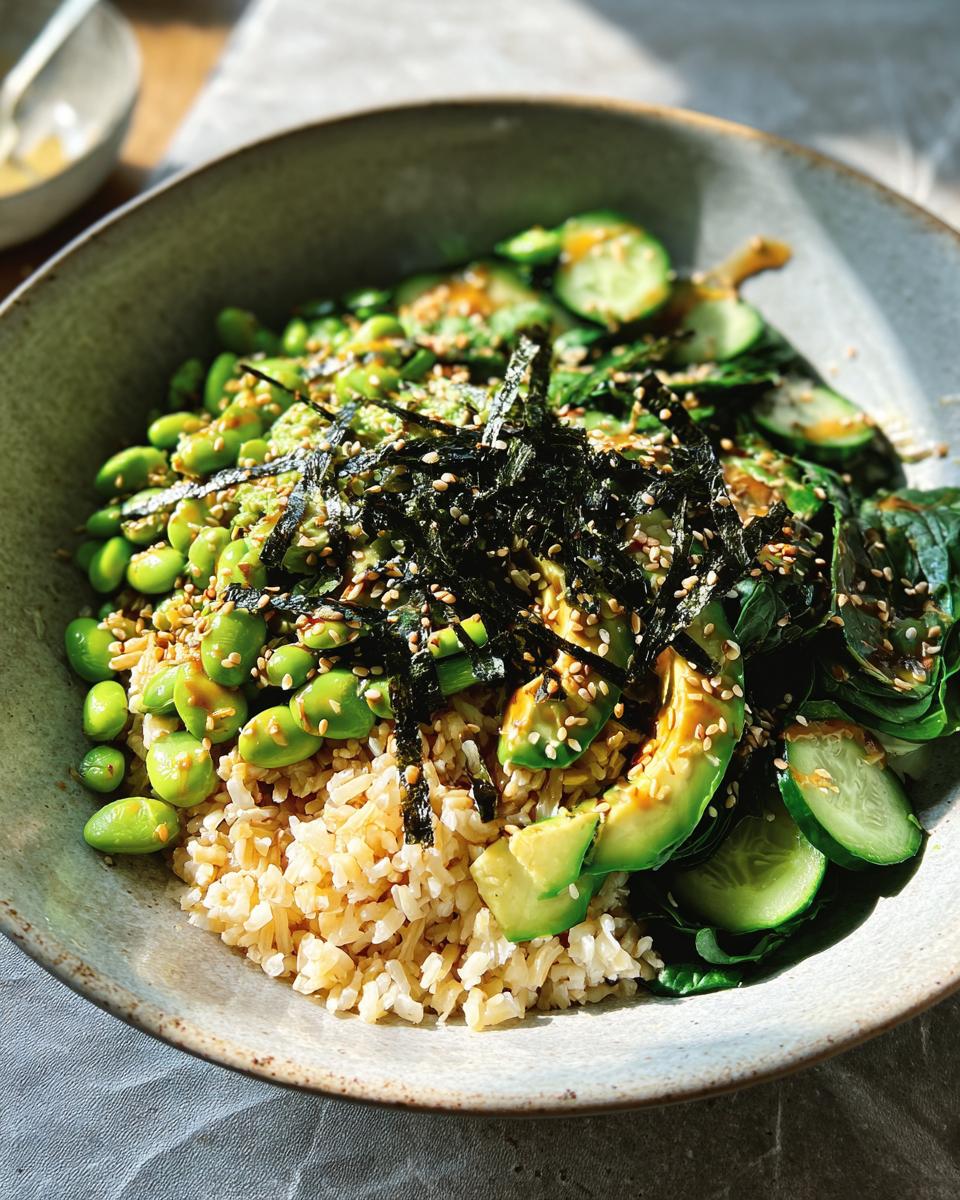
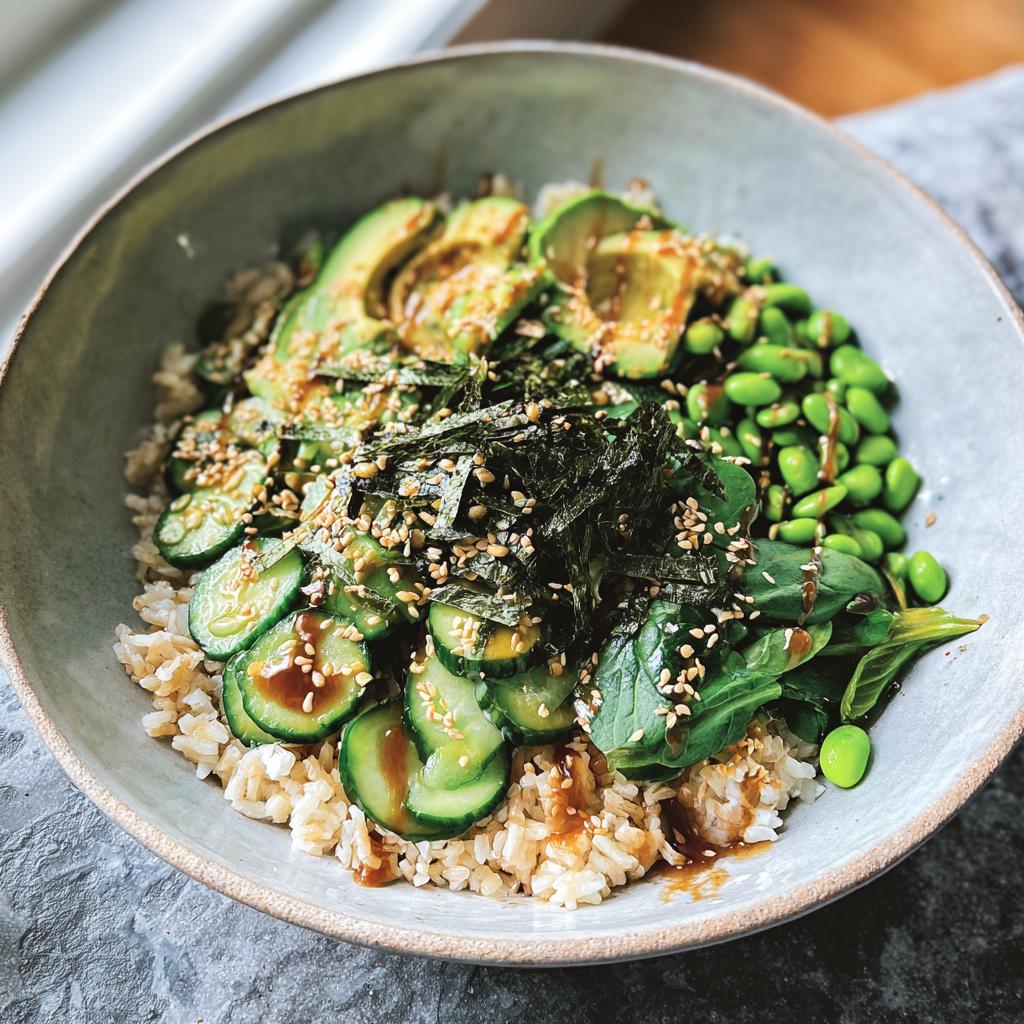
Time for the fun part – building your masterpiece! Start with a nice base of that fluffy brown rice in your bowl. Then, artfully arrange the edamame, those pretty cucumber slices, creamy avocado, and a little nest of fresh spinach. Drizzle it all with a good splash of olive oil and then generously pour over that yummy dressing you just made. It’s starting to look like a restaurant meal, right?
Tips for Success in Your Rice Bowl Journey
Alright, future rice bowl pro, let’s talk about making these bowls absolutely perfect every single time! As a nutrition strategist, I’ve learned a few tricks that make all the difference, especially when you’re just starting out. First off, ingredient freshness is key! Make sure your veggies are crisp and your avocado is perfectly ripe—it just tastes better, trust me. Don’t be afraid to get creative with your rice bowls; this is where the fun really begins! If you need some ideas for other delicious dinners, you might love this guide to dinner recipes or even this one on ground beef recipes. Remember, the goal is a happy, healthy meal that you genuinely enjoy making and eating. For more inspiration on amazing rice bowl ideas, check out what my friends are cooking up over here!
Customizing Your Rice Bowls: Beyond The Basics
Oh, the possibilities are ENDLESS when it comes to rice bowls! This basic recipe is just the jumping-off point. Want to make it even more delicious and healthy? Totally! For protein, try adding some seasoned tofu, grilled chicken, or even some shrimp. If you’re feeling a bit adventurous, whip up this amazing chickpea and spinach coconut curry to serve alongside your rice. You can also swap out the spinach for shredded carrots, bell peppers, or even some corn. And get this, wanting something different? Try these Greek chicken power bowls for a totally different flavor profile. The best part about these bowls is that they’re so forgiving and adaptable to whatever you have on hand. Happy experimenting!

Frequently Asked Questions About Beginner Rice Bowls
Got questions about diving into the world of rice bowls? That’s totally normal, and I’m here to help! Think of me as your friendly guide on this delicious journey. Here are a few things beginners often ask:
Can I use white rice instead of brown rice?
Absolutely! White rice works just fine if that’s what you have on hand or prefer. While brown rice has a bit more fiber, the important thing is having a cooked grain base for your bowl. Just make sure it’s cooked and cooled down a bit before you start assembling!
How long do rice bowls last in the fridge?
For the freshest taste, I like to enjoy my rice bowls the same day I make them. However, if you prep your ingredients separately, they can last for about 2-3 days when stored in airtight containers in the fridge. Just assemble them when you’re ready to eat to keep the textures nice and crisp!
What are some other protein options for rice bowls?
Oh, the protein possibilities are endless! Besides the edamame in this recipe, you could easily add cooked chicken (grilled or shredded), baked tofu, hard-boiled eggs, salmon, shrimp, or even some lean ground beef seasoned with soy sauce and ginger. Really, whatever protein your family loves will work!
Serving and Storing Your Delicious Rice Bowls
Alright, so you’ve made this incredible rice bowl – how do you make sure it’s the star of your dinner table and how do you handle leftovers? It’s super simple! For the best experience, serve these bowls as soon as they’re assembled. That way, everything stays nice and fresh, especially the crunchy cucumbers and creamy avocado. If you happen to have any extras, which is rare in my house!, you can store the components separately in airtight containers in the fridge for a day or two. Then, just assemble them again for lunch or another quick dinner. Need more quick dinner ideas? You’ll love this list of 15 healthy dinner ideas!
Estimated Nutritional Information
Just a heads-up, the nutrition details for these amazing rice bowls are estimates, and they can totally change depending on exactly what you toss in! Think of this as a ballpark figure to give you an idea. For one serving, you’re likely looking at around 450-550 calories, with about 15-20g of protein, 25-30g of healthy fats, and 40-50g of carbs. Pretty great for a quick, wholesome meal, right?
Beginner-Friendly Rice Bowls
Ingredients
Equipment
Method
- Toast the sesame seeds in a dry skillet over medium heat until fragrant, about 3-5 minutes. Set aside.
- Prepare the dressing: In a small bowl, whisk together the miso paste, toasted sesame oil, mirin, sugar, and toasted sesame seeds until smooth.
- Assemble the bowls: Divide the cooked brown rice among four bowls. Top with edamame beans, sliced cucumbers, sliced avocados, and baby spinach leaves.
- Drizzle with extra-virgin olive oil and the prepared sesame-miso dressing.
- Garnish with toasted sesame seeds, strips of nori seaweed, sea salt, and black pepper.
Notes
Tried this recipe?
Let us know how it was!
Certified Family Nutrition Strategist
My path into family nutrition began working with Phoenix Area Family Services, where I saw how traditional nutrition advice often ignored real-world constraints like budget limitations, time crunches, and kids who refuse to eat anything green. That experience sparked my mission to develop meal planning systems that work with family realities, not against them.
Over eight years, I’ve helped hundreds of families reduce grocery spending by 25% while dramatically improving their nutrition. My meal planning frameworks have been adopted by local wellness centers because they actually work for busy parents juggling different ages, preferences, and dietary needs in one household.
As a bilingual first-generation Mexican-American and mother of three, I personally navigate the daily challenge of feeding a family nutritiously while honoring cultural traditions and managing a household budget. My “kid-friendly low-carb” protocols show families how to gradually introduce healthier options without triggering mealtime battles or abandoning beloved family recipes.
My “realistic wellness” philosophy is straightforward: health improvements must work within existing family dynamics and financial realities to be truly sustainable. When I’m not developing meal planning systems, I’m creating portable trail snacks for our weekend family hiking adventures – because healthy eating should fuel the life you want to live.
My personal low-carb journey started after pregnancy as a way to regain energy for active parenting, and that experience continues to inform my professional commitment to making healthy eating feel supportive rather than burdensome for busy families.