

Oh, that smell! You know the one—that warm, sweet cloud of cinnamon and baked apples that just screams cozy autumn evenings? That’s the smell of pure memories, and I’m so happy to share my absolute favorite recipe for making it happen in your kitchen. Don’t let the name scare you; this **Classic Apple Crisp with Oat Crumble** is amazingly simple and tastes like a dessert that’s been perfected over decades. Trust me, when I was picking apples with my kiddos last fall, this dish wasn’t just dessert; it was a family project! As a Certified Family Nutrition Strategist, Maria Fernandez, I promise this recipe balances that comforting tradition with wholesome ingredients you can feel good about serving. It’s the perfect hug in a bowl!
Why You Will Love This Classic Apple Crisp with Oat Crumble
I’ve made a lot of desserts over the years, but this crisp always brings the family running to the kitchen. It’s just unbeatable comfort food. Here’s why I think you’re going to absolutely adore this apple crisp recipe:
- It’s incredibly forgiving! You don’t need fancy tools or perfect technique to succeed here.
- The oat crumble topping bakes up beautifully golden and crunchy every time—no soggy bottoms!
- It’s the ultimate warm fruit desserts because you can use whatever apples you have on hand.
- The filling is perfectly spiced with just the right amount of warmth from the cinnamon and nutmeg.
- It’s fast! You can have this ready for the oven in about 20 minutes, which is a miracle on a busy weeknight.
- It tastes like a hug from your favorite relative, pure nostalgia in every bite.
Equipment Needed for Your Classic Apple Crisp with Oat Crumble
Before we even grab the apples, let’s just make sure your kitchen is ready! Being prepared is half the battle, especially when you’ve got gooey apples that need containing. You don’t need a ton of fancy gadgets for this, which is why I love it so much. Here’s the short list of tools I always pull out for my Classic Apple Crisp with Oat Crumble:
- You need a good, sturdy 9×13-inch baking pan. If you don’t have that, a 3.5 or 4-quart baking dish will work perfectly fine too.
- A large bowl is essential for tossing all those apple chunks with the sugar and spices so they get fully coated.
- A medium bowl comes in handy strictly for mixing up that amazing oat crumble topping separately.
- You’ll want a pastry cutter, or if you’re feeling old school like my mom, just a regular old fork will do the trick to cut that cold butter into the dry ingredients.
- Finally, a wire rack is necessary for letting the crisp cool just a tiny bit so you don’t burn your mouth off!
Gathering Ingredients for the Perfect Classic Apple Crisp with Oat Crumble
Okay, let’s talk apples! Getting the right mix here is what makes this more than just mush in a pan. You need about 8 medium apples, and that should give you roughly 10 cups once they are peeled and ready to go into the dish. Remember, they need to be cut into uniform 1-inch chunks—about 1/4 to 1/2 inch thick is the sweet spot for cooking evenly. Toss those lovelies with your sugars, spices, and a little bit of flour to thicken the juices, and you’re set there. For the topping, the secret is keeping that butter ice cold and cubed up! If your butter is warm, you’ll just get a greasy mess instead of that beautiful, craggy oat crumble topping. Want to see more great ideas for this kind of baking comfort? You can peep over at Sally’s awesome apple crisp post for other ideas while you gather supplies!
For the Apple Filling
This is where the gooey base comes from. Make sure you give these ingredients a good, thorough toss in that big bowl!
- 8 medium apples, peeled and cut into 1-inch chunks (yields about 10 cups for the filling)
- 1/2 cup packed light or dark brown sugar (that’s 100g if you’re using the scale!)
- 1/4 cup all-purpose flour (31g is perfect if you level out your measuring cup!)
- 1 teaspoon pure vanilla extract—don’t skip this, it brightens everything up!
- 1 teaspoon ground cinnamon
- 1/2 teaspoon ground nutmeg
- 1/4 teaspoon salt
For the Oat Crumble Topping
This topping layer is crucial. I like to use dark brown sugar here for a deeper molasses flavor that really complements the apples. Remember: cold butter is your best friend!
- 3/4 cup all-purpose flour (about 94g, measured lightly)
- 3/4 cup packed light or dark brown sugar (150g goes a long way here!)
- 1 teaspoon ground cinnamon
- 1/2 cup unsalted butter, make sure it’s cold and cubed—no melting allowed! (8 Tbsp or 113g)
- 1 cup old-fashioned whole rolled oats (85g)
- Optional addition: A little drizzle of salted caramel and a scoop of vanilla ice cream pairings never hurt anyone!
Step-by-Step Instructions for the Classic Apple Crisp with Oat Crumble
This is where the magic happens, and honestly, it’s so straightforward you’ll wonder why you didn’t make this apple crisp recipe sooner! We take our time just enough to make sure the apples are happy and the topping is perfectly textured, ready to bake into something spectacular.
Preparing the Oven and Apple Layer
First things first: get that oven warming up to 350°F (177°C). That’s the happy temperature for baking this kind of dessert. While it heats up, take your large bowl—the one you used to measure the fruit—and toss all those prepped apples with the brown sugar, flour, vanilla, cinnamon, nutmeg, and salt. Make sure every single chunk gets coated! Then, just spread that lovely, spiced apple mixture right into your greased 9×13-inch baking pan. Smooth it out gently; you want an even layer for reliable baking.
Creating the Perfect Oat Crumble Topping
Now for the best part, the topping! Grab your medium bowl for this one. Whisk together the flour, brown sugar, and cinnamon first. Next, you need to ‘cut in’ that cold, cubed butter. Use your pastry cutter or just two forks and work quickly until the mixture looks super crumbly, like coarse, slightly damp sand. Don’t overwork it! Once you get that nice texture, stir in the whole rolled oats. Don’t mix them in too hard; we want them sitting right on top.
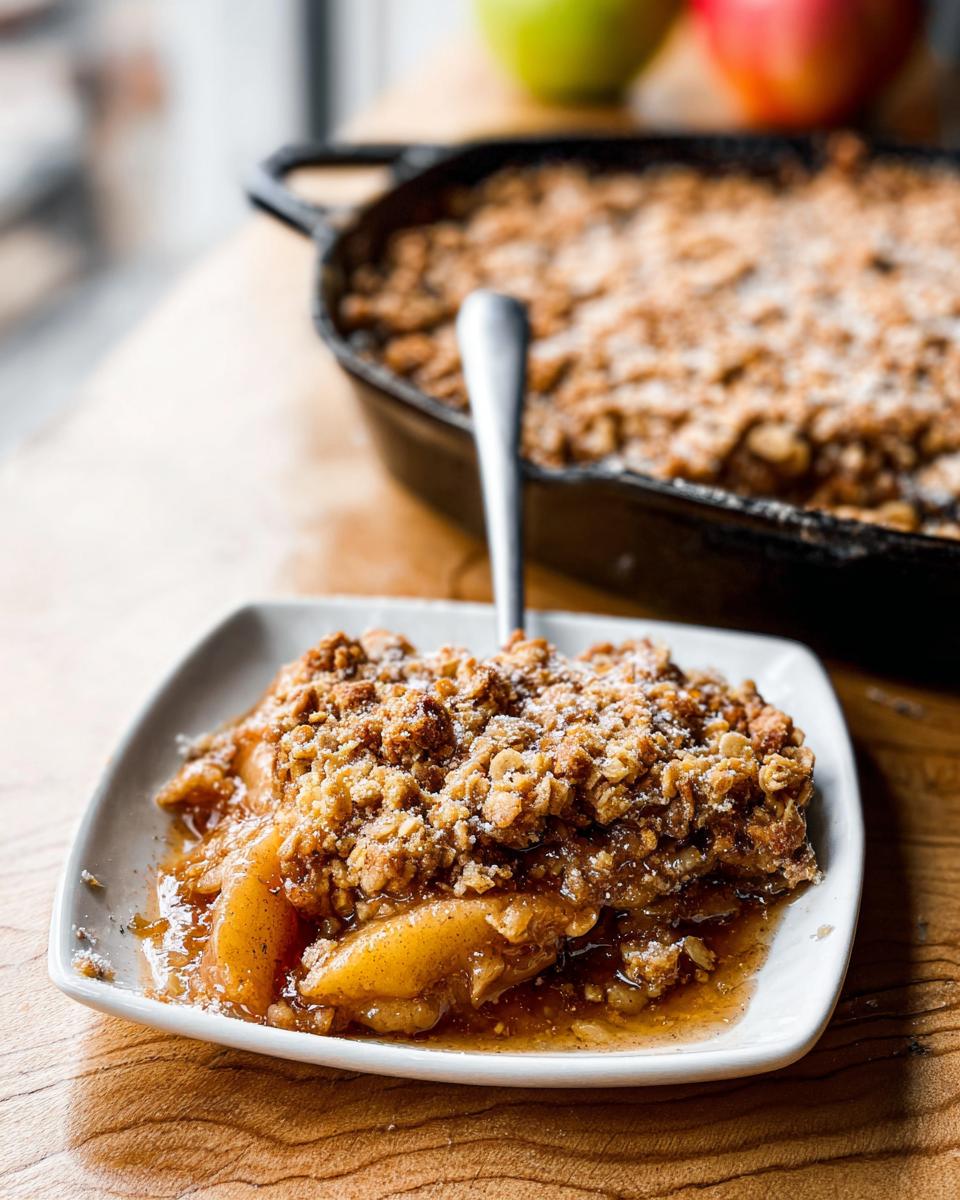
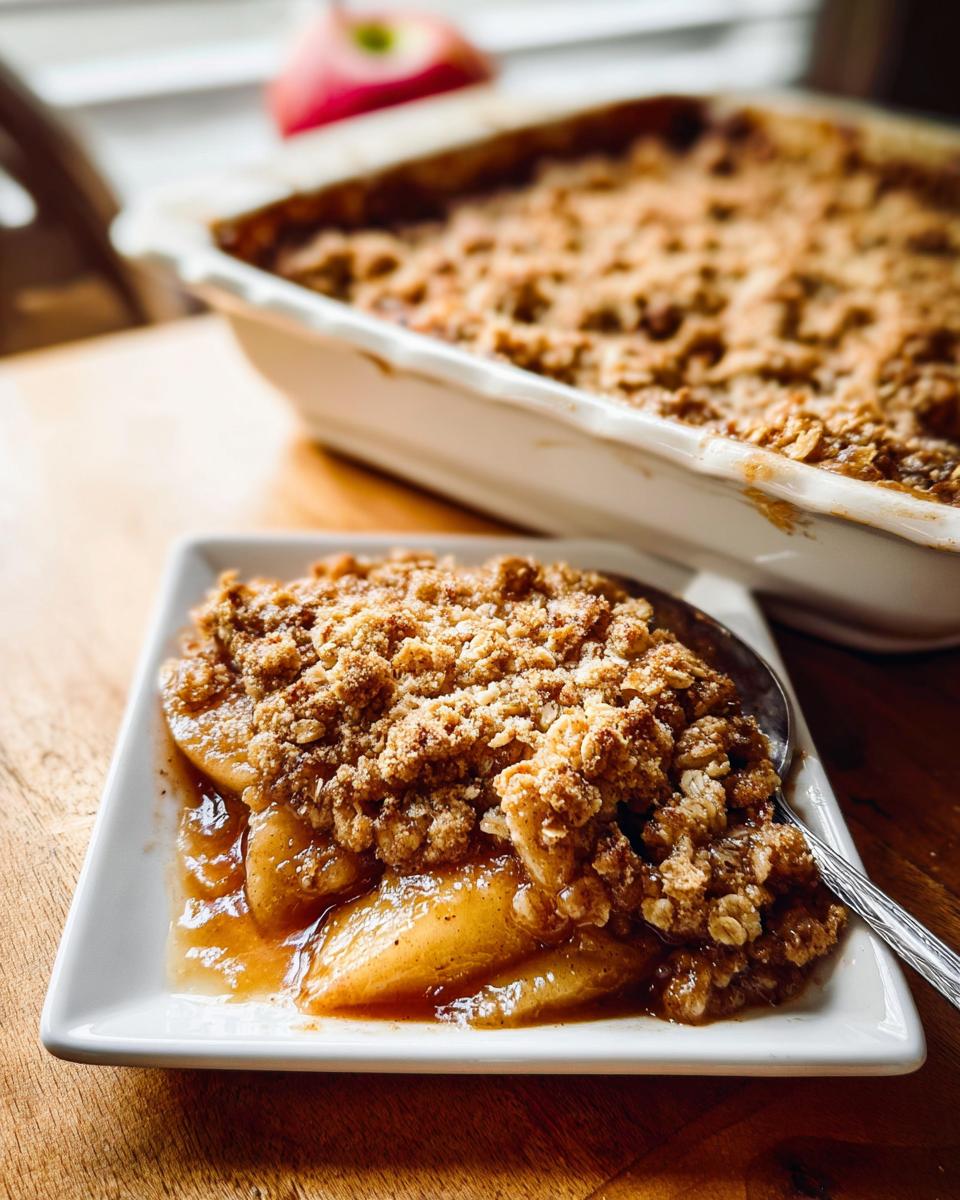
Baking and Resting the Classic Apple Crisp with Oat Crumble
Sprinkle that wonderful oat crumble topping evenly all over the apple layer. It should look generously covered! Pop the whole dish into the preheated oven, and set your timer for 45 minutes. You’ll know it’s done when that topping is totally golden brown, and you can see the sugary apple juices bubbling up happily around the edges. This is key: once you pull it out, let it rest on the wire rack for at least 5 minutes. This resting time lets those juices settle down just a bit so your first scoop isn’t a total soup explosion!
Tips for Success When Making Your Classic Apple Crisp with Oat Crumble
Even though this is a super easy recipe, there are just a few little secrets I’ve learned over the years to make sure nobody ends up with soupy apples or a melted, flat topping. These little things will really elevate your apple crisp recipe from good to absolutely unforgettable, I promise!
The Best Apples for This Crisp
My biggest tip on the apple front is to never, ever use just one kind! If you bake with all sweet apples, the result can be a little bland once everything cooks down. If you use all tart apples, well, it might make your cheeks pucker up! The solution is simple: mix them! I always use a combination of Granny Smith for that necessary tartness, paired with something sweeter and softer that breaks down nicely, like Honeycrisp or Fuji. Aim for about a 50/50 split. This balance gives you great flavor and the perfect chunky texture that holds up well under the heat.
Keeping That Topping Crumbly
This is the second most important rule after getting the apples right, especially if you want that beautiful crunchy oat crumble topping. The butter needs to be cold—and I mean *really* cold—from the fridge, cut into small cubes. When you start cutting that butter into the flour and sugar mix, you are trying to create little pockets of fat. When those pockets hit the hot oven, the butter melts, creating steam, which leaves behind those lovely crunchy, craggy pockets. If your butter warms up while you are mixing, use the freezer for five minutes! Seriously, do it. You want the mixture to definitely look like coarse crumbs, not a wet paste.

Preventing a Soggy Bottom Layer
Since we are dealing with so much fruit juice and moisture, preventing the bottom layer of apples from turning into soup is a big concern for home cooks. My trick, aside from making sure you use the right amount of flour in the filling, is simply giving the apples a little head start. If you look at the instructions, we mix everything and bake it at 350°F. If your apples seem extra juicy when you put them in the pan, try baking just the apple layer for about 10 minutes *before* you sprinkle on the crumble topping. Just pull it out, sprinkle the topping on, and return it to the oven for the remaining time. It helps seal the juices in slightly without burning the topping! Trust me, that little pre-bake step is a game-changer for beautiful, bubbling fruit underneath that perfect crunch.
Serving Suggestions for This Warm Fruit Dessert
The anticipation is over, and now you get to eat! This lovely dessert is best served when it’s still warm, which really brings out the spice notes in the apple filling. Forget being subtle here; the contrast between the warm fruit and a cold topping is what makes eating this dish feel like a huge treat. My family insists on a heaping scoop of good quality vanilla ice cream—the classic vanilla ice cream pairings just can’t be beaten! Sometimes we even drizzle a little bit of salted caramel sauce over the top of the melting ice cream. It turns a simple crisp into an actual event, guaranteed to make everyone happy!

Storage and Reheating Instructions for Leftover Classic Apple Crisp with Oat Crumble
The best part about making a big batch is having leftovers for a treat the next day! Seriously, this apple crisp recipe stays great for days. Cover your dish tightly with plastic wrap or foil—or if you already used foil on it, just make sure it’s sealed well. You can keep the leftovers safely stored in the refrigerator for up to 5 days. Don’t leave it on the counter, especially with all that fruit juice in there!
Now, reheating is important if you want that lovely crunch back. If you’re just grabbing a small serving, the microwave works fine, but it can make the oat crumble topping a little soft. For the best texture, put your piece in a toaster oven or a regular oven set to 325°F for about 10 minutes. That gentle heat warms the apples through and crisps up the top layer just like magic again!
Frequently Asked Questions About the Apple Crisp Recipe
I get so many questions whenever I post this recipe because everyone wants their Classic Apple Crisp with Oat Crumble to be absolutely perfect! It’s great that so many families are bringing this comforting dish back to their tables. Here are a few things folks ask me most often when they are planning their baking day.
Can I use different types of apples in this apple crisp recipe?
Oh, absolutely! That’s one of the best parts about making your own warm fruit desserts—you get to tailor the flavor exactly to your liking. My biggest piece of advice for any apple crisp recipe is to not stick to just one variety. If you use only sweet apples, the final result can taste a bit flat once it cooks down. If you go all tart, it can be too sharp for some people! I always tell everyone to aim for a 50/50 mix. Pairing a tart apple like Granny Smith with a sweeter, softer one like Honeycrisp or Gala gives you the best texture—the tart ones stay firm, and the sweeter ones melt just enough to create that gorgeous, thick syrup at the bottom.
How do I keep the oat crumble topping from getting soggy?
This is the million-dollar question for any crisp lover! Soggy topping is the enemy of a good bake. The secret really does come down to the butter temperature; I can’t stress this enough. You must use cold and cubed butter when you cut it into the flour and oats. If the butter is soft or melted, it just gets absorbed into the flour, creating an oily paste instead of those distinct little buttery crumbs. Those cold pieces of fat create steam pockets in the oven, which is what makes the topping light and crunchy. If your kitchen is warm, work fast, or pop that topping bowl in the freezer for five minutes before the final stir before it goes on the apples!
Is this dessert suitable for making ahead of time?
Yes, it is! This is a lifesaver for anyone juggling family schedules. You have two options here. You can totally assemble the entire thing—apples mixed, topping sprinkled—and cover it tightly. It will hold up perfectly fine in the fridge for a full day. When you’re ready to bake, you might need to add about 5 to 10 extra minutes to the baking time since it’s going in cold. If you’ve already baked it, though, it’s best served the same day. Reheating (as I mentioned earlier) works, but the topping just won’t have that fresh-out-of-the-oven crispness, no matter how hard you try!
Nutritional Estimates for Classic Apple Crisp with Oat Crumble
I always get questions about how this comforting dessert fits into a balanced family diet. Being a Certified Family Nutrition Strategist means I love a good treat, but I also like seeing what’s in the bowl! These numbers are based on dividing the whole recipe into 8 average servings, but remember, every apple in the recipe is slightly different, and how much butter clings to your fingers during the topping process can shift things around!
Please take these figures as a helpful guideline rather than a strict measurement. These estimates are calculated using standard pantry ingredients and don’t account for slight variations in apple size or sugar adherence. Think of this as a general snapshot of what you’re enjoying when you dig into this wonderful Classic Apple Crisp with Oat Crumble.
- Calories: Approximately 380 per serving
- Fat: Around 18g
- Protein: About 4g
- Carbohydrates: Roughly 54g
As you can see, it has a bit of substance, mostly coming from the oats and butter, making it a satisfying end to any meal. If you’re worried about the sugar content, my tip is to use just a little less brown sugar in the oat crumble topping—it almost always still comes out perfect!
Share Your Family’s Experience with This Classic Apple Crisp with Oat Crumble
Now that you’ve had a chance to bake up this fantastic, comforting dessert, I would just absolutely love to hear about it! There’s nothing better than knowing this Classic Apple Crisp with Oat Crumble is making memories in another family’s kitchen. Did your kids get their hands messy stirring the apples? I hope so!
Please take a moment to leave a star rating right here on the site—it helps other home cooks know this recipe is worth the effort. And if you have a moment, share your experience in the comments below. Did you stick to the classic scoop of vanilla ice cream, or did you try something totally different for your vanilla ice cream pairings?
I’m always reading those comments, and I cherish seeing how you’ve made this family tradition your very own. Happy baking, everyone!

Classic Apple Crisp with Oat Crumble
Ingredients
Equipment
Method
- Preheat your oven to 350°F (177°C). Lightly grease a 9×13-inch baking pan. Any 3.5-4-quart baking dish will work.
- Mix all of the filling ingredients together in a large bowl. Spread the apple mixture evenly into the prepared baking pan.
- Make the topping: Whisk the flour, brown sugar, and cinnamon together in a medium bowl. Cut in the cold butter using a pastry cutter or fork until the mixture becomes very crumbly. Stir in the oats. Sprinkle this topping evenly over the apple filling.
- Bake for 45 minutes, or until the topping is golden brown and the fruit juices are bubbling around the edges.
- Remove the crisp from the oven, place it on a wire rack, and allow it to cool for at least 5 minutes before serving. Serve warm, at room temperature, or cold, plain or with salted caramel and/or vanilla ice cream.
- Cover any leftovers and store them in the refrigerator for up to 5 days.
Notes
Tried this recipe?
Let us know how it was!
Certified Family Nutrition Strategist
My path into family nutrition began working with Phoenix Area Family Services, where I saw how traditional nutrition advice often ignored real-world constraints like budget limitations, time crunches, and kids who refuse to eat anything green. That experience sparked my mission to develop meal planning systems that work with family realities, not against them.
Over eight years, I’ve helped hundreds of families reduce grocery spending by 25% while dramatically improving their nutrition. My meal planning frameworks have been adopted by local wellness centers because they actually work for busy parents juggling different ages, preferences, and dietary needs in one household.
As a bilingual first-generation Mexican-American and mother of three, I personally navigate the daily challenge of feeding a family nutritiously while honoring cultural traditions and managing a household budget. My “kid-friendly low-carb” protocols show families how to gradually introduce healthier options without triggering mealtime battles or abandoning beloved family recipes.
My “realistic wellness” philosophy is straightforward: health improvements must work within existing family dynamics and financial realities to be truly sustainable. When I’m not developing meal planning systems, I’m creating portable trail snacks for our weekend family hiking adventures – because healthy eating should fuel the life you want to live.
My personal low-carb journey started after pregnancy as a way to regain energy for active parenting, and that experience continues to inform my professional commitment to making healthy eating feel supportive rather than burdensome for busy families.