

Oh my goodness, do you ever just have those days where only something ridiculously rich and comforting will fix everything? Me too! That’s exactly why I perfected these amazing Peanut Butter Chocolate Fudge Squares. They hit that sweet spot—totally decadent, perfectly bite-sized, and honestly, faster to make than brewing a pot of coffee. I remember making the first batch on a sweltering summer day for my friends; drawing on a little bit of my Lebanese-Italian heritage, I aimed for nostalgia you could eat. Everyone devoured them, amazed they weren’t heavy! I’m SIMO MIMO, Master of Global Fusion Innovation, and trust me, this little homemade candy idea is my secret weapon for quick satisfaction!
Why You Will Love These Peanut Butter Chocolate Fudge Squares
Honestly, you’re going to make these constantly! They’re the ultimate answer when that craving for something rich and chocolatey hits hard. Forget complicated baking; we’re talking less than 30 minutes total time here, which is wild for something this good.

- Super rich, satisfying, and perfectly sized for grabbing just one (or three!).
- They hold up wonderfully, making them ideal for packing up for school or parties.
- A fantastic blend of creamy peanut butter and dark chocolate goodness that everyone adores.
- They fit seamlessly into a conscious lifestyle—so delicious, yet so manageable!
These **Peanut Butter Chocolate Fudge Squares** are just pure joy in a tiny package.
Essential Ingredients for Perfect Peanut Butter Chocolate Fudge Squares
Okay, let’s talk ingredients! Listen, when you’re making something this simple, the quality of what you put in really, really shines through. I always tell everyone to grab their ingredients first and make sure they’re ready to go, especially regarding temperature. It makes the whole process so much smoother!
For the Peanut Butter Base
This is the creamy heart of our fudge, so we can’t be sloppy here. You absolutely need your butter and peanut butter to be at room temperature. If they’re cold, you’ll end up with lumpy fudge—we don’t want that mess! Make sure you’re using a standard smooth peanut butter (like Jif or Skippy) for that classic texture, not the natural kind that separates.
- Brown sugar: Make sure it’s packed down nice and tight in the measuring cup!
- Powdered sugar: Sift this if you can, just to avoid hitting any stray lumps the second you start mixing.
- Butter and smooth peanut butter: Room temperature is the non-negotiable secret here.
- Vanilla: Just a splash to boost that nutty flavor.
For the Chocolate Glaze
This layer sets up beautifully and gives us that lovely snap when you bite in. I prefer semisweet chocolate because it balances the extreme sweetness of the peanut butter layer underneath perfectly. Don’t skimp on the butter or corn syrup here; those give the glaze its incredible shine and smooth melt.
- Semisweet chocolate: Use good quality bars or chips—it makes a difference!
- Butter and corn syrup: These make the chocolate incredibly silky.
- Cream: Just a touch to thin it down to the perfect pourable consistency.
Step-by-Step Guide to Making Peanut Butter Chocolate Fudge Squares
Ready to roll? This whole process is a breeze and should only take you about 20 minutes total—seriously! We want to move quickly so the layers stay separate but everything sets up beautifully. Your goal is perfect **Peanut Butter Chocolate Fudge Squares** every time, and that starts with prep!
Preparing the Pan and Peanut Butter Swirl Base
First things first: grab that 8-inch square pan. I highly recommend lining it with parchment paper, leaving an overhang on two sides. It acts like a little sling, and trust me, you’ll thank me later when it’s time to lift this sticky wonderfulness out! Now for the base: whip those sugars, room-temp butter, vanilla, and peanut butter together in a big bowl. It won’t look like smooth frosting; it’ll be a bit crumbly, which is exactly what we want. Just press that firmly and evenly into your prepared pan. Pop it in the fridge while you deal with the topping.
Crafting the Smooth Chocolate Glaze
Time for the melt! You can use your microwave for the semisweet chocolate, butter, and corn syrup, but watch it closely so it doesn’t seize up. Heat in short bursts, stirring until it’s mostly melted, then keep stirring until it’s totally smooth. The absolute key to this shiny chocolate topping for your **Peanut Butter Chocolate Fudge Squares** is adding that cream last. Whisk it in gently; that’s what turns gloppy melted chocolate into a luxurious, pourable glaze. Quick, quick!
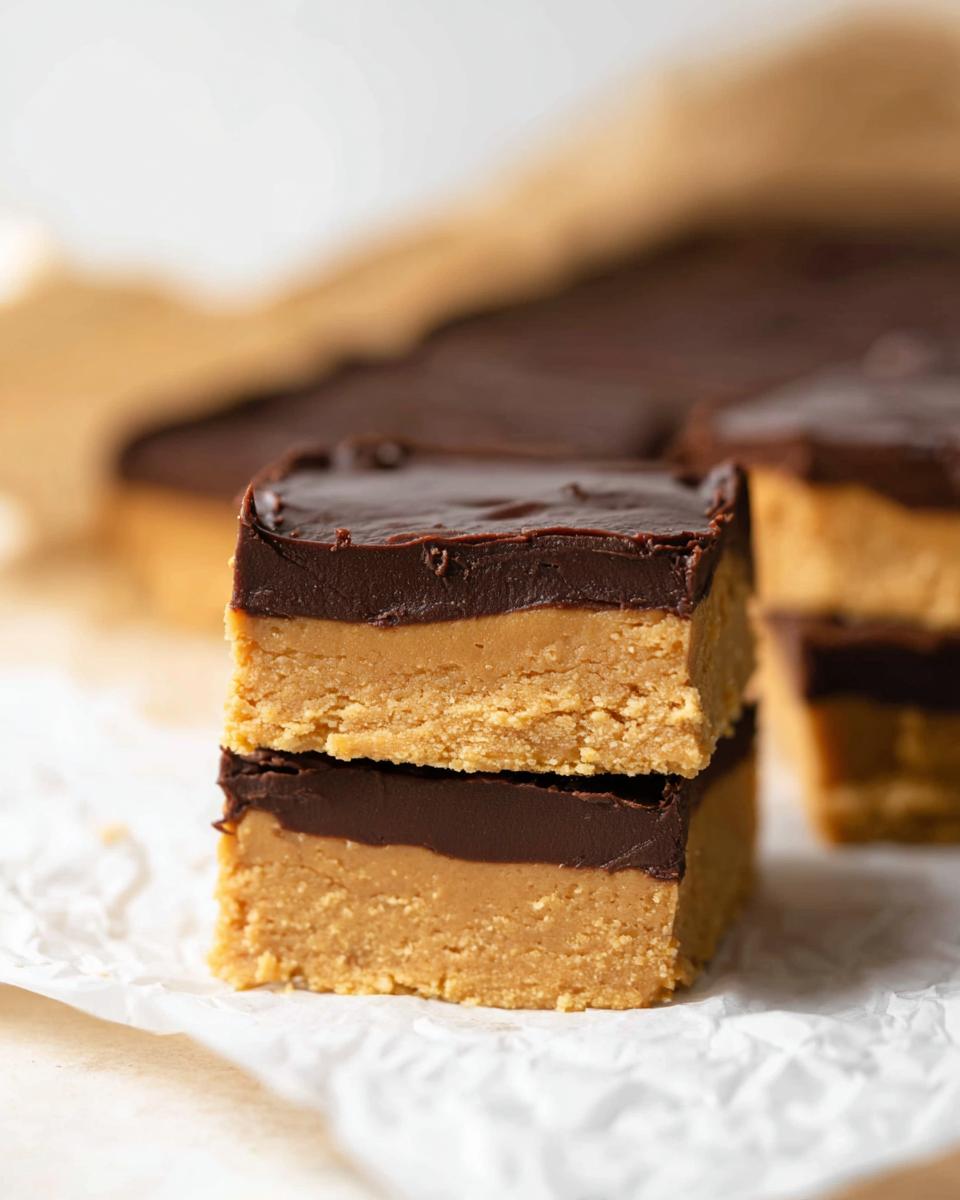
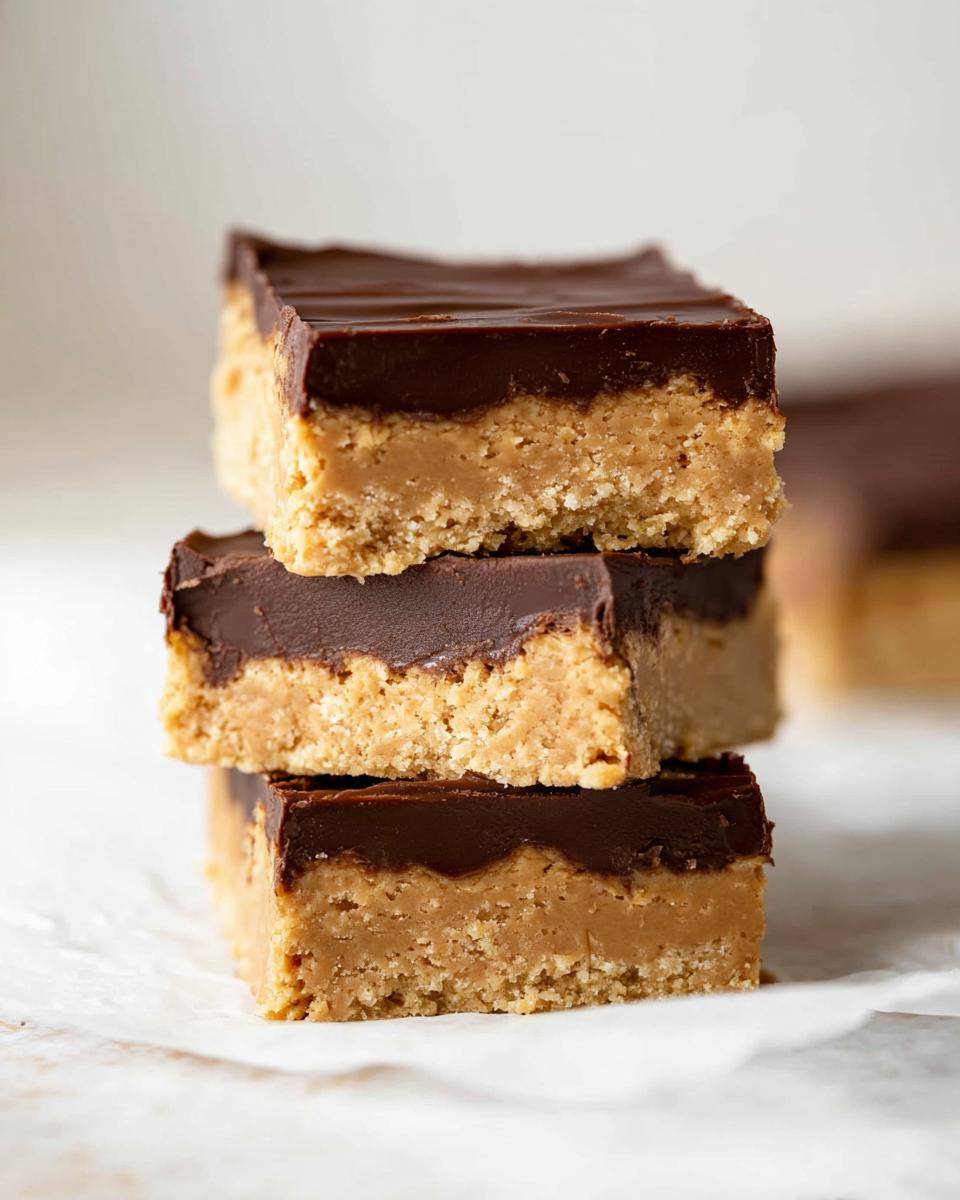
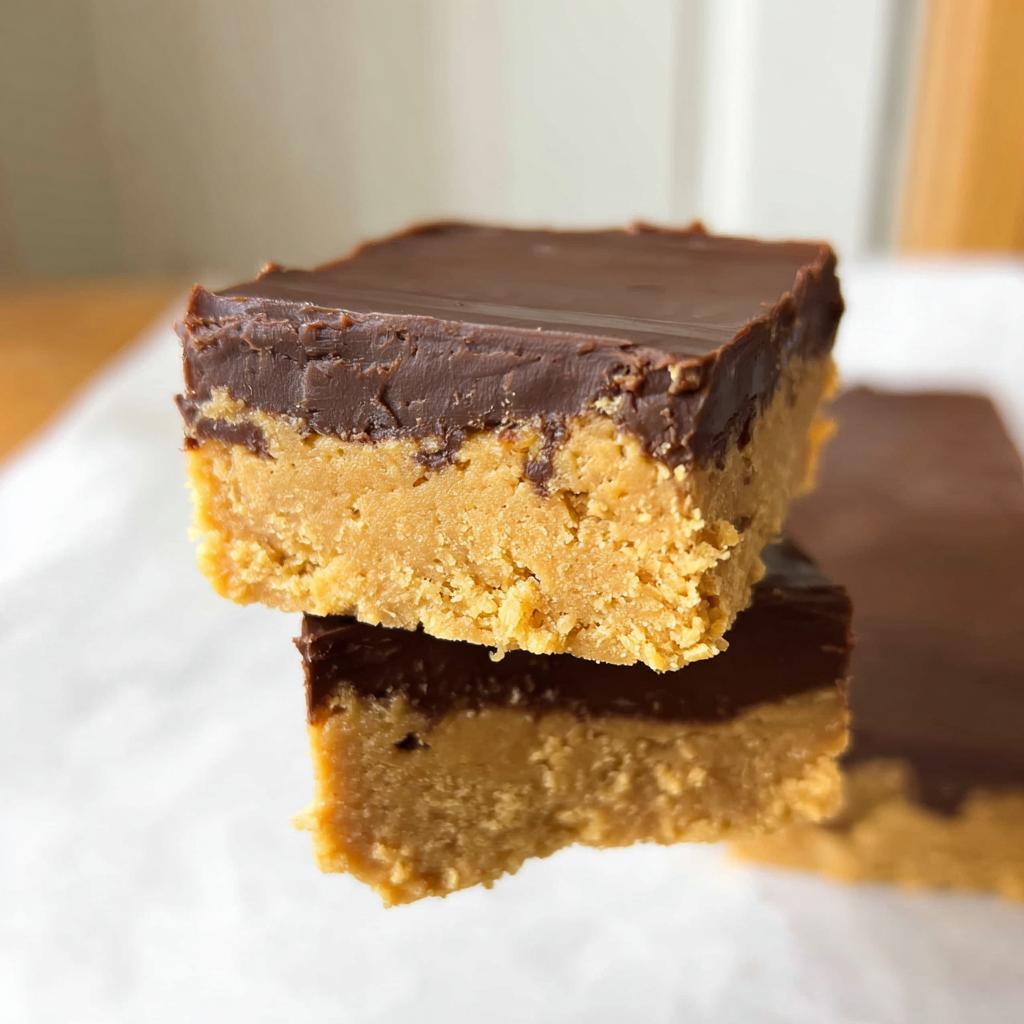
Assembling and Cutting Your Rich Bite Sized Desserts
Take your chilled peanut butter base out of the fridge. Pour that dreamy chocolate glaze right over the top. Use an offset spatula—or just the back of a spoon if you don’t have one—to gently coax the chocolate right to the edges. Once it’s perfectly even, back into the fridge it goes. It needs to firm up—give it at least 30 minutes, maybe two hours for the best results. When it’s rock-solid, pull it out using those parchment slings. Then, grab a sharp, large knife and slice it into satisfying 1-inch pieces. Clean cuts are easier if you wipe the knife between slices!
If you want more pointers on keeping your fudge perfect, check out my detailed baking tips!
Tips for Success with Your Peanut Butter Chocolate Fudge Squares
If you want these **Peanut Butter Chocolate Fudge Squares** to reach their absolute legendary status, temperature is your best friend. Seriously, I cannot stress this enough: make sure your butter and peanut butter for the base are truly at room temperature. If you try to mix cold butter, the sugars won’t cream right, and you’ll end up fighting stubborn clumps instead of mixing a silky base.
Also, a quick note on nut butters! While I love natural peanut butter for sandwiches, it often has too much oil for this recipe. Stick to the standard processed kind for the best structure. If you are determined to try a peanut butter swirl effect, wait until the chocolate glaze is semi-set, then drizzle a little extra melted peanut butter on top and lightly drag a toothpick through it. It works wonders!
For more insights that will elevate all your baking projects, take a peek at my general baking essentials guide!
Variations for Peanut Butter Chocolate Fudge Squares
Part of the fun of making treats like these **Peanut Butter Chocolate Fudge Squares** is playing around a little bit! Since the process is so simple, you can whip up a batch of the base and then customize the topping totally differently for next time. It lets you keep things exciting in the kitchen, right?
If you happen to run out of peanut butter—or if you just feel like mixing things up—don’t sweat it! These fudge squares are surprisingly forgiving with different spreads. You could swap out that cup of peanut butter for creamy almond butter; the flavor profile becomes a little earthier, but the texture stays fantastic. Cashew butter is another yummy choice if you have some lying around!
The easiest area to play is definitely the chocolate glaze. If you’re feeling super decadent, melt down half semisweet and half milk chocolate chips together. Wow, that makes the whole topping taste richer and way sweeter. Or, if you want to get totally wild—and I mean *wild*—once the glaze is slightly set, dust the whole top with a little flaky sea salt. That salt cuts through the richness of the **Peanut Butter Chocolate Fudge Squares** so beautifully. It’s such a simple addition, but it makes them taste like they came from a fancy candy shop!
Storage and Reheating Instructions for Homemade Candy Ideas
Okay, so you’re going to have leftovers—if your friends don’t devour them first! The great news about these Peanut Butter Chocolate Fudge Squares is that they are candy, not cake, so they hang around forever. I always keep mine right in the fridge in a good airtight container. They stay perfect for several weeks that way, which is fantastic!
Unlike cake, you almost never want to reheat fudge. In fact, I think they taste best slightly chilled! If they sit out on the counter for, say, 20 minutes before serving, that gives the chocolate glaze that perfect little snap without making the peanut butter layer too soft. Enjoy those rich bite sized desserts!
Frequently Asked Questions About This Chocolate Fudge Recipe
It happens every time! People try out one of my favorite chocolate fudge recipe variations, and they always have a couple of questions pop up while they’re whipping it together. That’s totally normal, especially when you are aiming for that perfect, clean presentation or need to make a quick substitution!
Can I make this recipe without chilling the base first?
Oh boy, please don’t! That chilling step is your insurance policy. The peanut butter base is pretty soft since we’re using room temperature ingredients. If you dump hot, freshly melted chocolate glaze onto a soft base, they will immediately start merging, and you won’t get those distinct layers. You’ll end up with a swirly mess instead of distinct homemade candy ideas! Give that base 30 minutes in the fridge so it firms up and locks into place before you pour the topping over.
What is the best way to get a clean peanut butter swirl?
This particular design is meant to be two distinct, beautiful layers—a fudge skyscraper! So, if you are aiming for a clean look, keep it layered! If you’re dead-set on getting a beautiful peanut butter swirl throughout, you need to work when the layers are partially set. While the top chocolate is just starting to firm up (maybe 15 minutes in the fridge), drizzle a little extra melted peanut butter (straight from the jar, no mixing needed) on top, and gently drag a toothpick through it just once or twice. Don’t overdo it, or you’ll just smear the top layer!

Are these Peanut Butter Chocolate Fudge Squares suitable for low-carb diets?
That is such a great question, especially since these are such rich bite sized desserts! As written, this recipe uses standard brown sugar and powdered sugar, so it definitely won’t fit a strict low-carb plan. However, the structure relies on the bulk of those two sugars, so substitutions need to be made carefully. If you’re dedicated to keeping it low-carb, you absolutely need to swap out the brown and powdered sugar for your favorite keto-friendly alternatives like erythritol or monk fruit blends that measure 1:1 for texture. Remember, the notes mention flexibility with nut butters; sweeteners are the next area to get creative with!
Nutritional Information Estimate for Peanut Butter Chocolate Fudge Squares
Now, I know some of you wonderful bakers are watching your macros, just like I often do! Since these are such delicious, rich bite sized desserts, I always want to be upfront about what’s in them. The numbers below are just my best guess, based on using standard pantry ingredients for 16 squares. Remember, if you start swapping out sugar for alternative sweeteners, those carb counts will change, of course!
For a single serving of my classic Peanut Butter Chocolate Fudge Squares, you are looking at approximately:
- Calories: 200
- Fat: 12g
- Carbohydrates: 22g
- Protein: 4g
- Sugar: 18g
It’s always a good idea to double-check if you make big changes to my recipe, but for indulging in this fantastic chocolate fudge recipe, those numbers are pretty manageable, don’t you think? For more inspiration on sweet treats, you can check out some notes over here too, like at this vintage recipe reference.
Share Your Delicious Peanut Butter Chocolate Fudge Squares Creations
I absolutely love hearing from you when you make my recipes! Baking is always better when shared, right? I put my heart into these **Peanut Butter Chocolate Fudge Squares**, and seeing them pop up in your kitchens is the best encouragement a baker could ask for.
When you give this recipe a try, please don’t be shy! Head down to the comments section below and let me know what you thought. Were you able to get those clean cuts? Did your friends love them as much as mine?
If you snap a picture of your beautiful, shiny fudge—especially those rich bite sized desserts—tag me on social media! I want to see your creations and share them with the rest of our cooking community. It’s so fun seeing how my little twists on classic homemade candy ideas end up on your tables. Happy baking, friends!
Peanut Butter Chocolate Fudge Squares
Ingredients
Equipment
Method
- Grease an 8-inch square baking pan, or line it with parchment paper on the bottom and two sides for easy removal later.
- In a large bowl, beat the powdered sugar, brown sugar, butter, vanilla, and peanut butter together until the mixture is fully combined and slightly crumbly.
- Press the peanut butter mixture evenly into the prepared pan.
- Refrigerate the base while you prepare the chocolate glaze.
- Melt the chocolate, butter, and corn syrup together in the microwave or a double boiler. Mix until smooth.
- Add the cream to the melted chocolate mixture and mix with a whisk or spatula until the glaze is completely smooth and shiny.
- Pour the chocolate glaze over the peanut butter layer and spread it evenly using an offset spatula or spoon.
- Refrigerate the fudge until it is firm, which may take 30 minutes to a couple of hours.
- Run a smooth-bladed knife along the pan sides to loosen the fudge. Lift the entire block out using the parchment paper overhang.
- Place the fudge on a flat surface and cut it into 1-inch squares, triangles, or rectangles using a sharp knife.
Nutrition
Notes
Tried this recipe?
Let us know how it was!
Master of Global Fusion Innovation
My culinary adventure reflects my Lebanese-Italian heritage and a decade spent in the dynamic fusion restaurant scenes of Miami and Barcelona. I’ve made it my mission to prove that beloved global comfort foods can be successfully adapted for low-carb living without losing their soul, their cultural authenticity, or their ability to comfort.
With advanced training in molecular gastronomy and experience spanning Mediterranean, Middle Eastern, and Latin American traditions, I’ve developed what I call “respectful innovation” – culinary creativity that honors traditional cooking wisdom rather than replacing it. My alternative ingredient substitution systems are now taught in specialty diet cooking schools throughout the region.
Drawing from my trilingual upbringing, I understand how deeply food connects to identity and memory. That’s why my flavor-bridging techniques allow classic dishes from around the world to maintain their comforting, familiar qualities while meeting contemporary nutritional standards. I regularly share these techniques at international culinary symposiums and innovation events.
When I’m not experimenting in my Miami fusion kitchen laboratory, you’ll find me at local salsa dance venues – the rhythm and improvisation skills translate directly to my creative cooking process! My role as a foster parent to rescue rabbits has unexpectedly inspired some of my most creative plant-based low-carb innovations.
My personal low-carb journey began as a way to maintain energy for my active lifestyle, but it’s evolved into a professional mission of proving that healthy eating can be globally adventurous rather than restrictively limiting. Every recipe I create is a passport to culinary adventure, transforming kitchens into laboratories for exploring healthy versions of the world’s most beloved comfort foods.