
Oh, doesn’t the thought of those fast-food favorites just bring you right back? I still remember rushing home after school, my siblings and I practically fighting over the last cheesy, delicious Mexican Pizza. That flavor is just pure nostalgia, isn’t it? Well, guess what? You can capture that feeling right now because I’m sharing my absolute favorite recipe for the Mexican Pizza (Taco Bell Copycat Recipe). Trust me, making this healthier, from-scratch version is half the fun! It’s so simple, and when I took that first bite, it was like being ten years old again. Cooking it myself gives me such pride because it tastes just as magical, but I know exactly what went into those perfect layers. You can see the full recipe details here: check out the recipe.
Why You Will Love This Mexican Pizza (Taco Bell Copycat Recipe)
I know you’re busy, so let’s get straight to why this Mexican Pizza copycat is about to become your new weeknight champion. It ticks every single box for a perfect fun family meal without requiring you to stand over the stove for hours. Seriously, cleanup is a breeze too!
- It’s lightning fast! We’re talking 30 minutes total time, which is faster than waiting for delivery, believe it or not.
- The assembly is so easy, the kids want to help layer everything, which is always a win in my book. It’s a great activity for a taco bell style dinner night.
- You’re in total control! You decide how much seasoning goes in, how cheesy it gets, and you can use leaner meat or even slip in veggies without anyone noticing.
- That crispy, layered taco crust texture? We nail it every time, whether you use the air fryer or the oven. No soggy bottoms here!
Essential Ingredients for the Mexican Pizza (Taco Bell Copycat Recipe)
Okay, listing out ingredients is my favorite part because it shows you exactly how simple this whole thing is! We aren’t dealing with forty fancy jars here. It’s all about layering a few key things perfectly. Think of it like building a little cheesy, savory tower. I’ve broken it down into the sections so you know what goes where when you start assembling your masterpiece.
For the Layered Taco Crusts
We need eight tortillas total to make four layered pizzas—two for the bottom and two for the top of each little guy. I always spring for the plain flour tortillas because they get that perfect slightly chewy, slightly crispy edge when they bake up. You’ll need eight of those to start your layered taco crust!
For the Seasoned Beef Filling
This is where we get that classic, savory punch. You’ll start with one pound of ground beef, which you’ll brown up until it looks done. Then, the real flavor comes in: mix in about two tablespoons of taco seasoning and a quarter cup of water, just like you would for standard tacos. But here’s the secret sauce twist for the pizza filling? We also stir in four tablespoons of enchilada sauce right into the meat mixture. It just gives the beef an extra layer of richness that cuts through the cheese beautifully.
For Assembly and Topping the Mexican Pizza (Taco Bell Copycat Recipe)
For the actual structure, grab about eight ounces of refried beans—that’s usually about half a standard can, perfect for spreading a thin layer. You need cheese for both inside and out! For the interior layers, grab about a half cup of your favorite blend—I find that mixing cheddar and mozzarella gives me the best melt. And here’s something important for that top layer: you need another four tablespoons of enchilada sauce to spread over the top tortilla before you lay on the final half cup of cheese.
Optional Garnishes for Serving
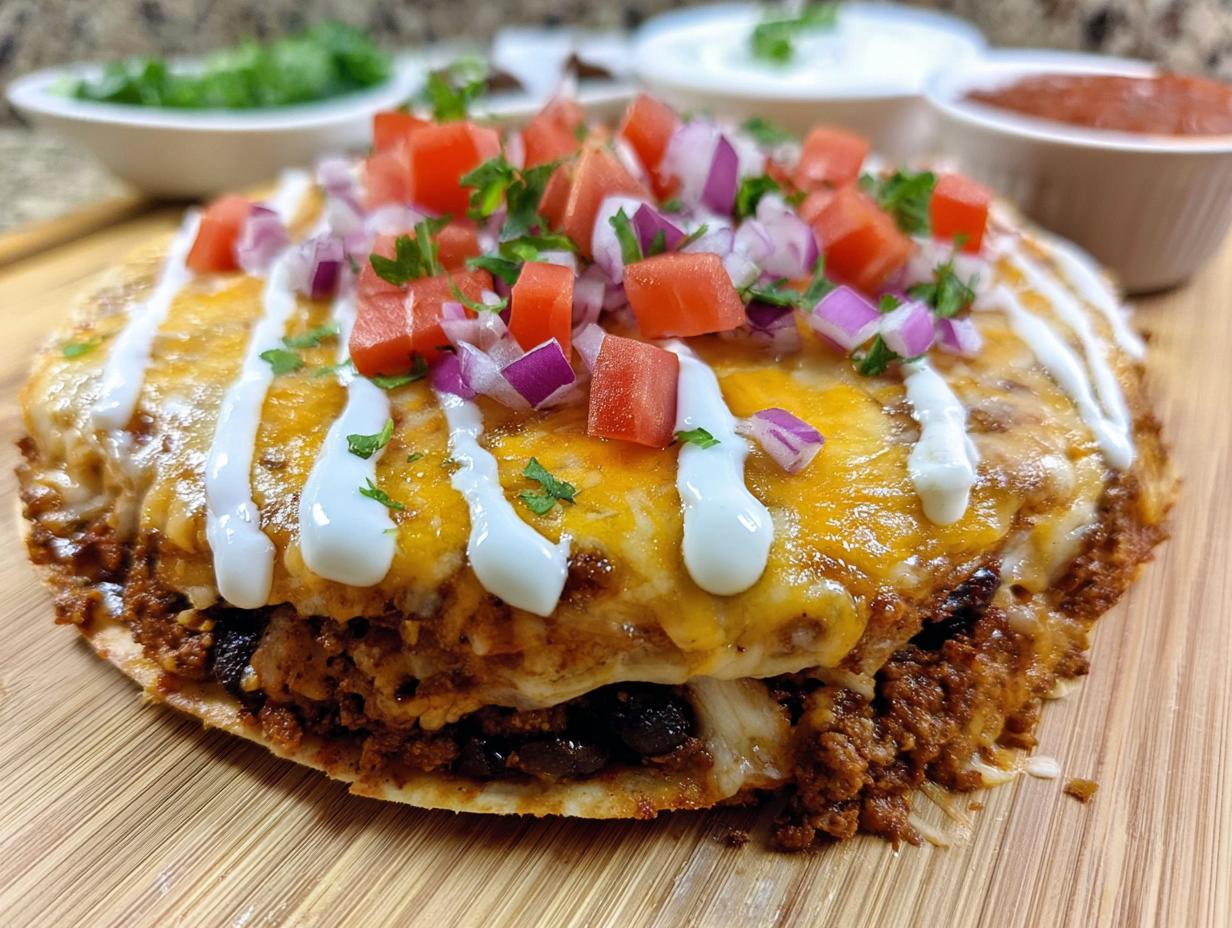
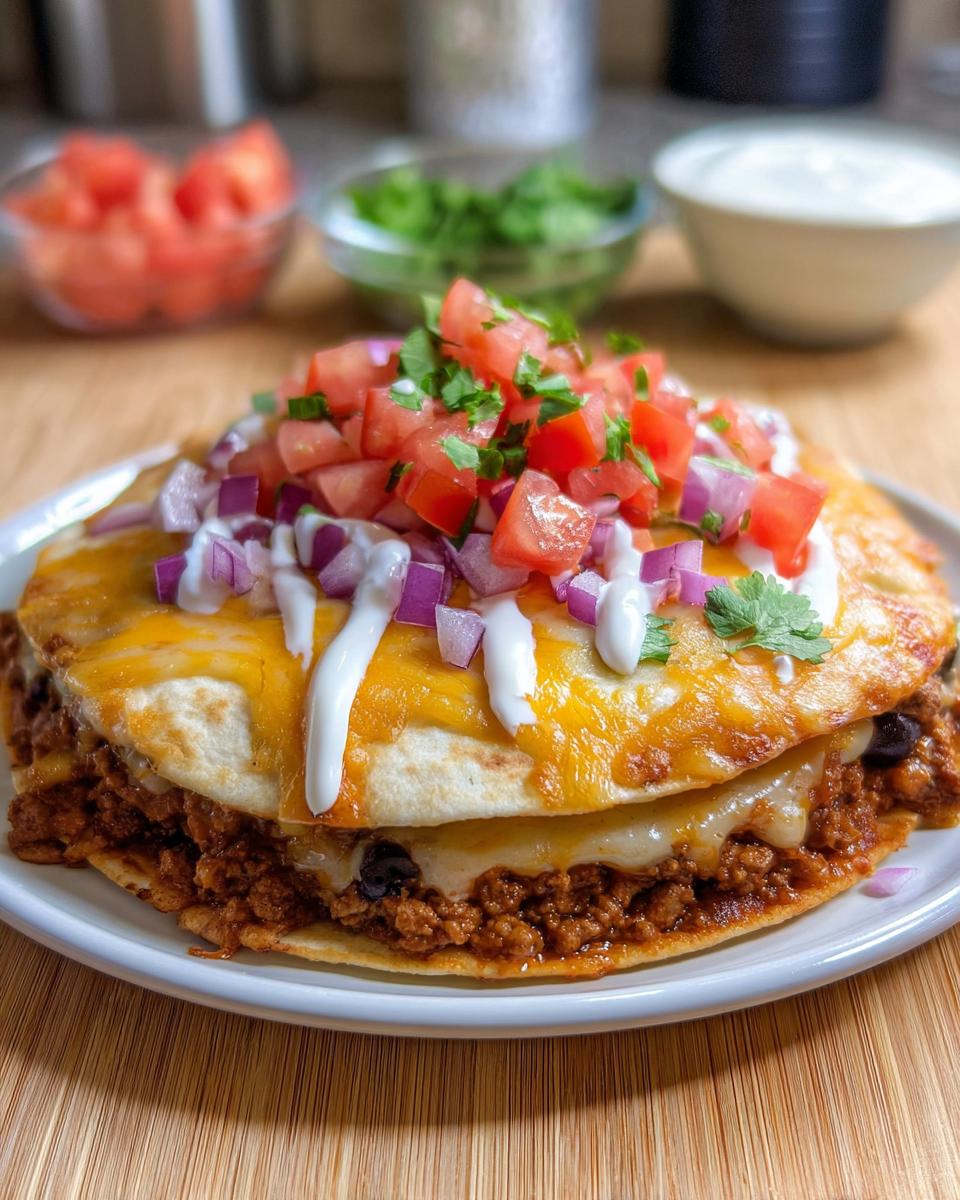
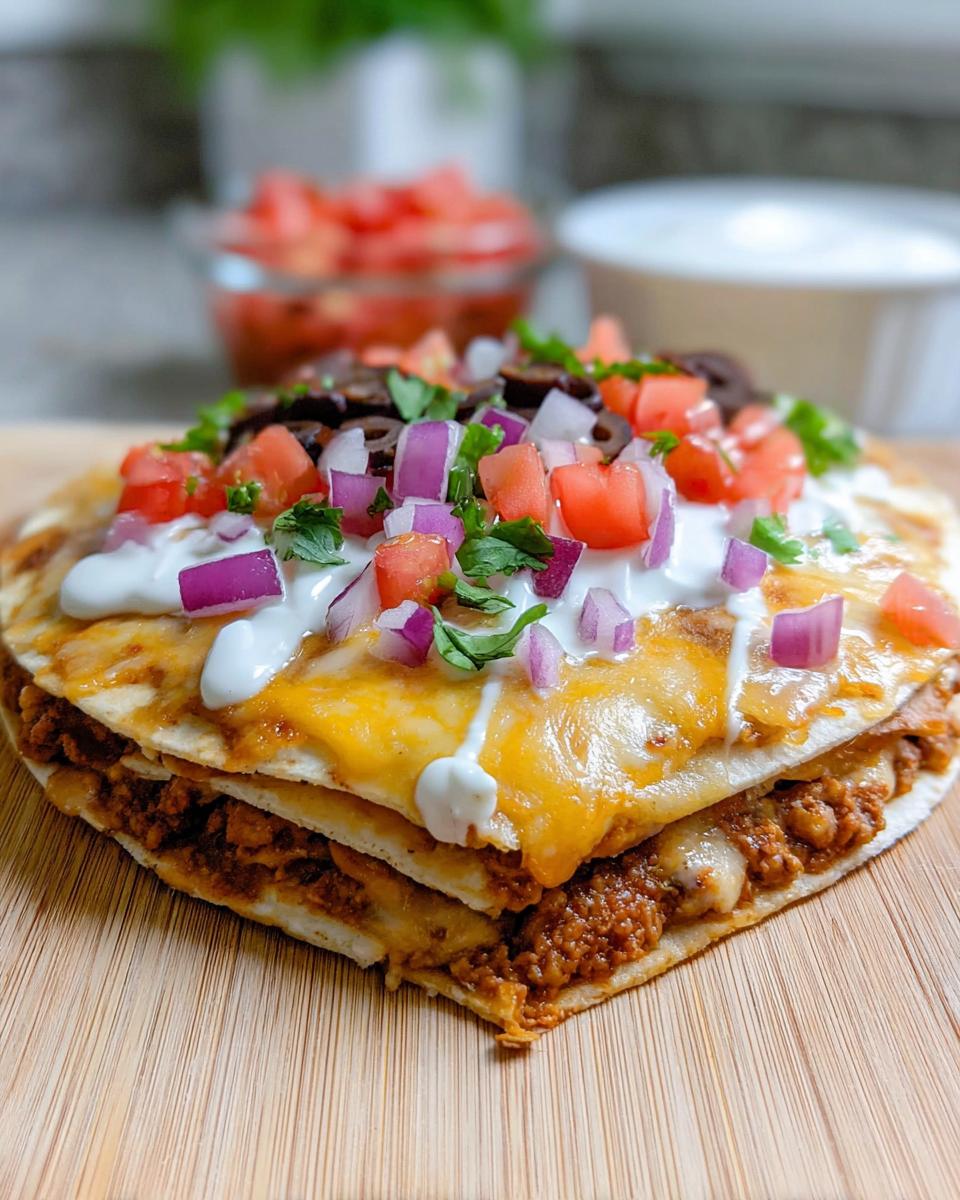
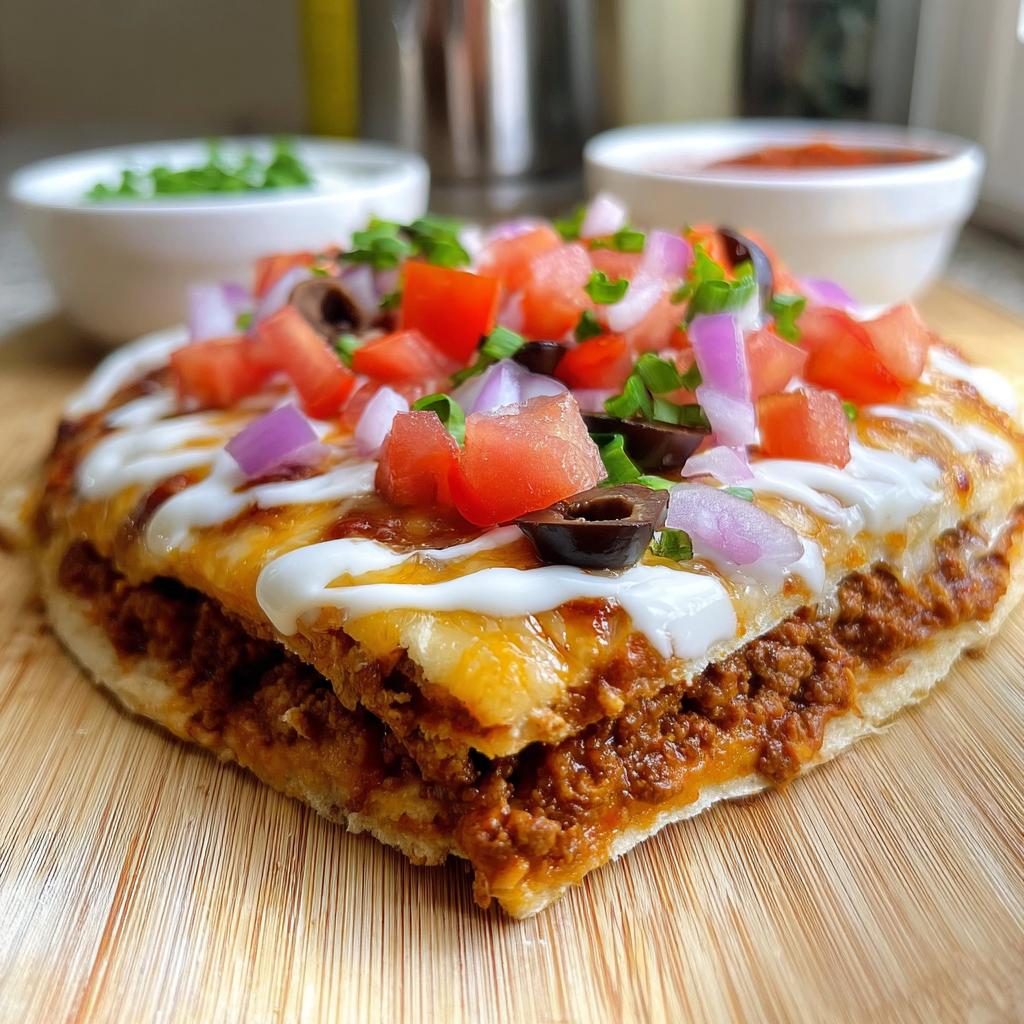
This is where you make it your own, though I argue that without these, it’s just a flat taco! For the diced tomato, make sure you scoop out the watery seeds so you don’t accidentally make your pizza soggy—that’s a huge no-no. You’ll also want a small diced red onion, a handful of black olives, and, of course, a dollop of cool sour cream and some finely diced green onions for a nice pop of color!

Expert Tips for Perfecting Your Mexican Pizza (Taco Bell Copycat Recipe)
Honestly, knowing the basic steps is great, but when you want that real, authentic copycat experience—the one that snaps just right when you bite into it—you need a few little tricks up your sleeve. I’ve messed up enough of these over the years to figure out what works and what turns your dinner into a sad, floppy mess. Since we are making this Mexican Pizza copycat ourselves, we get to be the pros here!
First off, let’s talk grease management. When you’re browning that ground beef, don’t feel rushed. Get it cooked completely, and then drain off every last bit of fat you can. I usually tilt the pan right over the sink after cooking and use a paper towel to carefully dab the beef in the pan. Nobody wants an oily, soggy bottom layer, trust me. That fat sinks right into the tortilla and ruins our crispy goal!
If you want amazing flavor control, I highly recommend skipping the packet seasoning entirely and whipping up your own blend. It’s so easy, and you control the salt! You can check out my favorite super simple guide on homemade taco seasoning if you haven’t already. It makes a huge difference in the richness of the meat.
Achieving the Ideal Layered Taco Crust Texture
The absolute key to making this feel like a true taco bell style dinner is getting those tortillas just perfectly crisp. You have three cooking options, remember? Whether you’re air frying, baking, or pan-frying, the enemy is moisture. That means we have to be mindful of how much we pile on before the heat hits.
When you spread those refried beans, aim for a really thin, even coat across the entire surface of the bottom tortilla. If you make the bean layer too thick, those lower tortillas soak up the moisture and they just won’t crisp up, no matter what cooking method you choose! Keep the layers light and even right up until you’re ready to put them in the heat source. A thin layer of beans means a happy, crispy base layer!
Step-by-Step Instructions to Make the Mexican Pizza (Taco Bell Copycat Recipe)
Alright, let’s get these beauties assembled! This process moves super fast once you have your components ready, so have everything lined up. We are basically making four little layered sandwiches that we are going to crisp up until they are perfect. Remember, we cook them *after* assembly. This is where the magic happens!
Preparing the Seasoned Beef Filling
First things first, grab that large frying pan and get the ground beef cooking over medium heat. You need to use whatever tool you have to break that meat up into nice small crumbles—don’t leave big clumps! Let it cook for about five to eight minutes until there’s no pink left. Drain off all that grease; we talked about this! Once it’s drained, toss in your taco seasoning, the quarter cup of water, and those key four tablespoons of enchilada sauce. Stir it all together and let it simmer gently for just a minute or two so the flavors can marry. Set that aside to cool just a tiny bit while we layer.
Assembling the Four-Layer Mexican Pizza (Taco Bell Copycat Recipe)
Now, grab your first tortilla. Spread a thin, even layer of refried beans across the whole thing. Next, scoop on some of your seasoned beef mixture. Don’t overload it! Then generously sprinkle some of your interior cheese blend over the beef. Now, gently place the second tortilla right on top of that cheese layer. That’s one half done!
Flip this whole layered disk over. On the top tortilla, spread exactly one tablespoon of the topping enchilada sauce evenly across it. Finish this by covering it completely with your final sprinkle of shredded cheese. Repeat this whole process for the remaining three Mexican Pizzas. You should have four fully assembled disks ready for cooking!

Cooking Methods: Air Fryer, Oven, or Stovetop
This is the fun part because you get to choose your own adventure! If you’re using your air fryer—which I sometimes love for extra crispiness, check out my air fryer tips if you’re new to it—preheat it to 400°F. Work in small batches, place the pizza inside carefully, and cook for about five minutes until that cheese is melted and bubbly.
If you prefer the oven, preheat it to 350°F and lay the pizzas on a lined sheet pan. They bake for eight to ten minutes. If you’re using the stovetop pan-fry method, use just a touch of oil, cover the pan with a lid, and cook over medium heat for about four to five minutes per side until the bottom is clearly crisp.
Once they are done cooking via your preferred path, move them immediately to the serving plate! Then, go wild with those fresh garnishes we prepared earlier!
Ingredient Substitutions for Your Mexican Pizza
I totally get it—sometimes you don’t have exactly what the recipe calls for, or maybe you’re cooking for someone who needs something different. Don’t stress! This recipe is super flexible, and we can swap things out while still keeping that essential Mexican Pizza copycat flavor profile intact. When you’re making a beloved childhood favorite, you want to make sure everyone at the table gets to enjoy it!
Let’s talk about the meat first, because that’s usually the main thing people ask about. If ground beef isn’t your thing, you can totally use ground turkey, and it works beautifully! You might need to add just a tiny splash more water when you season it since turkey can sometimes dry out a bit faster. For my vegetarian friends, this is fantastic with vegetarian crumbles or even just an extra layer of seasoned refried beans and maybe some black beans mixed in for bulk. Just make sure whatever you use is well-seasoned!
When it comes to cheese, I recommended a cheddar/mozzarella blend because it melts perfectly, but if you only have a standard Mexican blend, go for it! Monterey Jack is also a great melter here. The key is making sure whatever cheese you use melts well enough to hold those two tortillas together for you. Don’t skip the cheese layer on the inside; it’s crucial for that gooey texture!
Now, about the tortillas—we love the flour ones because they give us that slightly softer structure when cooked, which reminds me exactly of the original. But if all you have are corn tortillas, you can certainly use ten of those instead of eight flour ones, or you can make four crispier pizzas with the same count. Just know that corn tortillas might crisp up harder and faster in the heating process. If you go that route, keep a super close eye on them so they don’t burn before the cheese melts!
Storage and Reheating Instructions for Leftover Mexican Pizza (Taco Bell Copycat Recipe)
Oh, I wish I could tell you that these Mexican Pizzas last long enough around here to need storing, but honestly, they rarely do! But when they somehow survive—usually because I hide one for a late-night snack—you need to know how to treat these leftovers. The absolute, 100% best texture happens when you eat them fresh off the pan or out of the air fryer. That crispness is everything!
However, we can save them! The most important thing to remember when storing your Mexican Pizza (Taco Bell Copycat Recipe) leftovers is to separate the fresh stuff. If you piled on the diced tomatoes, sour cream, or green onions before you put them away, those things will get soggy and start making your beautiful crispy crust weep. Nobody wants that!
How to Store Your Leftovers
Let the cooked pizzas cool down completely first. Once they are at room temperature, you want to wrap each one tightly in plastic wrap, or place them between sheets of wax paper in an airtight container. Keep them in the fridge, and they should be perfectly fine for about three days. The fillings stay great, and as long as they aren’t drowning in cold toppings, the crust holds up surprisingly well!
The Best Way to Reheat for Maximum Crispness
Leave the microwave alone! I mean it! Microwaving these just turns the tortillas into rubbery sponges, and that’s a tragedy. If you want to bring that layered taco crust back to its former glory, you have two amazing options, and both involve dry heat.
If you’re in a rush, the air fryer is your secret weapon. Preheat it to about 350°F. Pop the cooled pizza right in there—no oil needed—and let it heat for about 4 to 6 minutes. It gets the cheese bubbly and blasts the crust back to life! It’s hands-down the fastest way to rescue a cold slice.
If you are reheating a bigger batch, the oven is better. I preheat my oven to 350°F, just like when we first baked them, and place the leftovers directly on a lined sheet pan. Give them about 8 to 10 minutes. They come out tasting almost brand new. Once they are heated through and crispy, *then* you can add your fresh dollop of sour cream on top before diving in. Enjoy those saved treasures!
Serving Suggestions for a Taco Bell Style Dinner
So you’ve got these amazing, hot, crispy Mexican Pizzas sitting on your counter—what goes with them? When I make these, I treat it like a full-blown, fun night in! We aren’t just making one dish here; we are building a complete taco bell style dinner experience. Since the pizza itself is rich with savory beef, beans, and cheese, we need sides that are bright, fresh, or super easy to scoop up!
My kids usually demand chips and dip, and who am I to argue? It’s mandatory, right? I always make sure I have a large bowl of tortilla chips ready to go. And if you want to step it up just a tiny bit from the jarred stuff, check out my recipe for quick salsa. It takes ten minutes, and the fresh flavor just elevates everything else on the table. It’s so much better than anything that sits on a shelf for months.
Balancing Richness with Fresh Sides
Because the pizza is so satisfying, I like to pair it with something cool and maybe a little bit acidic to cut through all that cheese and beef. A simple side salad works wonders! I’m not talking about mixing lettuce and calling it a day, though. I mean a mix of crisp romaine, maybe some shaved carrots, and most importantly, a bright vinaigrette. A lime-cilantro dressing is my go-to; it matches the flavor profile perfectly without adding more heavy sauce to the mix.
If you’re looking for something more substantial, a batch of simple Mexican rice is always a hit. You can make it quickly while the pizzas are baking. Just remember to toast your rice a little before adding your broth; that initial toasting step is the secret to fluffy, perfectly cooked Mexican rice instead of sticky mush. It’s such a classic accompaniment, and it makes the meal feel complete.
Don’t Forget the Drinks!
And hey, don’t forget what you’re drinking! For a truly authentic vibe, you can’t go wrong with some ice-cold soda, but I prefer mixing up a frosty batch of aguas frescas. Horchata is my favorite, but a simple limeade made with sparkling water can be incredibly refreshing after a bite of savory pizza. It’s these little touches that turn a simple weeknight meal into a fun, memorable celebration!
Frequently Asked Questions About Making Mexican Pizza
I totally get that when you’re recreating a fast-food legend like this, you’re going to have questions! And that’s what the Q&A section is for, right? I want you to feel totally confident making this happen tonight. We all want that perfect, crispy result, especially when making a Mexican Pizza copycat for the first time. Here are the things I hear most often about getting this fun family meal just right.
How do I ensure my Mexican Pizza is crispy like the original?
This is the million-dollar question, and the answer circles back to moisture control! Remember how we talked about draining the excess grease from the beef? That’s step one. Step two, and this is crucial, is making sure you don’t put any cold or wet toppings—like those diced fresh tomatoes or sour cream—on the pizza *before* it cooks. If you do, the cheese melts over the wet ingredient and creates steam pockets, which leads to sogginess.
The best way to guarantee crisp is to use the air fryer at 400°F for just 5 minutes, or use the pan-frying method with a lid on medium heat to really crisp that bottom tortilla. Keep the layers thin and aim for high heat for a short time. That quick blast of heat melts the cheese and crisps the edges simultaneously!
Can I prepare the beef filling ahead of time for this fun family meal?
Yes, absolutely! That’s one of the major perks of planning ahead for a great taco bell style dinner. You can totally cook the ground beef, mix in the seasoning and enchilada sauce, and store the cooked filling in an airtight container in the fridge for up to three or four days.
When you’re ready to eat, just scoop the cold filling onto your bean-covered tortilla, layer the cheese, and then proceed with your preferred cooking method. Since the meat is already cooked through, you are really just using the oven or air fryer time to melt the cheese and crisp the tortillas. It cuts your active time down even more when you are ready for dinner!
Is this recipe actually healthier than ordering from the restaurant?
In my opinion, 100% yes! When you make your own Mexican Pizza (Taco Bell Copycat Recipe), you control everything. You’re using fresh tortillas, you can use leaner ground beef (or even skip the beef entirely for a vegetarian version), and you control the exact amount of oil used in the cooking process. Plus, we skip all those mystery additives they use to keep their food shelf-stable. I know exactly what’s going into mine, and that peace of mind is worth it!
Can I make this vegetarian?
You certainly can! You have a couple of great options here. You can substitute the ground beef with commercial vegetarian crumbles, making sure you season them well with the taco spices. Or, my personal favorite vegetarian hack is to increase the refried beans slightly and mix in a cup of seasoned black beans with the enchilada sauce instead of the meat. It still gives you that hearty, savory center layer needed to make the stacked crust work!
Share Your Mexican Pizza (Taco Bell Copycat Recipe) Creations
Well, friends, we did it! We took those classic, comforting flavors of childhood and wrapped them up in a crispy, cheesy, healthier-at-home package. I am so excited for you to try this Mexican Pizza (Taco Bell Copycat Recipe). Seriously, when you take that first bite that snaps just right, the nostalgia hits you hard, and I want to hear all about it!
I really hope you made this for a fun family meal. Did the kids love helping you layer it? Were you team Air Fryer or did you stick to the traditional oven baking method? Don’t be shy about telling me what worked best for your kitchen setup.
Tell Me How It Went!
Please, please, please leave me a rating underneath this post! Five stars lets me know I delivered on that authentic taste, and any notes you have about tinkering with the spices or the cheese blend are gold to me. I read every single comment that comes through, and your feedback helps me make sure this recipe stays absolutely perfect for everyone who tries it.
And if you snapped a picture—and I hope you did, because these look gorgeous, especially loaded with fresh toppings—tag me on social media! Seeing your beautiful stack of homemade goodness floating around the internet is seriously the best reward. It makes me feel like we’re all cooking together in the same vibrant kitchen, laughing over how easy dinner can be.
Thank you so much for cooking along with me today. Happy eating, and I can’t wait to see your crispy Mexican Pizzas!
Mexican Pizza (Taco Bell Copycat Recipe)
Ingredients
Equipment
Method
- In a large frying pan or skillet on medium heat, add the ground beef. Use a spatula or spoon to break up the meat into small pieces as it cooks. Sauté for about 5 to 8 minutes or until the meat is cooked through. Remove grease from the pan.
- Add in the taco seasoning, water, and enchilada sauce. Stir until evenly combined. Let simmer for 1 to 2 minutes.
- To assemble the pizzas, spread a layer of refried beans on one tortilla. Then top with ground beef. Add a layer of cheese and top with another tortilla.
- Spread 1 tablespoon of enchilada sauce on top of the tortilla and top with shredded cheese to evenly cover the top.
- Repeat with remaining tortillas to assemble all the pizzas.
- AIR FRYER COOKING METHOD: Preheat Air Fryer to 400°F. Working in batches, carefully place the pizza in the air fryer and cook for about 5 minutes, or until the cheese melts and the tortillas are crispy. Repeat with remaining pizzas.
- OVEN BAKING METHOD: Preheat oven to 350°F. Line a sheet pan with tin foil or parchment paper (optional). Arrange the pizzas on the sheet pan leaving a space between them. Bake for 8 to 10 minutes or until the cheese is melted and the tortillas are crispy.
- PAN FRYING METHOD: In a large frying pan with a lid, on medium heat add a splash of oil to coat the pan. Add one pizza at a time and cover with the lid. Cook for 4 to 5 minutes or until the cheese melts and the bottom tortilla is crispy.
- Transfer the cooked pizzas to a serving plate and top with the optional garnishes – tomatoes, red onion, olives, sour cream, and green onion. Serve.
Nutrition
Notes
Tried this recipe?
Let us know how it was!
Master of Culinary Visual Arts
My culinary journey started in the fast-paced kitchens of boutique coastal restaurants throughout Southern California, where I learned that beautiful food doesn’t have to be complicated. After nine years of professional cooking, I’ve made it my mission to prove that sophisticated, nutritionally sound meals can be accessible to busy home cooks who refuse to compromise on flavor or visual appeal.
What changed everything for me was watching talented home cooks feel intimidated by healthy cooking. That’s when I transitioned to private instruction, teaching busy professionals and families how to create restaurant-quality meals using simple techniques and ingredients they can actually find at their local grocery store. My “15-minute meal” frameworks are now used by several regional cooking schools!
As a third-generation Mexican-American, I love weaving vibrant Latin flavors into low-carb creations – proving that healthy eating can be both culturally authentic and visually spectacular. My “effortless elegance” philosophy is simple: nutritious food should look as stunning as it tastes, without requiring professional chef skills or expensive equipment.
When I’m not developing recipes in my San Diego coastal kitchen, you’ll find me surfing the local breaks with my Golden Retriever mix, Mango, who’s both my kitchen companion and unofficial taste-testing assistant. My personal low-carb lifestyle started as a way to maintain energy for my active coastal life, and it’s become the foundation for proving that healthy eating enhances rather than restricts life’s pleasures.