

Oh boy, Thanksgiving! That glorious time of year when the table groans under the weight of deliciousness, but let’s be real – the dessert prep can feel like a whole extra holiday on its own. I remember my first time hosting, and let me tell you, I was *way* too ambitious. I ended up with a black, burnt pumpkin pie disaster! It was then I learned the magic of simplicity. Now, I swear by these 5-Ingredient Thanksgiving Desserts (No Fail). Seriously, they’re like a cheat code for deliciousness. This pumpkin cheesecake, with its gingersnap crust and creamy filling, is my absolute go-to. It’s so easy, so foolproof, and uses just a handful of ingredients to create something truly memorable. You’ve got this!

Why You’ll Love These 5-Ingredient Thanksgiving Desserts (No Fail)
Trust me, this 5-Ingredient Thanksgiving Dessert is a game-changer for a reason. It ticks all the boxes:
- Unbelievably Easy: With just five key ingredients, you’ll be amazed at how little effort this takes. That means less stress for you and more time to actually enjoy your guests!
- Seriously Quick: Prep is a breeze, and while it needs some chill time, the active cooking is minimal. It’s perfect for busy holiday schedules.
- “No-Fail” Guaranteed: I’ve designed this recipe to be incredibly forgiving. The water bath and careful cooling steps ensure a beautiful, crack-free cheesecake every single time.
- Incredibly Delicious: Don’t let the ingredient count fool you; the combination of gingersnap, creamy pumpkin, and sweet caramel is pure holiday bliss. It tastes like it took hours!
Gather Your Minimal Ingredients
Alright, let’s get our ducks in a row! The beauty of this 5-ingredient wonder is exactly that – the ingredients. So simple, so effective. Here’s exactly what you’ll need to pull off this Thanksgiving showstopper:
For the Crust
- 7.5 ounces gingersnaps (or about 1.5 cups of finely ground gingersnap crumbs. I like to crush mine in the food processor, it’s so much easier!)
- 1/4 cup granulated sugar
- 4 tablespoons unsalted butter, melted (Make sure it’s good quality butter!)
For the Filling – The Star of the Show!
- 1 (15-ounce can) pumpkin puree (I always grab Libby’s, it’s a reliable brand for that perfect pumpkin flavor.)
- 1.33 cups granulated sugar (Yes, it seems like a lot, but it balances the pumpkin and spices beautifully.)
- 1 teaspoon ground cinnamon
- 0.5 teaspoon ground ginger
- 0.25 teaspoon ground nutmeg
- 0.25 teaspoon ground cloves (This little bit adds such a warm depth!)
- 0.5 teaspoon salt
- 1 cup cold heavy cream (Keep this cold, trust me on this!)
- 1.5 pounds cream cheese (That’s three 8-ounce packages, and they *must* be at room temperature. This is key for a silky smooth filling! Take them out at least an hour before you start.)
- 5 large eggs (Also room temperature. It makes all the difference for a smooth, well-emulsified batter.)
For Serving (The Finishing Touch!)
- 1 jar caramel sauce (Just grab your favorite store-bought kind. Easy peasy!)
Step-by-Step Guide to Your 5-Ingredient Thanksgiving Dessert
Alright, deep breaths! We’re going to make this happen together. Making a perfect cheesecake might sound intimidating, but it’s totally doable, especially with this streamlined recipe. Think of it as a little culinary adventure with a very delicious reward! You can find more inspiration for similar recipes here.

Preparing the Crust
First things first, let’s get that oven preheated to 325°F (160°C). Now, grab your springform pan – that beautiful round pan with the removable sides. You want to wrap the bottom and sides really well with heavy-duty aluminum foil. This is super important for the water bath later, keeping any sneaky water out. Give the inside a quick spray with cooking spray. Then, take your finely crushed gingersnaps, sugar, and melted butter and just pulse them in your food processor until they look like wet sand. Press this mixture firmly and evenly into the bottom of your prepared pan. Pop it into the oven for about 15 minutes until it smells amazing. Let it cool while we work on the filling.
Crafting the Creamy Filling
This is where the magic really happens! In a saucepan, stir together your pumpkin, sugar, cinnamon, ginger, nutmeg, cloves, and that pinch of salt. Cook it over medium heat, stirring constantly, for about 5 minutes until it gets thick and shiny – kind of like a thick jam. This helps cook off some of the water from the pumpkin. Now, scrape that gorgeous pumpkin mixture into your food processor. Let it whiz for a full minute with the feed tube open; this makes it super smooth. With the motor still running, slowly pour in that cold heavy cream. Then, add your softened cream cheese chunks. Process until it’s all smooth as silk – no lumps allowed! Finally, add the eggs, but only process *just* until they’re incorporated. Seriously, don’t go crazy here; overmixing the eggs can lead to cracks.
Baking with a Water Bath
Okay, here’s the secret weapon for that super smooth, crack-free cheesecake: the water bath! Pour your glorious pumpkin filling into that cooled gingersnap crust. Now, place your foil-wrapped springform pan into a bigger roasting pan. Carefully pour boiling water into the roasting pan until it comes about halfway up the sides of your cheesecake pan. This water bath creates a gentle, steamy environment that bakes the cheesecake evenly. Slide the whole setup into your preheated oven and bake for about 1.5 to 1.75 hours. You’re looking for the edges to be set, but the center should still jiggle just a little, like a nervous pudding!
Cooling and Chilling for Perfection
This part takes patience, but it’s crucial for that perfect texture. Carefully take the roasting pan out of the oven. Gently run a thin knife around the edge of the cheesecake to loosen it from the pan – this prevents cracks as it cools. Let the cheesecake *stay* in the water bath until the water is just warm, about 45 minutes. Then, lift the springform pan out of the water, ditch the foil, and let it cool completely on a wire rack. We’re talking a good 3 hours here. Once it’s completely room temp, wrap it up and let it chill in the fridge for at least 4 hours, or better yet, overnight. This is where it really firms up and develops that incredible flavor.
Serving Your Masterpiece
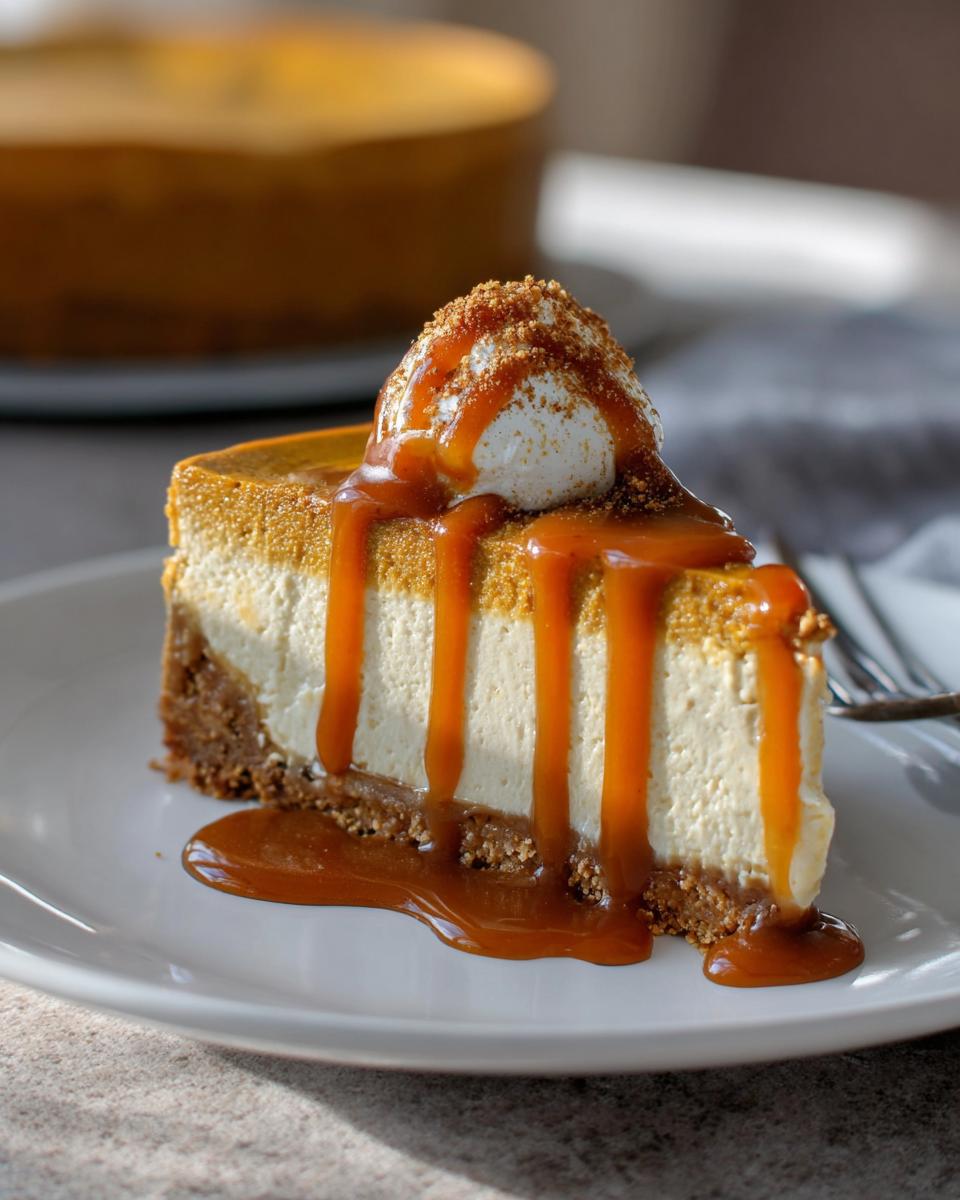
The moment of truth! Once it’s perfectly chilled, carefully release the sides of the springform pan. You might need to run a spatula underneath to help it slide onto a serving plate. If there’s a little condensation on top, just blot it gently with a paper towel. Let the cheesecake sit out for about 30 minutes before slicing so it’s not too cold. Gently warm your caramel sauce in the microwave, then drizzle it over each slice. Oh, and if you want to go the extra mile, some sweetened whipped cream is absolutely divine on top!

Tips for Success with 5-Ingredient Thanksgiving Desserts
Okay, so you’ve got your ingredients, you’re ready to go, but how do we make SURE this turns out absolutely perfect every time? It’s all in the nitty-gritty, little things that make a huge difference. Think of these as my “secret sauce” for a no-fail bake!
- Room Temperature is KING: Seriously, don’t skip taking those cream cheese and eggs out ahead of time. Cold stuff in a warm batter? Hello, lumps and cracks! They need to be soft and yielding so they blend in smoothly.
- Easy Does It with Those Eggs: When you add the eggs, just mix until they’re combined. If you beat them too much, they can actually cause the cheesecake to puff up too much in the oven and then crack when it cools. We want smooth and creamy, not airy and broken!
- Water Bath Works Wonders: That foil-wrapped pan and boiling water aren’t just for show. They create this lovely, humid environment that cooks the cheesecake gently and evenly. It’s the golden ticket to preventing cracks and getting that super smooth texture we’re all after. Make sure your foil is snug, though!
- Patience, Young Grasshopper: The cooling process is just as important as the baking. Let it cool gradually. Rushing this step is a recipe for disaster (literally, cracks!). It needs time to set up properly before you even *think* about slicing into it.
Frequently Asked Questions About This Thanksgiving Dessert
Got questions about this fantastic dessert? I’ve got answers! It’s my mission to make holiday baking as stress-free and delicious as possible for you.
Can I make this 5-Ingredient Thanksgiving Dessert ahead of time?
Absolutely! This is one of my favorite make-ahead recipes. You can bake it up to two days in advance and keep it covered in the fridge. It actually tastes even better the next day, giving all those flavors a chance to meld together!
What if I don’t have a springform pan?
No springform pan? No problem! You can totally make this in a regular 9-inch pie plate. Just press the crust into the bottom and up the sides a bit, then pour in the filling. It won’t have that clean slice edge, but it will taste just as amazing!
Can I use a different type of cookie for the crust?
You sure can! Gingersnaps give it that lovely spice note, but graham crackers are a classic for a reason. Shortbread rounds would also be divine for a buttery, less spiced flavor. Just aim for about the same amount of finely crushed cookies!
Estimated Nutritional Information
Just a little heads-up, the numbers below are estimates, okay? They can totally change depending on the brands you use and the exact ingredients. But this gives you a good ballpark idea of what a slice of this deliciousness has!
- Calories: Around 643
- Fat: About 40g
- Protein: Roughly 8g
- Carbohydrates: Around 66g
- Sugar: Typically 54g
Share Your 5-Ingredient Thanksgiving Dessert Success!
I’d LOVE to hear how your 5-Ingredient Thanksgiving Dessert turned out! Did you try it? Did it earn rave reviews? Drop a comment below and let me know all about it! Share your photos on social media and tag me – I can’t wait to see your beautiful creations making your Thanksgiving table extra special!

5-Ingredient Thanksgiving Dessert
Ingredients
Equipment
Method
- Preheat your oven to 325°F (160°C). Wrap a 9- or 10-inch springform pan with heavy-duty aluminum foil, ensuring the bottom and sides are completely covered. Spray the inside of the pan with nonstick cooking spray.
- In a food processor, pulse the gingersnaps, sugar, and melted butter until finely ground. Press the crumb mixture evenly into the prepared springform pan. Bake for about 15 minutes until fragrant. Let cool on a wire rack.
- Boil water for the water bath. In a saucepan, stir together pumpkin, sugar, cinnamon, ginger, nutmeg, cloves, and salt. Cook over medium heat for 5 minutes, stirring constantly, until thick and shiny. Scrape into a food processor and process for 1 minute with the feed tube open.
- With the motor running, add the cold cream. Add the cream cheese chunks and process until smooth. Add the eggs and process just until incorporated; do not overmix.
- Pour the batter into the cooled crust. Place the springform pan in a large roasting pan. Pour boiling water into the roasting pan until it comes halfway up the sides of the cake pan. Bake for 1.5 to 1.75 hours, until the center is just set but still jiggles slightly.
- Carefully remove the roasting pan from the oven. Run a knife around the edges of the cheesecake to loosen it. Let it cool in the water bath until the water is warm, about 45 minutes. Remove the springform pan from the water bath, discard the foil, and let it cool completely at room temperature, about 3 hours.
- Cover the cheesecake and refrigerate for at least 4 hours or overnight.
- To serve, remove the outer ring of the springform pan. Slide a spatula under the cheesecake to loosen it from the bottom, then transfer to a serving platter. If there’s condensation on top, gently blot it with a paper towel. Let the cheesecake stand at room temperature for 30 minutes before cutting.
- Warm the caramel sauce in the microwave. Drizzle over each slice of cheesecake. Add sweetened whipped cream if desired.
Nutrition
Notes
Tried this recipe?
Let us know how it was!
Master of Global Fusion Innovation
My culinary adventure reflects my Lebanese-Italian heritage and a decade spent in the dynamic fusion restaurant scenes of Miami and Barcelona. I’ve made it my mission to prove that beloved global comfort foods can be successfully adapted for low-carb living without losing their soul, their cultural authenticity, or their ability to comfort.
With advanced training in molecular gastronomy and experience spanning Mediterranean, Middle Eastern, and Latin American traditions, I’ve developed what I call “respectful innovation” – culinary creativity that honors traditional cooking wisdom rather than replacing it. My alternative ingredient substitution systems are now taught in specialty diet cooking schools throughout the region.
Drawing from my trilingual upbringing, I understand how deeply food connects to identity and memory. That’s why my flavor-bridging techniques allow classic dishes from around the world to maintain their comforting, familiar qualities while meeting contemporary nutritional standards. I regularly share these techniques at international culinary symposiums and innovation events.
When I’m not experimenting in my Miami fusion kitchen laboratory, you’ll find me at local salsa dance venues – the rhythm and improvisation skills translate directly to my creative cooking process! My role as a foster parent to rescue rabbits has unexpectedly inspired some of my most creative plant-based low-carb innovations.
My personal low-carb journey began as a way to maintain energy for my active lifestyle, but it’s evolved into a professional mission of proving that healthy eating can be globally adventurous rather than restrictively limiting. Every recipe I create is a passport to culinary adventure, transforming kitchens into laboratories for exploring healthy versions of the world’s most beloved comfort foods.