
Oh man, let me tell you about this recipe! If you’re anything like me, you love a meal that’s got layers of amazing textures, right? We’re talking about that perfect bite where you get a little crisp on the outside and then BAM! – total juicy goodness on the inside. That’s exactly what we’re diving into with these Best Ground Beef Recipes 2025: Crispy Outside, Juicy Inside. I still remember the first time I put a unique spin on a classic ground beef recipe. It was during a rainy weekend spent in my Miami kitchen, filled with the sounds of sizzling meat and aromatic herbs. I decided to experiment by adding a hint of sumac to enhance the dish’s flavor. As the beef browned perfectly, creating that coveted crispy outer layer, I couldn’t help but feel connected to my heritage and the many meals shared around family tables. That dish not only became a family favorite but also sparked my journey into creating recipes that celebrate cultural diversity while adapting to health trends.
Why You’ll Love These Best Ground Beef Recipes 2025: Crispy Outside, Juicy Inside
Seriously, what’s not to adore about this recipe? It hits all the right notes and then some! We’re talking about pure comfort food bliss that’s ridiculously easy to whip up, making it a total family favorite for those busy weeknights. Plus, cleanup? A breeze! You get that amazing contrast of textures – a satisfyingly crispy shell giving way to incredibly juicy, flavorful beef inside. Trust me, this is going to be your new go-to. It just hits different, you know?
- Pure comfort food heaven!
- An absolute family favorite you’ll make again and again.
- Super quick prep means dinner on the table fast.
- And let’s not forget about easy cleanup – my favorite part!
- That “crispy outside, juicy inside” thing? It’s legit amazing.
Gathering Your Ingredients for the Best Ground Beef Recipes 2025
Alright, let’s get our kitchen prepped! This recipe is all about bringing together some fantastic flavors, and getting your ingredients ready is half the fun. First up, we’ve got the Spanish Rice. You’ll need some good ol’ unsalted butter, uncooked basmati rice that you’ll want to rinse really well, garlic powder, kosher salt, onion powder, low-sodium chicken broth, and tomato sauce. Make sure that rice is rinsed well – it helps keep it from getting gummy, you know? Then for our star, the Seasoned Beef, grab some neutral oil, a pound of ground beef (we’ll talk about types later!), more garlic powder, ground cumin, chili powder, kosher salt, onion powder, paprika, and a bit more low-sodium chicken broth and tomato sauce to get everything nice and saucy. For a little kick, we’ll whip up a quick chipotle mayo with sour cream, mayo, some of that amazing chipotle sauce from a can of chiles in adobo, and a pinch of salt. Finally, for assembling these beauties, grab your flour tortillas, some queso (store-bought or homemade is fine!), some crunchy red tortilla chips broken into pieces, and shredded cheddar cheese. Easy peasy!
Mastering the ‘Crispy Outside, Juicy Inside’ Technique
Okay, so getting that perfect contrast – crispy on the outside, super juicy on the inside – is totally doable, and it all comes down to a few key steps. First, we’re going to toast our rice till it’s beautifully golden; this gives it a fantastic texture and nutty flavor. Then, we’ll brown that ground beef just right. The trick to keeping it juicy is not to overcook it and to let it simmer in that delicious broth and sauce mixture for a bit, letting all those spices really sink in. And for the final magic? We’re gonna get those burritos nice and golden brown and slightly crispy in a hot skillet. Trust me, it makes all the difference!
For more awesome ground beef ideas, check out these other ground beef recipes – they’re fantastic inspiration!
Preparing the Flavorful Spanish Rice
First things first, let’s get that rice going. Melt your butter in a saucepan over medium heat. Toss in the rinsed basmati rice and stir it around until it looks toasted and smells amazing, maybe about 5 minutes. Then, add your garlic powder, salt, and onion powder. Stir for another minute until fragrant. Pour in the broth and tomato sauce, bring it up to a boil, then immediately turn the heat way down low, pop a lid on top, and let it cook, totally undisturbed, for about 17 minutes. When it’s done, just fluff it up with a fork!
Seasoning and Cooking the Juicy Ground Beef
Now for the star of the show – the beef! Grab a big skillet, get it nice and warm with a tablespoon of neutral oil. Toss in your pound of ground beef and break it up with a spoon as it cooks until it’s beautifully browned. Drain off any excess fat if you need to. Now, sprinkle in all those yummy spices: garlic powder, cumin, chili powder, salt, onion powder, and paprika. Give it a good stir to coat everything. Then, pour in your chicken broth and tomato sauce. Let it all simmer down until most of the liquid is soaked up, about 5 minutes. This little simmer infuses so much flavor and keeps that beef wonderfully juicy!
Crafting the Zesty Chipotle Mayo
This is super simple! Just grab a small bowl and stir together the sour cream, mayonnaise, that essential chipotle sauce (just a tablespoon is usually perfect!), and a pinch of salt. Mix it all up until it’s smooth and creamy. That’s it! Super quick, but it adds a fantastic creamy heat.
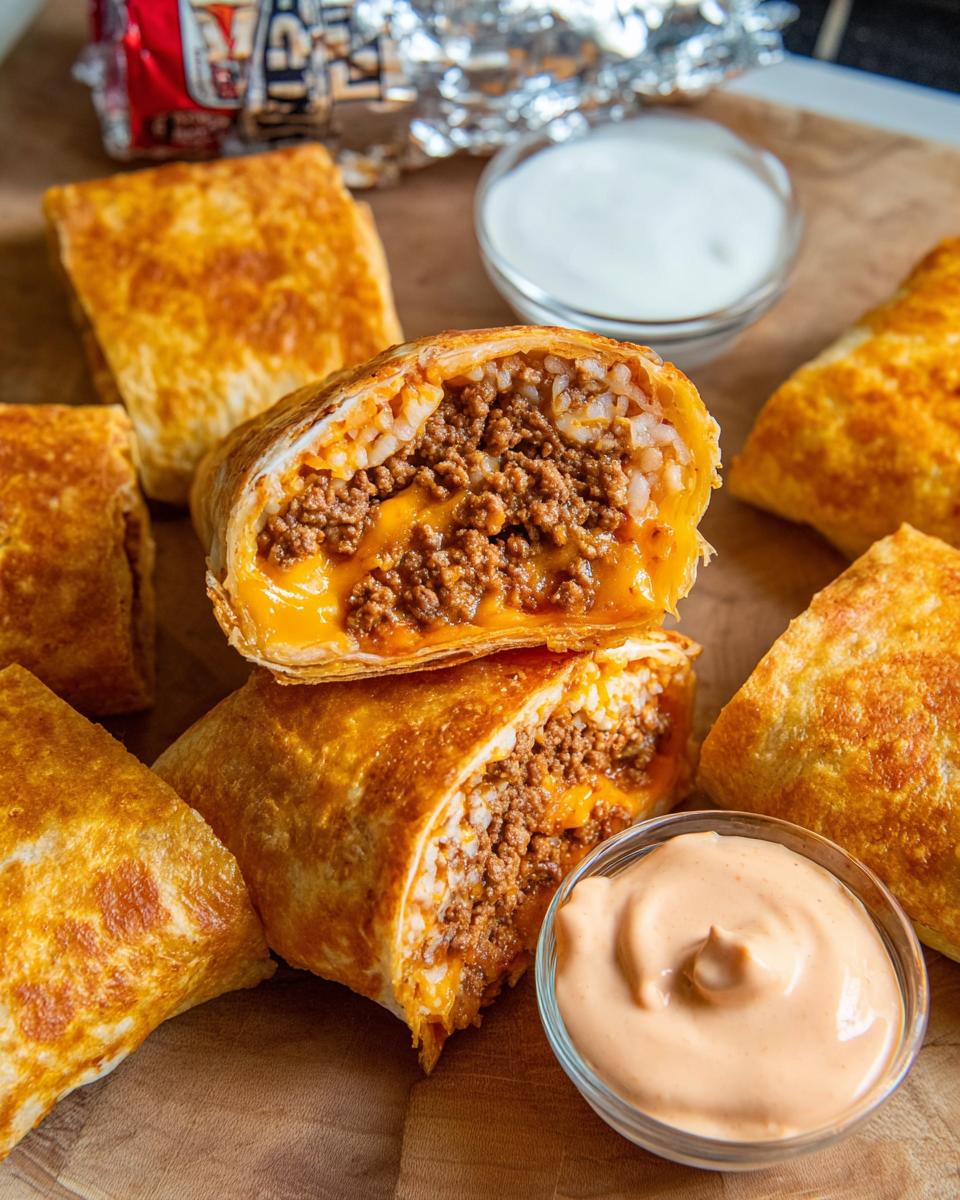
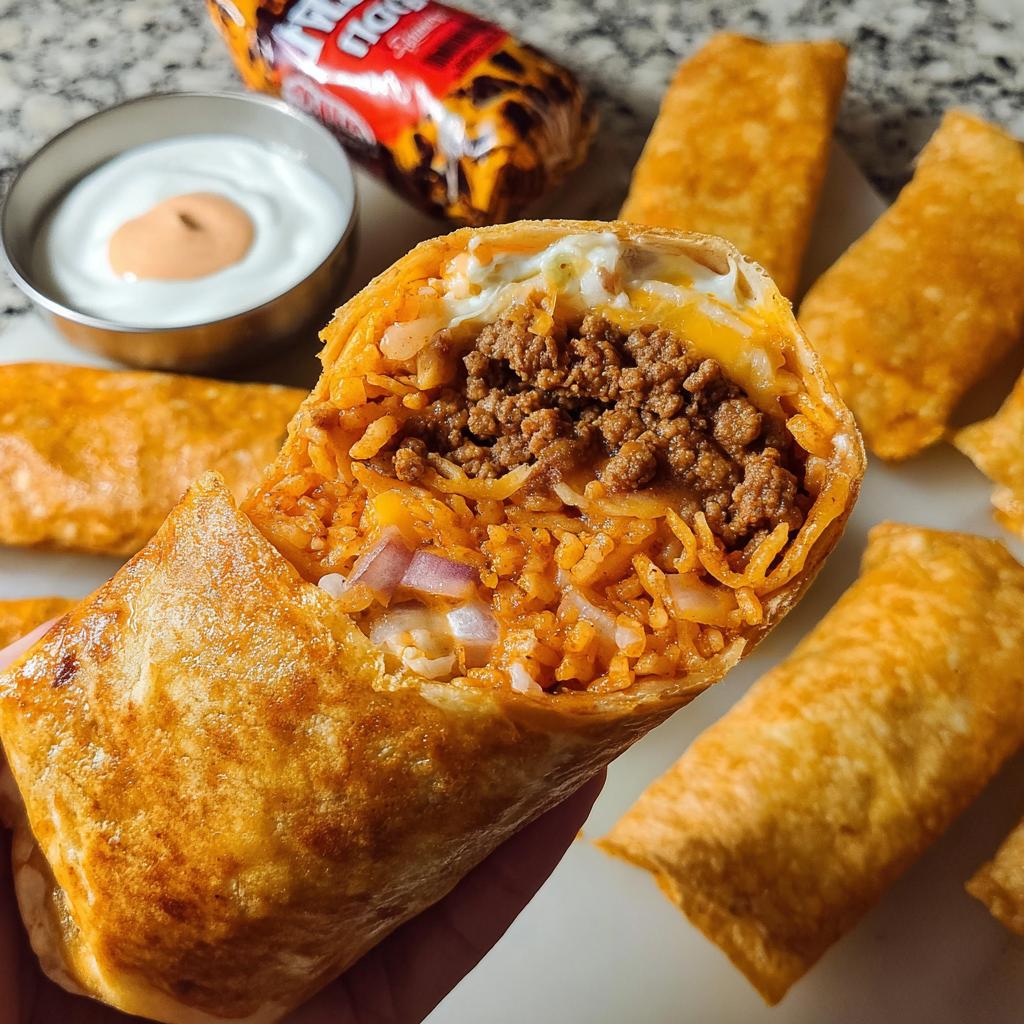
Assembling Your Best Ground Beef Recipes 2025 Burritos
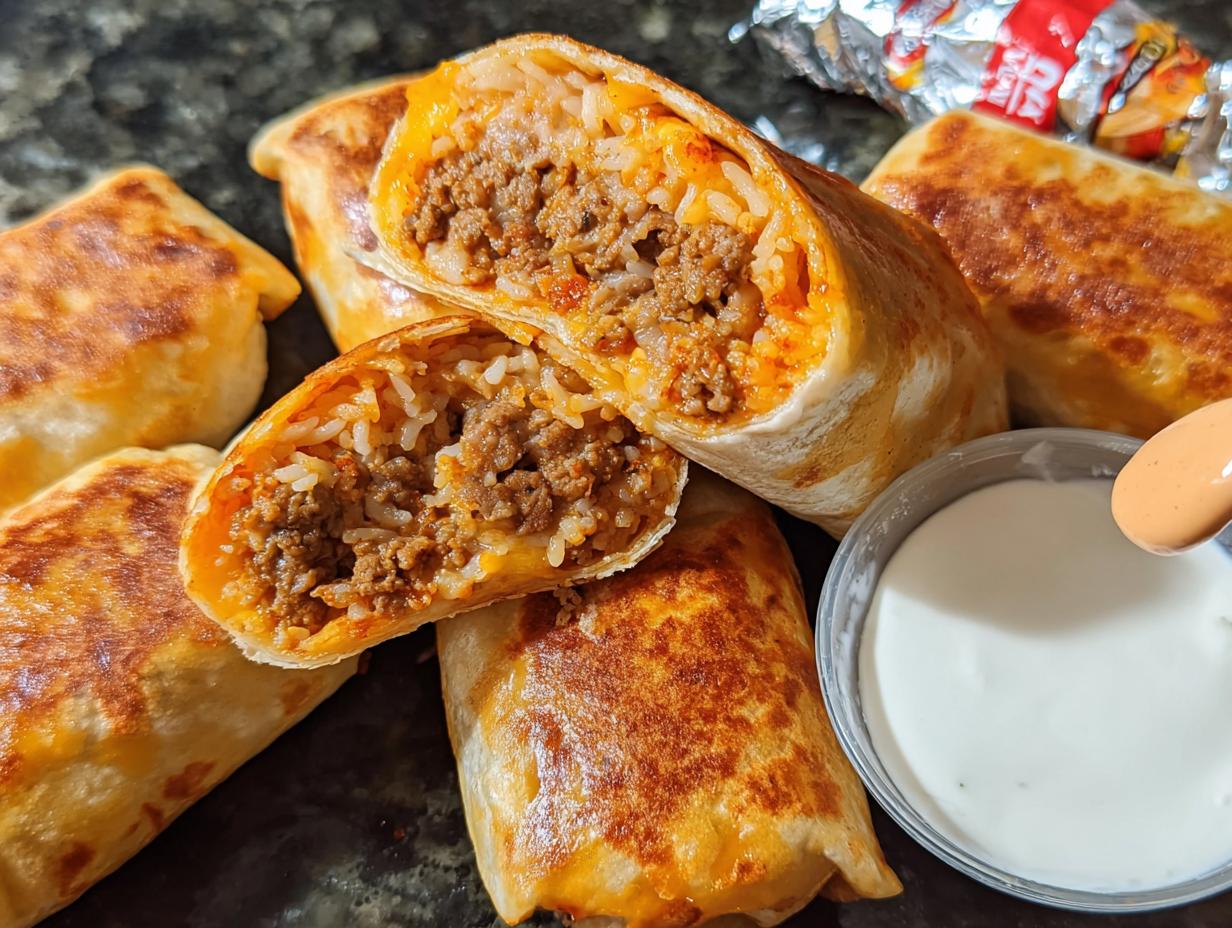
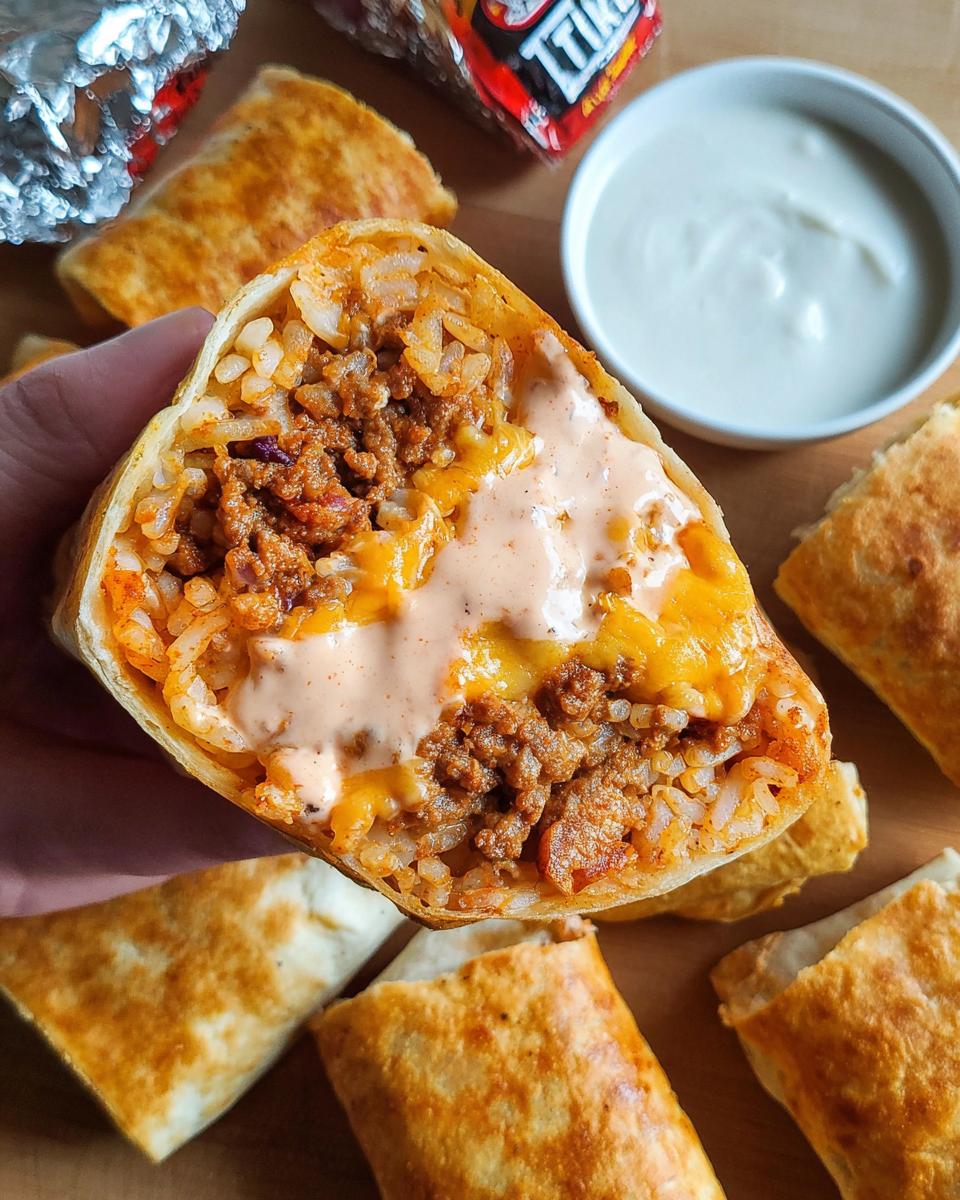
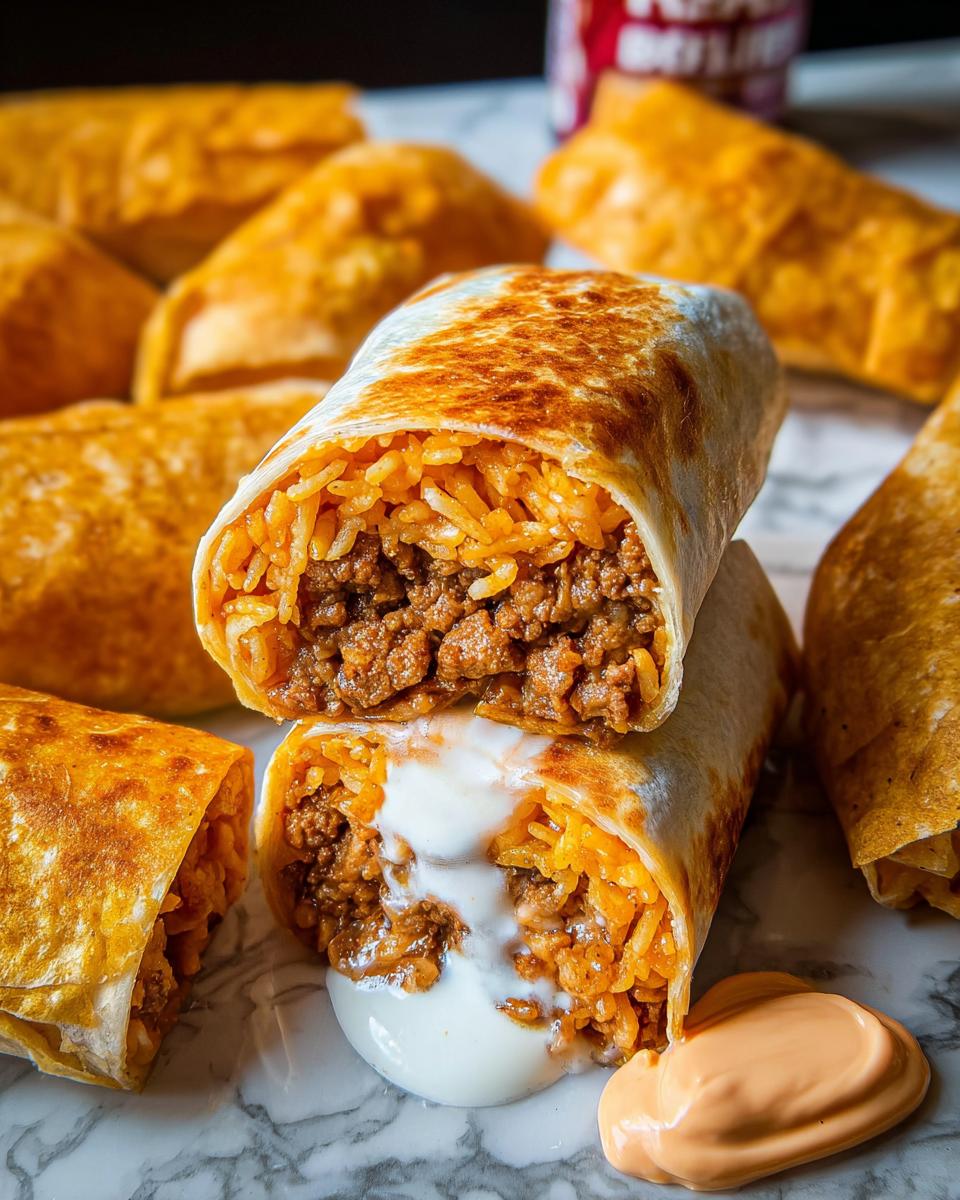
Alright, it’s time for the fun part – building these amazing burritos! Lay out one of your tortillas, nice and flat. Think of it like your canvas! Spoon about half a cup of that delicious Spanish rice right in the center, leaving a little space around the edges. Next, pile on about the same amount of your seasoned beef – remember, we want it perfectly juicy! Then comes a drizzle of that zesty chipotle mayo, followed by a spoonful of warm queso, and those crunchy tortilla chip pieces. Now, for the folding: take the two sides (left and right) and fold them *in* towards the center, so they just meet. Then, grab the bottom edge and pull it up and over the filling tightly, rolling it up like a little burrito and tucking in those sides as you go. Repeat this for all six, tucking them in snugly!
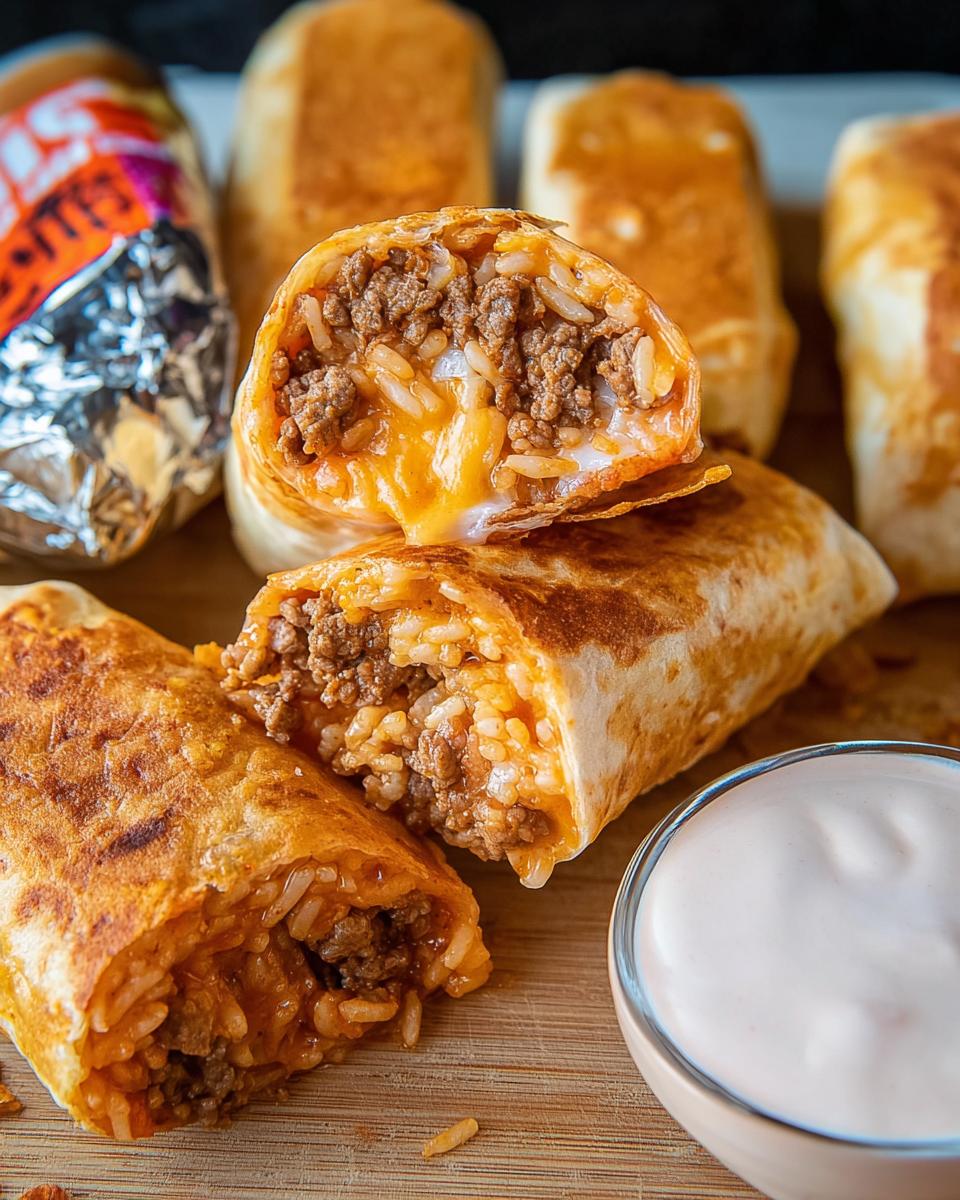
Achieving the Perfect Crispy Exterior
This is where the magic *really* happens, folks! Grab your large nonstick skillet and set it over medium heat. We’re gonna start by making little cheesy anchors. Sprinkle about a quarter cup of shredded cheddar cheese right in the center of the pan, making a line about as long as one of your burritos. Once that cheese starts to get melty and just *barely* browned around the edges – that’s your cue! Carefully lay one of your assembled burritos right on top of that cheesy line, seam-side down. Let it sizzle for a minute or two until it’s golden brown and that cheese is helping to seal the deal and crisp up the bottom. Now for the flip! Gently ease a spatula underneath and flip that burrito over. You want to keep that cheesy seam side pressed to the pan as it cooks on the other side for another minute or two until it’s gorgeously golden brown. Transfer it to a platter and repeat with the rest of your burritos. The final result? Pure, crispy, golden-brown perfection!
Tips for Success with These Ground Beef Recipes
Okay, so you’re ready to make this killer ground beef dish, right? Here are a few little secrets from my kitchen to yours to make sure it turns out absolutely perfect every time. First off, don’t skimp on the quality of your ground beef – a good quality meat with a little fat (like 80/20) really helps with that juicy interior. And for the cooking, make sure your skillet is nice and hot before you add the beef; that’s key for getting a great sear! Also, don’t overcrowd the pan when you’re browning it, or it’ll steam instead of getting that lovely crispy edge.
Making Healthy Swaps in Your Ground Beef Recipes
Want to lighten things up just a touch? No problem! You can totally use leaner ground beef, like say, 90/10, if you’re watching the fat content. If you do that, just be mindful not to overcook it, as leaner meat can dry out faster. Using low-sodium broth and tomato sauce is already a great start, but you could even add some extra veggies like finely diced bell peppers or onions when you’re cooking the beef for a nutrient boost. And for the chipotle mayo, you can use Greek yogurt instead of sour cream for a creamy tang with less fat. Easy swaps make big differences!
Frequently Asked Questions About These Best Ground Beef Recipes 2025
Got questions about making these fantastic ground beef creations? I’ve got you covered! These are some of the things folks often ask me, so hopefully, this helps you nail it.
Can I make this ahead of time?
Absolutely! You can totally prep the Spanish rice and the seasoned beef mixture a day in advance. Store them separately in the fridge. Just assemble and crisp them up right before you’re ready to eat. It’s a great way to save time and still get that amazing crispy-juicy combo!
What kind of ground beef is best for a crispy texture?
For that perfect balance of juicy inside and crispy outside, I usually go for an 80/20 blend of ground beef. That little bit of fat melts down, keeping the inside moist while helping the outside get that nice sear. If you prefer to use leaner beef, just be extra careful not to overcook it and maybe add a tiny splash more broth or sauce!
How do I prevent the tortillas from tearing when assembling?
Oh, the dreaded tortilla tear! It happens to the best of us. Make sure your tortillas are warmed up just a bit – you can do this by microwaving them for about 15-20 seconds or warming them quickly in a dry skillet. This makes them more pliable. Also, don’t overstuff them! Stick to the recommended amounts for rice, beef, mayo, and queso, and roll them up snugly but not *too* tightly.
Are these considered comfort food?
Oh, 100%! These burritos are pure comfort food bliss. They’re hearty, flavorful, and just so satisfying. They remind me of those cozy family dinners where everyone gathered around the table, happy and well-fed. It’s that perfect blend of familiar flavors and exciting new textures that just makes you feel good.
Serving and Storing Your Delicious Creation
Now that you’ve got these amazing, crispy-on-the-outside, super-juicy-on-the-inside burritos, what do you serve with them? Since they’re so packed with flavor, you don’t need a whole lot! A simple green salad with a zesty lime vinaigrette is perfect, or maybe some extra dollops of sour cream and a sprinkle of chopped cilantro. If you happen to have any leftovers (which is rare in my house!), just let them cool completely, then wrap them tightly in plastic wrap or foil, or pop them in an airtight container. They’ll keep in the fridge for about 2 to 3 days. To reheat, I find the best way is to pop them back into a skillet over medium heat for a few minutes on each side, just like we did when we first made them, to get that crispiness back!
Estimated Nutritional Information
Just a heads-up, the nutritional facts for these amazing burritos are estimates! Depending on the specific brands you use and how generous you are with toppings, the numbers can shift a bit. But generally, you’re looking at around 796 calories per serving.
Best Ground Beef Recipes 2025: Crispy Outside, Juicy Inside
Ingredients
Equipment
Method
- In a small saucepan over medium heat, melt butter. Add rice and cook, stirring occasionally, until toasted and golden brown, about 5 minutes.
- Add garlic powder, salt, and onion powder and cook, stirring, until warmed through, about 1 minute. Add broth and sauce and bring to a boil. Reduce heat to low and cover saucepan with a lid. Cook, undisturbed, for 17 minutes.
- Uncover and fluff rice with a fork.
- In a large skillet over medium heat, heat oil. Add ground beef and cook, breaking up with a spoon, until browned, about 7 minutes.
- Add garlic powder, cumin, chili powder, salt, onion powder, and paprika and mix until combined. Add broth and sauce and bring to a simmer. Cook, stirring occasionally, until liquid is mostly absorbed, about 5 minutes.
- In a small bowl, combine sour cream, mayonnaise, chipotle sauce, and salt.
- Place a tortilla on a work surface. Fill the center of tortilla with 1/2 cup rice, 1/2 cup seasoned beef, 1 Tbsp. chipotle mayo, 1 Tbsp. queso, and 4 to 5 pieces of broken tortilla chips. Fold 2 sides of tortilla toward each other, bringing the bottom half up and over the filling, then tightly roll into a burrito and tuck in the sides. Repeat with remaining 5 tortillas.
- In a large nonstick skillet over medium heat, arrange 1/4 cup cheese in a line about the length of a burrito in the center of skillet. Place a burrito, seam side down, directly on top of cheese. Once cheese starts to brown around the edges, gently flip burrito with a spatula, keeping cheese pressed to seam side of burrito. Continue to cook until other side is golden brown, 1 to 2 minutes. Transfer burrito to a platter. Repeat with remaining burritos.
- Serve burritos with sour cream and hot sauce alongside.
Nutrition
Notes
Tried this recipe?
Let us know how it was!
Master of Culinary Visual Arts
My culinary journey started in the fast-paced kitchens of boutique coastal restaurants throughout Southern California, where I learned that beautiful food doesn’t have to be complicated. After nine years of professional cooking, I’ve made it my mission to prove that sophisticated, nutritionally sound meals can be accessible to busy home cooks who refuse to compromise on flavor or visual appeal.
What changed everything for me was watching talented home cooks feel intimidated by healthy cooking. That’s when I transitioned to private instruction, teaching busy professionals and families how to create restaurant-quality meals using simple techniques and ingredients they can actually find at their local grocery store. My “15-minute meal” frameworks are now used by several regional cooking schools!
As a third-generation Mexican-American, I love weaving vibrant Latin flavors into low-carb creations – proving that healthy eating can be both culturally authentic and visually spectacular. My “effortless elegance” philosophy is simple: nutritious food should look as stunning as it tastes, without requiring professional chef skills or expensive equipment.
When I’m not developing recipes in my San Diego coastal kitchen, you’ll find me surfing the local breaks with my Golden Retriever mix, Mango, who’s both my kitchen companion and unofficial taste-testing assistant. My personal low-carb lifestyle started as a way to maintain energy for my active coastal life, and it’s become the foundation for proving that healthy eating enhances rather than restricts life’s pleasures.