
Oh my goodness, are you ready to ring in the new year with style? When that clock starts ticking down, you can’t just serve any old dessert; you need a showstopper! Forget the store-bought options; we’re talking about making memories right there on the cake plate. Finding that perfect dessert that screams celebration is half the fun, and honestly, you’re going to want to flip through these 12 New Year’s Eve Cakes That Wow for sure.
I remember my first big New Year’s bake so vividly. I had just moved to Miami, trying to blend my Lebanese-Italian roots into something totally new. I ended up making a stunning tiramisu-inspired cake with velvety mascarpone and just a whisper of rosewater. When I brought it out, everyone gathered around! It sparked so many great conversations, and suddenly, I wasn’t the new person anymore; I was the baker who brought the amazing dessert.
That’s what a great cake does—it brings people together. Whether you’re leaning into dramatic dark chocolate or something light and bubbly, trust me, making your own spectacular New Year’s Cake is the best way to kick off twelve months of delicious possibilities!
Why You Need These 12 New Year’s Eve Cakes That Wow in Your Repertoire
Look, you’re planning a massive celebration, right? You want something ready for its close-up when the ball drops! These recipes aren’t just filler; they are designed to be the star of your party table. They pull double duty by being shockingly delicious and absolutely gorgeous to look at.
- They look professional, even if you’re using a simple kitchen mixer.
- The flavor profiles are exciting and memorable—think beyond basic birthday fare.
- Most of these designs look complicated, but I promise, we break down the hard parts to make them doable for you!
Visual Impact: The Ultimate Celebration Cake
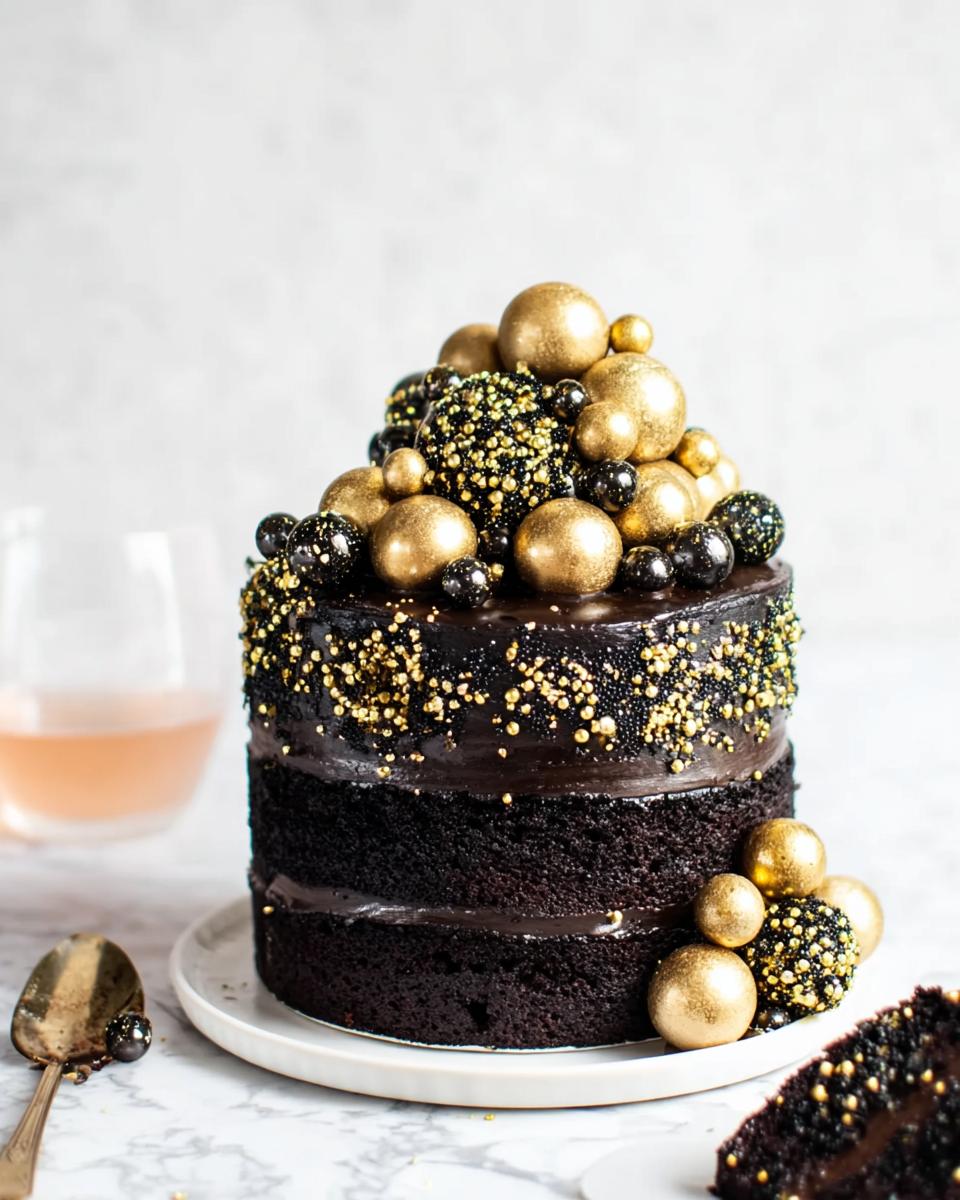
When I talk about visual impact, I mean turning heads! Midnight black frosting paired with shimmering edible gold makes these cakes instantly photogenic. They become instant centerpieces that elevate your entire party decor. We are chasing that ‘wow’ factor, honey!
Flavor Exploration Beyond Vanilla
It’s the start of a new chapter, so why stick to the same old flavors? These 12 options introduce you to rich dark chocolate combinations, sophisticated spice blends, and textures that feel truly celebratory. It’s your chance to show off your baking inspiration!
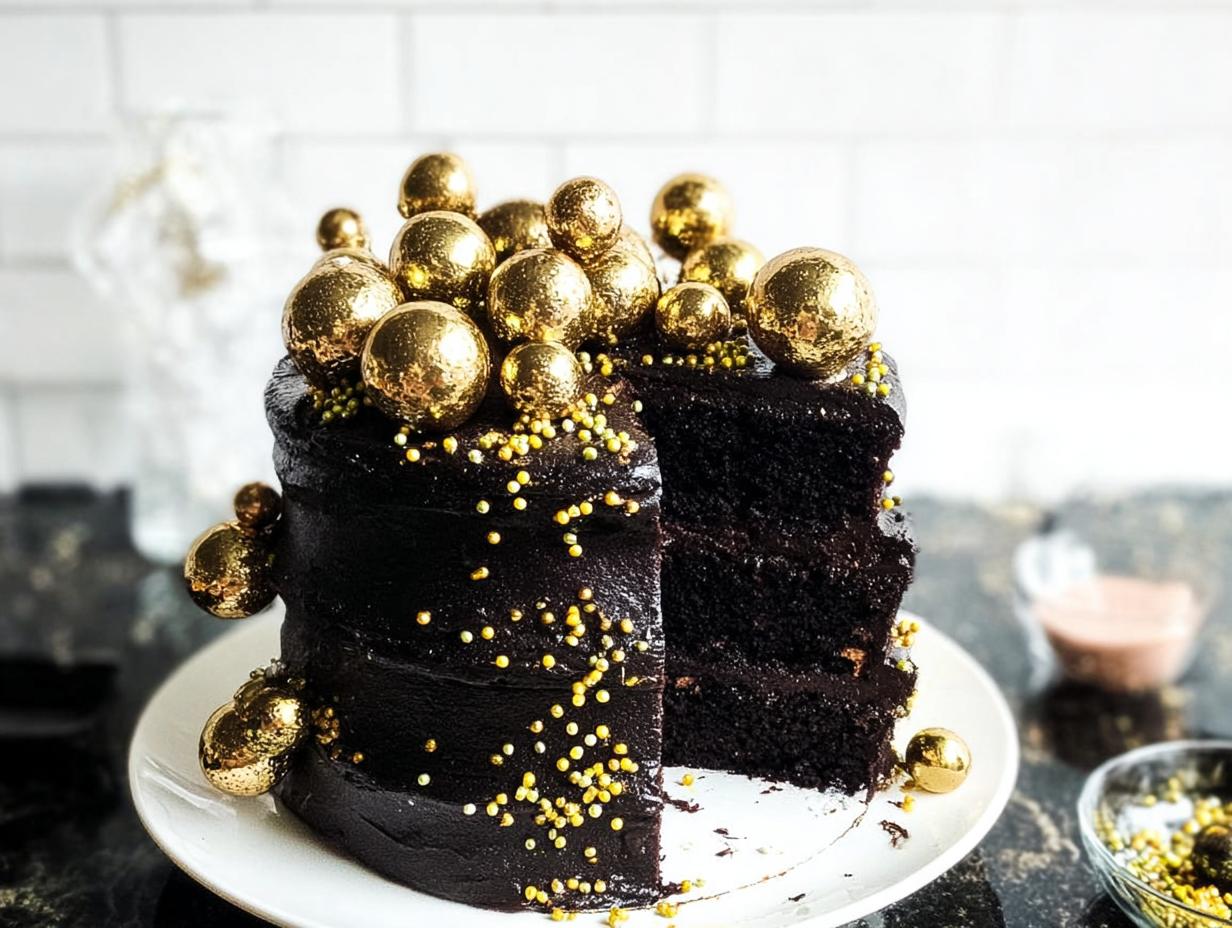
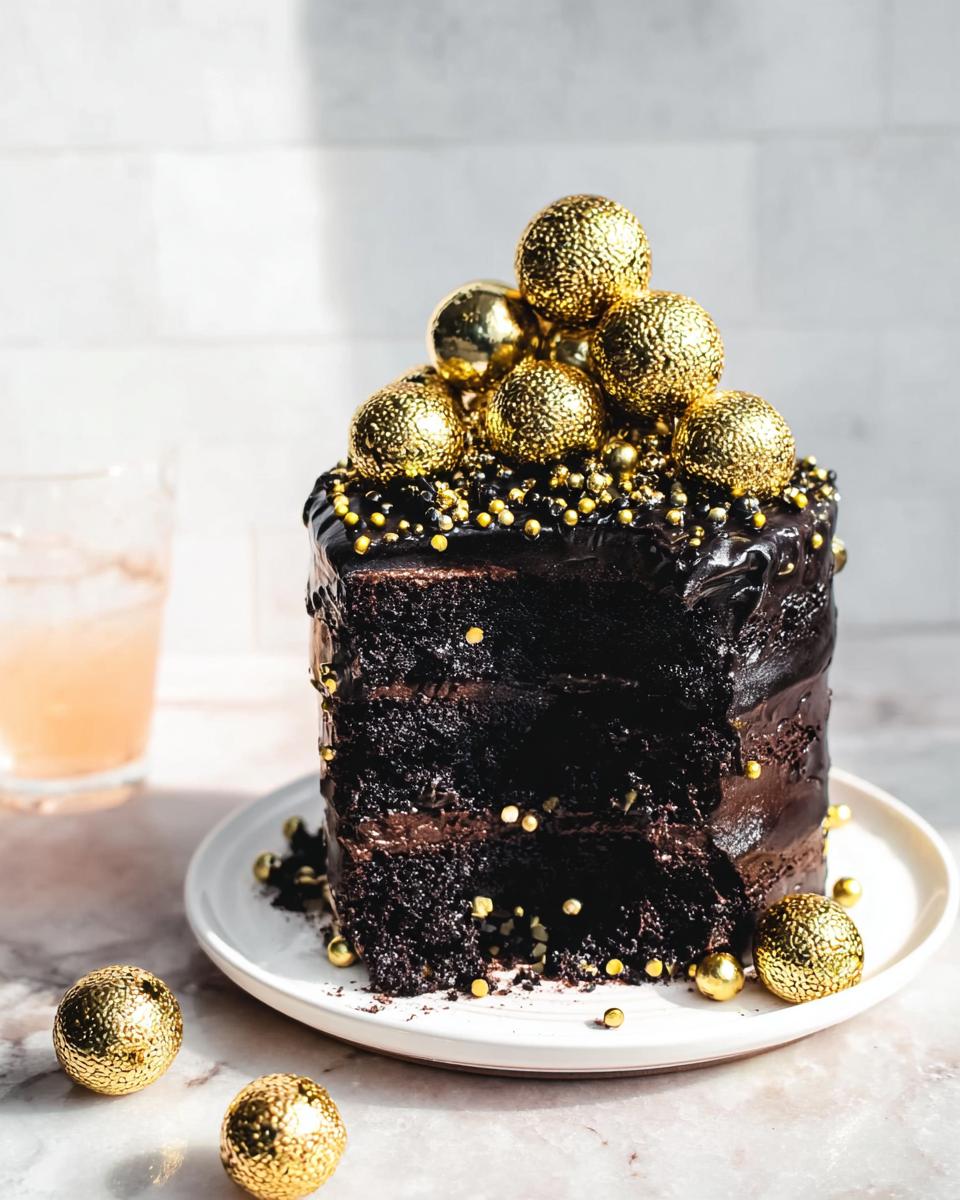
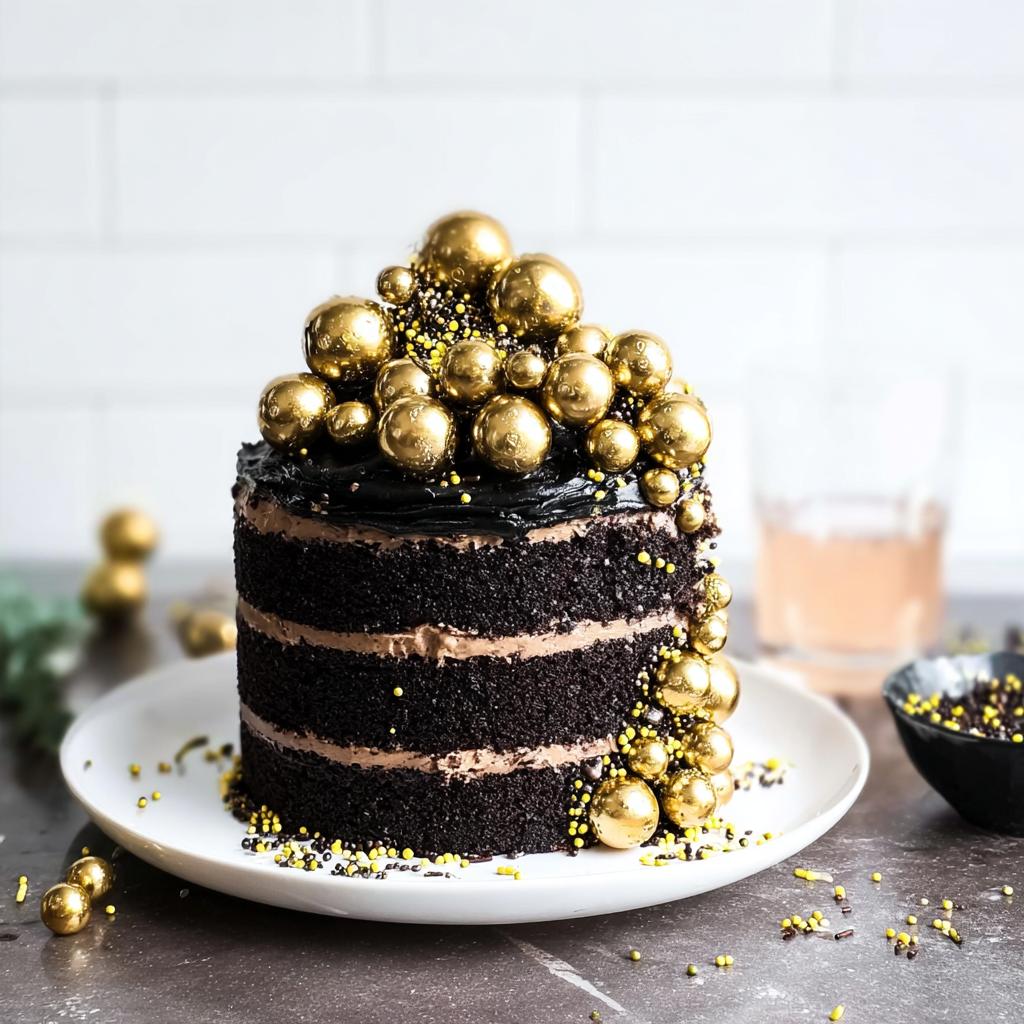
Spotlight Recipe: New Year’s Eve Chocolate Cake with Gold Spheres
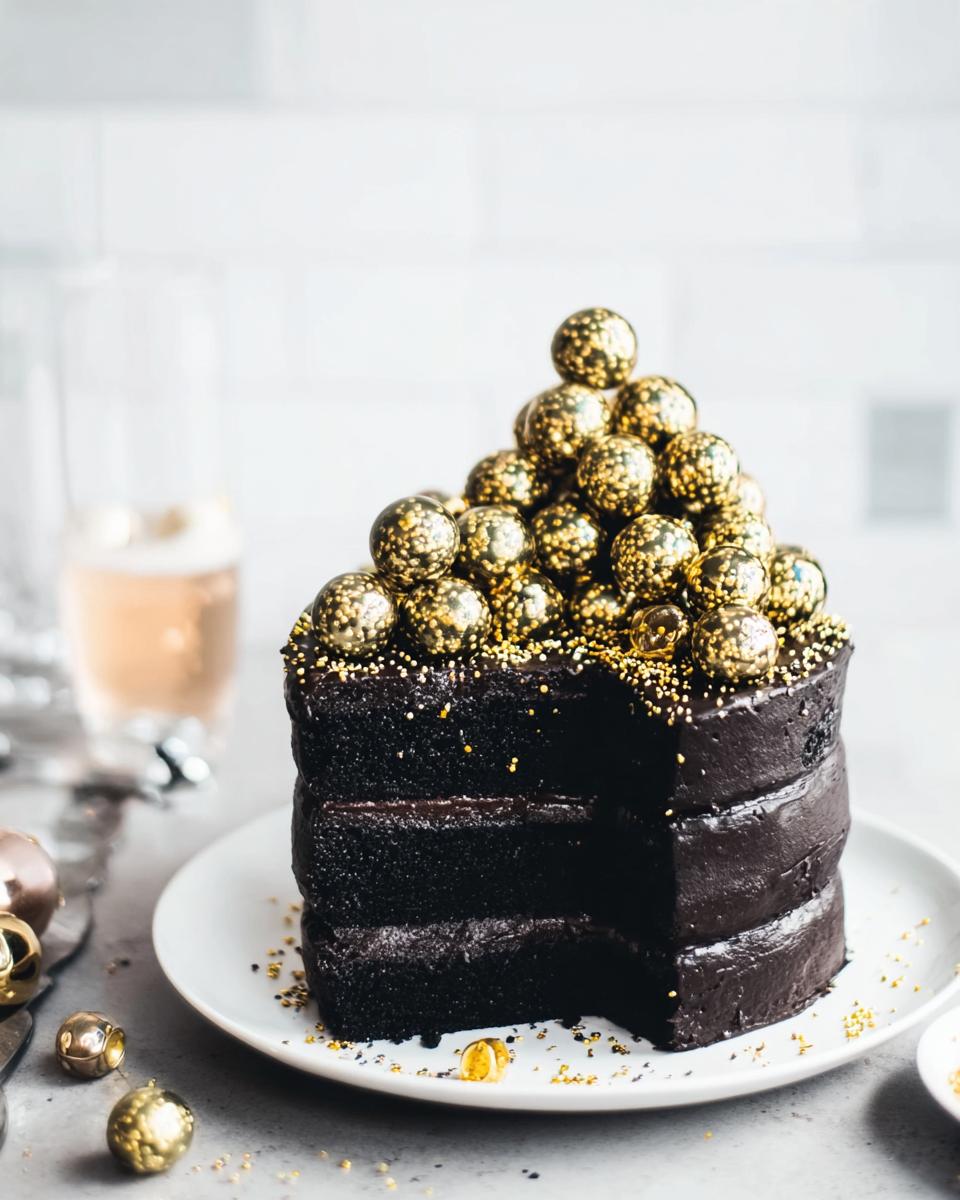
Okay, people, prepare yourselves! To really deliver on the promise of 12 New Year’s Eve Cakes That Wow, we have to start with a showstopper. This New Year’s Eve Chocolate Cake with Gold Spheres is exactly what you need. It’s rich, it’s deep, and frankly, it looks like it belongs in a fancy bakery window, despite being totally achievable at home. We’re talking three chocolate layers smothered in nearly black frosting and those incredible, shimmering gold accents.
Best part? It feeds about 12 of your favorite party guests, and while the decorating takes a little focus, it comes together relatively fast—about 45 minutes baking plus 25 minutes chilling time before you can even start decorating. You can find the full recipe details right here!
Essential Equipment for Your New Year’s Cake
To get those crisp lines and perfectly formed spheres, you can’t just wing it! You’ll need a few key players in your kitchen arsenal. Don’t panic if you don’t have them all; they make a huge difference in finishing strong for a fantastic Celebration Cake.
- You absolutely need basic cake pans (we’re using 6-inch ones here).
- An offset spatula is your best friend for getting that glass-smooth finish on the frosting.
- A microwave is essential for melting those candy melts super quickly.
- For the stars of the show, grab some candy molds capable of making spheres.
- And trust me, have some parchment paper ready for easy cleanup!
- A bench scraper is fantastic for trimming up the candy molds later on.
- A small brush will be needed later for that magical gold paint.
Ingredients for the Dark Chocolate Frosting and Gold Spheres
This cake is all about the contrast, so let’s talk about getting that deep, dark look! For the frosting, you’ll need about 4.5 cups of your favorite chocolate frosting, but the real star ingredient here is the black gel food coloring. You’ll need most of that little bottle to get that real midnight effect, which pairs so well with the Dark Chocolate Frosting.
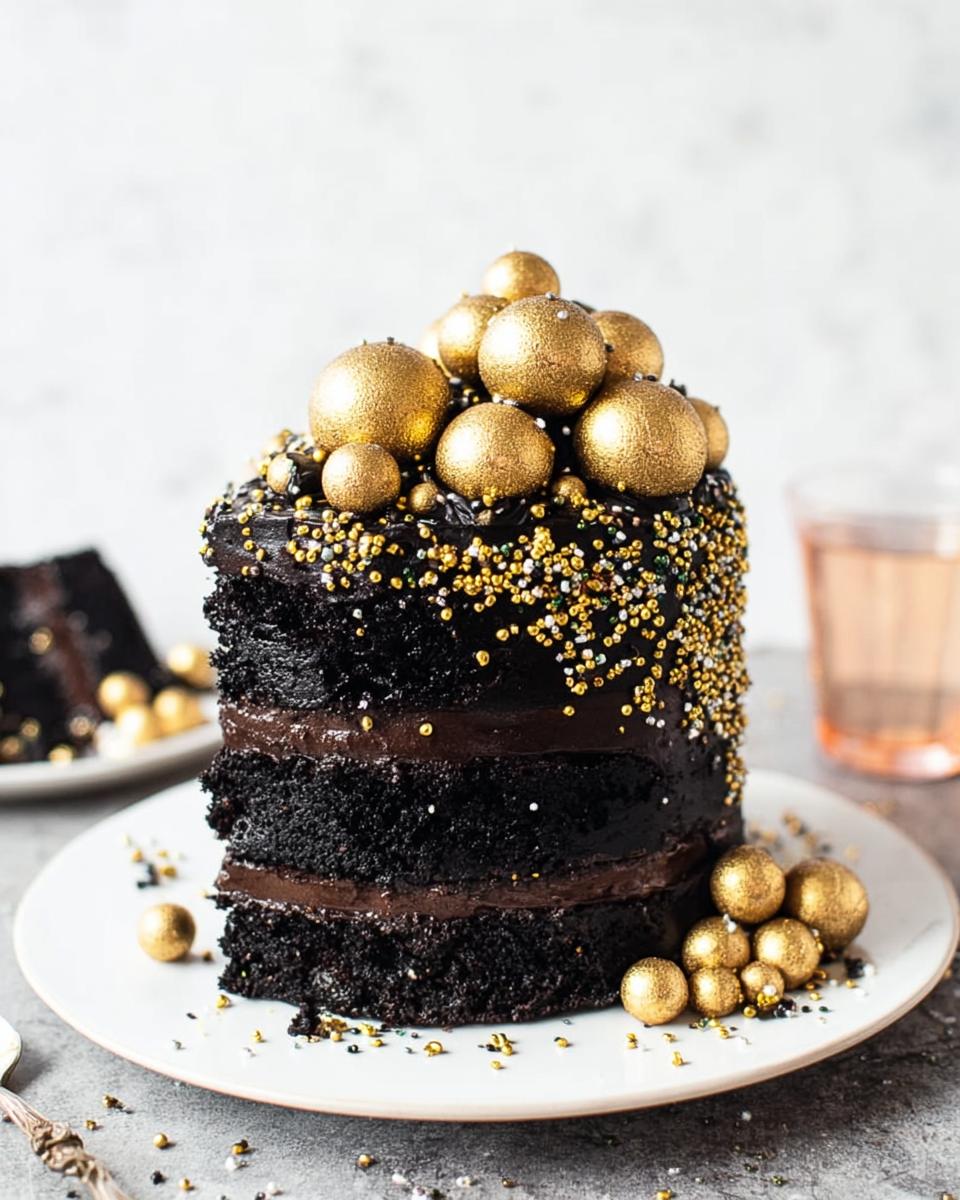
For the dazzling decorations, we’re going to use 10 ounces of yellow candy melts—don’t substitute these with regular chocolate, it won’t set right for spheres! Then, for the shimmer, grab your gold powdered food coloring and mix just a small amount with a few drops of vodka. The vodka evaporates fast but leaves that gorgeous metallic shine using Edible Gold. Finish it off with two sets of fancy sprinkles: Black Widow and Metallic Golden Dragee Melange. They really tie the whole look together!
Step-by-Step Instructions for the Showstopping New Year’s Cake
Alright, execution time! This is where we move from dreaming up dazzling New Year’s Cake designs to actually building one. Since we’re making a three-layer cake, you want to start by getting those layers perfectly leveled if they domed up a bit when they cooled. Precision matters here for a clean stack!
Once leveled, you start stacking with your frosting. I use about a half-inch layer of frosting between each tier. Don’t be stingy, but don’t drown the cake either! Then comes the absolute most important trick for a beautiful finish: the crumb coat. You slather on a *thin* layer of that gorgeous black frosting all over the outside of the stacked cake. It looks messy, I know! But you absolutely must pop that into the fridge for at least 15 to 25 minutes until it’s firm to the touch. That chilled layer locks in all those pesky crumbs, making your final coat look absolutely flawless.
Assembling and Applying the Dark Chocolate Frosting
After your cake has its little chill session, you pull it out for what I call the Glam Wrap. Take the rest of that black frosting and cover the whole thing. Use your offset spatula to work it smooth all around. Patience here beats rushing! Once the outside of the cake is looking smooth and sharp, we can make the fun part—the stars of the show!
Creating Edible Gold Spheres for Your Celebration Cake
These little gold beauties take a little finesse, but they are worth every second if you want one of those truly wow-worthy cakes. First, melt those yellow candy melts gently in the microwave. Remember, short bursts—30 seconds, then 10 seconds, stirring hard in between—stops them from seizing up on you. You want them totally smooth!
Next, fill your different-sized sphere molds. Don’t overfill! You want to invert them over parchment paper and gently tap to let the excess run out, leaving just a shell. Scrape the edges clean with that bench scraper. Pop them in the freezer for about 10 minutes to set them solid, then carefully unmold them. To make a full sphere, gently warm the flat edge of two halves on a warm pan for just a second until they get tacky, then press them together. Now for the magic: mix your gold powder with a few drops of vodka. Use a small brush to paint those spheres until every side shines. Once they are ready, gently press them onto your beautifully frosted cake!
Ingredient Notes and Substitutions for Your 12 New Year’s Eve Cakes That Wow
When you are aiming for cakes that truly stand out, like these showstoppers, knowing your ingredients is everything. It’s the difference between a good cake and one that everyone talks about until next year!
Let’s talk color first. Getting that intense, deep black for the Dark Chocolate Frosting is non-negotiable for this specific look. I know some people try to use cocoa powder, but trust me, you won’t get that dramatic depth without a quality black gel food coloring. If you use liquid dye, you’ll need way too much, and it thins out your frosting. Stick to the gel concentrate for the richest, darkest backdrop for those gold accents.
Now, for the dazzling decorations, we’re going to use 10 ounces of yellow candy melts—don’t substitute these with regular chocolate, it won’t set right for spheres! Then, for the shimmer, grab your gold powdered food coloring and mix just a small amount with a few drops of vodka. The vodka evaporates fast but leaves that gorgeous metallic shine using Edible Gold. Finish it off with two sets of fancy sprinkles: Black Widow and Metallic Golden Dragee Melange. They really tie the whole look together!
- Candy Melts vs. Chocolate: For the best results with those beautiful, smooth spheres, yellow candy melts are the easiest substitute for true modeling chocolate. They melt like a dream and harden up fast in the molds. If you *must* use white chocolate, make sure you use high-quality couverture chocolate and add a bit of refined coconut oil to help it thin out for molding.
- Painting the Gold: That vodka you mix with the gold powder? It’s amazing because it flashes off super fast, leaving zero alcohol taste behind. If you don’t keep vodka handy, clear vanilla extract or even lemon extract works in a pinch, but you’ll need to brush it on thinner since extracts are oil-based and can sometimes leave a slight residue if you use too much.
Finally, don’t skimp on the finishing touches—the sprinkles! Those fancy mixes aren’t just filler; they provide texture and contrast against the smooth frosting. Look for sets that mix different shapes and finishes, like the metallic dragees we used. High-quality sprinkles make the difference between a homemade look and that polished, party-ready finish that defines these 12 New Year’s Eve Cakes That Wow.
Tips for Success When Baking Your New Year’s Cake
Listen, making a cake this dramatic can feel a tiny bit intimidating, but these tips are my little secrets to keeping everything perfect, especially when we’re working with deep colors and delicate decorations. Think of these as handing you my cheat sheet so your cake lands firmly in the ‘Wow’ category, not the ‘Whoops’ category!
First up: that gorgeous black frosting. If you’re struggling to get that true midnight color, here’s what I do. Instead of adding all the black gel coloring at once, add about 75% and let the frosting sit on the counter for about 30 minutes. Seriously! Most gel colors need time to fully bloom and deepen their shade once they react with the fats in the frosting—it saves you from adding too much coloring and risking a bitter taste.
Preventing Cracks in Your Edible Gold Spheres
Those candy melt spheres are so delicate, and the biggest issue I see people run into is cracking when they try to join the two halves. The trick here is temperature control, my friend. When you warm the edges to seal them, use the absolute lowest heat setting you have—a non-stick pan on the lowest setting for literally just a few seconds. You just want the surface tacky, not melted all the way through or runny. If you go too hard, the shell gets too thin right at the seam, and boom, it cracks later when it cools down.
The Secret to a Mirror-Smooth Final Coat
Getting that flawless finish on the exterior of your New Year’s Cake is all about that crumb coat we talked about, but for the final coat, you need a warm finish. Dip your offset spatula into a tall glass of *very* hot water, wipe it completely dry with a towel, and then use that warm blade to smooth the frosting. The heat melts the outer layer of frosting ever so slightly, smoothing out any spatula trails. Rotate your cake stand and repeat until it looks like glass!
Making Sure the Sprinkles Stick Perfectly
We want those Sprinkles, especially the heavier metallic dragees, to stay exactly where you put them. If you apply them right after the final smoothing (before the frosting hardens up too much), they stick easily. But for sprinkles that go on the bottom half, I sometimes use a tiny bit of thinned, leftover black frosting as a decorative ‘glue’ along the bottom edge to really cement them in place so they don’t shake off when you move the cake.
Follow these little steps, and I guarantee your New Year’s centerpiece will be one of those 12 New Year’s Eve Cakes That Wow that steals the show! You got this!
Serving Suggestions for Your Festive New Year’s Cake
Okay, the cake is done—it’s black as midnight, shimmering with gold, and ready to be admired! But what do you serve alongside this magnificent thing? Because this cake is so rich with deep chocolate flavor, you don’t want accompaniments that fight it; you want things that cleanse the palate or enhance that luxurious feel.
When I unveil a cake like this, I always think about what cuts through the richness perfectly. Since it’s New Year’s Eve, you need bubbly, right? A crisp, dry Prosecco or a Cava is just beautiful alongside that dark chocolate. The bubbles act like a little scrubbing brush for your tongue, getting you ready for the next bite!
If you are leaning toward coffee, skip the sugary creamers, trust me. A strong espresso or a simple Americano lets the chocolate shine. For something sweet on the plate that keeps the elegance flowing, I adore serving these with a small handful of fresh raspberries or blackberries.
- The slight tartness of fresh berries cuts through the richness of the Dark Chocolate Frosting beautifully.
- For milk drinkers, just a splash of very cold heavy cream (nothing flavored!) works wonders.
- Consider a small, savory palate cleanser nearby, like a salted pistachio, so people don’t get overwhelmed by richness right before midnight.
Remember, this cake is the centerpiece! Keep the sideshow simple so all the attention stays on your stunning creation from the list of 12 New Year’s Eve Cakes That Wow!
Storage and Reheating Instructions for Your Celebration Cake
Okay, you’ve put in all that hard work making those shimmering gold spheres and perfecting that midnight-black finish; we definitely need a plan to keep this masterpiece safe until the big moment! Storing a highly decorated cake like this New Year’s Eve Chocolate Cake takes just a tiny bit more strategy than a simple layer cake, but it’s easy once you know the trick.
Because this cake has that rich, buttery frosting and those candy melt decorations, the refrigerator is your best friend for keeping everything firm and fresh until serving time. Condensation can be an enemy to decorations, so you have to handle this transport carefully. If you are making this more than a day ahead, wrap the cake *after* the crumb coat, but since we are dealing with those beautiful candy spheres, we want to wait as long as possible before sealing it up.
The Best Way to Refrigerate Your Cake
Once your cake is fully decorated with the gold spheres and sprinkles, you need to protect it from bumps and moisture in the fridge. Use a cake carrier if you have one—the tall dome style is perfect for this big, tall Celebration Cake. If you don’t have a carrier, you can loosely tent it with plastic wrap, but make sure the wrap isn’t touching the decorations. If it touches the gold spheres, the moisture from the fridge can cause discoloration or make the paint run. Try to keep it in the coldest, most stable part of your fridge.
When it comes to keeping the cake fresh, rich chocolate cakes like this are pretty hardy. It should stay looking fantastic in the fridge for up to three days. Just keep it away from anything smelly, like last night’s onion dip, because frosting loves to soak up surrounding aromas!
Bringing Your New Year’s Cake to Serving Temperature
This is perhaps the most important step after applying the gold paint! You cannot slice this cake straight out of the fridge, especially since it’s a dense chocolate base smothered in Dark Chocolate Frosting. If it’s too cold, the frosting will crack when you cut it, and the cake layers will taste tight and dense.
Give your cake plenty of time to come to room temperature before you plan on serving it. I usually pull it out about two hours before we sit down to eat. That gives the frosting enough time to soften back up to that perfect, creamy texture, and the cake layers will taste softer and richer. You’ll notice the cake looks a bit more vibrant after it warms up too—the gold really starts to pop!
What About Leftovers?
We rarely have leftovers when I make one of the 12 New Year’s Eve Cakes That Wow, but if you do, just treat it the same way! Store any remnants sealed tightly in the fridge. If you need to bring it back to life the next day, allow it that full two-hour warming period. Honestly, this cake is so good, it tastes just as amazing the day after the party as it did right when you finished decorating!
Frequently Asked Questions About 12 New Year’s Eve Cakes That Wow
I totally get it; sometimes when you see a showstopper that looks this good, you end up with a million little questions about the logistics! Don’t stress! Running through these FAQs should clear up any last-minute worrying so you can concentrate on celebrating when the time comes. Making one of these 12 New Year’s Eve Cakes That Wow at home is totally doable, I promise!
Can I use a different color for the frosting besides black?
Yes, you absolutely can be creative here! If black feels a little too severe for your party vibe, you could go with a deep navy blue or even a rich metallic pewter gray. However, I have to tell you why we went with black for this specific New Year’s Cake design: it makes the Edible Gold pop like nothing else! The contrast between that deep, dark base and the shimmering gold spheres is what really sells that luxurious, midnight vibe. Any lighter color will dilute that dramatic effect, but hey, if jewel-toned purple is your jam, go for it!
How far in advance can I make the gold spheres?
This is a great planning question, especially if you’re trying to juggle making the cake layers and the frosting. If you used the candy melts like the recipe suggests, those little Edible Gold spheres are pretty stable, but you don’t want them sitting around for weeks! I would recommend making them no more than 3 to 5 days ahead of time. Keep them in a single layer, in a container that seals well, and they must be stored somewhere cool and dry—definitely not the fridge if you can avoid it, as humidity can sometimes dull the metallic paint.
If you used real chocolate instead of melts, they will soften faster at room temperature, so limit that to 2 days ahead and keep them slightly cooler. The main enemy of your gold spheres is moisture, so keep that container sealed tight until right before you decorate!
What is the best way to work with such dark frosting?
Oh, dealing with super dark colors takes a specific approach, which I mentioned briefly earlier! The biggest challenge is getting that deep black without adding bitter flavor. My best advice, which is crucial if you are aiming for a truly black Dark Chocolate Frosting, is patience. Add your black gel coloring slowly, mix until it looks deep gray, and then *walk away* for 30 minutes. That color deepens on its own as the pigment oxidizes; trust me on this, or you’ll end up adding too much dye!
Can I use store-bought cake layers?
If you want to focus solely on the decoration—which is where the real fun is with these 12 New Year’s Eve Cakes That Wow—then absolutely! Using good quality, dense store-bought cake layers (like a fudgy brownie-style layer) saves you hours. Just make sure whatever you buy is relatively level. If the tops are domed, take a big serrated knife and slice them flat *before* chilling; that prepares them perfectly for stacking and frosting!
Do the metallic dragee sprinkles really make a difference?
They sure do! Those hard, shiny little balls—the metallic dragees—give your Celebration Cake the final, professional glint. They don’t add flavor, but they catch the party lights beautifully. If you can’t find the exact ones we listed, just look for a sprinkle mix that has a high percentage of actual metallic-coated balls, not just matte or glittery sugar. Texture is huge when serving a formal dessert!
Tips for Success When Baking Your New Year’s Cake
Listen, when you’re aiming for one of those spectacular looks like the gold spheres and deep black frosting, little details make the difference between ‘pretty good’ and ‘OMG, you bought that?!’ I’ve learned a few things over the years doing these dramatic finishes, so let me pass along the absolute must-knows for perfecting your New Year’s Cake!
First up: that intense black frosting. Getting the color right is key, but you can’t dump all the black gel food coloring in at once! It’s tempting, I know, because it looks gray at first. But you need to add about 75% of what you think you need, mix it well, and then just let that frosting sit on the counter for about 30 minutes before you decide if it needs more. Most black gel colors need that time to fully bloom and deepen their shade once they interact with the fats in the frosting. If you rush it, you’ll add too much dye, and it can sometimes leave a slightly bitter flavor behind. Be patient, grasshopper!
Preventing Cracks in Your Edible Gold Spheres
Those little gold beauties look amazing, but they can be temperamental! The biggest disaster waiting to happen is cracking when you try to seal the two halves together. The trick here is temperature, my friend. When you go in to seal the edges, you want the absolute lowest heat setting on your stove, using a non-stick pan. You are only trying to warm the flat edge of the candy melt shell for just a second or two until it just starts to look a little sticky—not melted or soupy! If you heat it too long, the chocolate shell gets too thin right at the seam, and when it cools, it cracks right off. Just tacky is the magic word here.
The Secret to a Mirror-Smooth Final Coat
After you’ve applied that Dark Chocolate Frosting for the final time, you’ve got to smooth it out, and I only use one trick for a professional, mirror-like finish, especially when topping it with Edible Gold elements.
Grab a tall glass, fill it with very hot water, and dip your offset spatula right into that water. Pull it out and wipe it bone-dry with a dedicated towel immediately. That brief warmth transfers to the metal blade, and when you run that warm, dry spatula over the surface of the frosting, it melts the outer layer ever so slightly. It instantly smooths out any ridges or spatula marks! You’ll have to reheat and dry the spatula a couple of times, but the result is worth it for any of these 12 New Year’s Eve Cakes That Wow.
Making Sure the Sprinkles Stick Perfectly
You don’t want your gorgeous Sprinkles falling off the bottom half of the cake when you try to move it! If you apply them right after that final smoothing coat—before the frosting starts to feel firm—they usually stick okay just from the frosting’s tackiness. But for the heavy hitters, like those metallic dragees, I sometimes use a tiny bit of thinned-out backup frosting as edible glue along the bottom border. Dab a little on where you want the sprinkles, and they stick fast! This is especially helpful if you plan on moving the cake a lot before serving night.
Serving Suggestions for Your Festive New Year’s Cake
You’ve done it! Your New Year’s Cake is dressed to the nines, shimmering away, and ready to bring in the countdown. Now, the dessert deserves the right reception! Because this creation is so intensely rich with deep chocolate and dark frosting, you don’t want to serve it with desserts that are equally heavy. You need something to refresh the palate after that gorgeous, rich bite!
For the absolute best pairing, anytime you have a decadent chocolate cake, you have to go bubbly. A really crisp, dry sparkling wine—think Brut Cava or maybe a good Italian Prosecco—is perfect. The tiny, sharp bubbles basically cleanse your mouth of the chocolate richness so you can appreciate the next slice even more! If you are serving coffee, stick to simple; an espresso or a strong, black drip coffee works way better than anything loaded with sugary syrups.
If you feel like you need something extra on the plate to balance it out, don’t reach for more cake or cookies! I love serving these Celebration Cakes alongside a small tangle of fresh berries. A few tart raspberries or even some plump blackberries provide that acidic pop that just cuts through the richness magically. It keeps the look elegant and lightens the overall experience, which is nice after a full holiday meal!
- Fresh raspberries or tart cherries are my top choice for visual contrast and flavor balance.
- Pair with high-quality, bitter dark roast coffee or sparkling wine.
- Avoid creamy accompaniments; the cake already has plenty of richness!
Keep the sideshow simple; the cake created from the 12 New Year’s Eve Cakes That Wow list is the whole main event!
Storage and Reheating Instructions for Your Celebration Cake
Alright, we’ve gone through all the effort making those perfect gold spheres and that sleek, dark finish; we officially need a plan to keep this treasure safe until the big moment! Storing a cake this detailed—especially one with candy decorations—needs a couple of careful considerations, but it’s super simple once you know the rules.
Since this cake has that beautiful, soft Dark Chocolate Frosting and all those meltable decorations, the refrigerator is your safest bet for keeping it looking pristine for a few days. If you can, use a proper cake carrier—the dome style protects the height and those delicate gold additions better than anything else. If you don’t have a carrier, you can cover it loosely with plastic wrap, but be super careful! Make sure that wrap isn’t touching the gold spheres or the sprinkles, because any contact in the cold can cause condensation, which might smear that lovely paint job.
The Best Way to Refrigerate Your Cake
I always wait until the very last minute to decorate heavily. If you are making this several days out, keep the cake layers wrapped well, and the frosting sealed. But once that cake is fully assembled and you’ve applied every gold piece, it needs to go straight into cool storage. Keep it in the main, stable part of the fridge—not jammed into the door where the temperature swings constantly.
This cake is so rich it stays fresh for days, easily hiding out in the fridge for up to three days before your party. Just make sure it’s sealed up tight. Chocolate is notorious for picking up outside smells—we definitely don’t want your gorgeous Celebration Cake tasting faintly of leftover garlic dip!
Bringing Your New Year’s Cake to Serving Temperature
This step is non-negotiable if you want the very best experience from this cake! You absolutely cannot slice this beauty straight out of the fridge. If it’s too cold, two things happen: the cake layers taste dense and tight, and the frosting—even though it’s soft—will be too stiff and will crack everywhere when you try to slice it cleanly.
Give this beauty time to warm up! I usually pull it out of the fridge at least a full two hours before we plan on serving it. That allows the butter in the frosting to soften back to that lovely, luxurious texture, and the cake crumb itself relaxes, making every bite taste moister and richer. You’ll see the gold shimmer look brighter when it warms up, too!
What About Leftovers?
Honestly, when I make one of these 12 New Year’s Eve Cakes That Wow, there are rarely any leftovers! But if you have some, just cover and refrigerate it exactly as you stored the whole cake. When you’re ready for a slice the next day, let that piece sit on the counter alone for about 30 to 45 minutes. It will come back to life beautifully, tasting almost as good as it did right after decorating!
Frequently Asked Questions About 12 New Year’s Eve Cakes That Wow
Can I use a different color for the frosting besides black?
Yes, you absolutely can be creative here! If black feels a little too severe for your party vibe, you could go with a deep navy blue or even a rich metallic pewter gray. However, I have to tell you why we went with black for this specific New Year’s Cake design: it makes the Edible Gold pop like nothing else! The contrast between that deep, dark base and the shimmering gold spheres is what really sells that luxurious, midnight vibe. Any lighter color will dilute that dramatic effect, but hey, if jewel-toned purple is your jam, go for it!
How far in advance can I make the gold spheres?
This is a great planning question, especially if you’re trying to juggle making the cake layers and the frosting. If you used the candy melts like the recipe suggests, those little Edible Gold spheres are pretty stable, but you don’t want them sitting around for weeks! I would recommend making them no more than 3 to 5 days ahead of time. Keep them in a single layer, in a container that seals well, and they must be stored somewhere cool and dry—definitely not the fridge if you can avoid it, as humidity can sometimes dull the metallic paint.
If you used real chocolate instead of melts, they will soften faster at room temperature, so limit that to 2 days ahead and keep them slightly cooler. The main enemy of your gold spheres is moisture, so keep that container sealed tight until right before you decorate!
What is the best way to work with such dark frosting?
Oh, dealing with super dark colors takes a specific approach, which I mentioned briefly earlier! The biggest challenge is getting that deep black without adding bitter flavor. My best advice, which is crucial if you are aiming for a truly black Dark Chocolate Frosting, is patience. Add your black gel coloring slowly, mix until it looks deep gray, and then *walk away* for 30 minutes. That color deepens on its own as the pigment oxidizes; trust me on this, or you’ll end up adding too much dye!
Can I use store-bought cake layers?
If you want to focus solely on the decoration—which is where the real fun is with these 12 New Year’s Eve Cakes That Wow—then absolutely! Using good quality, dense store-bought cake layers (like a fudgy brownie-style layer) saves you hours. Just make sure whatever you buy is relatively level. If the tops are domed, take a big serrated knife and slice them flat *before* chilling; that prepares them perfectly for stacking and frosting!
Do the metallic dragee sprinkles really make a difference?
They sure do! Those hard, shiny little balls—the metallic dragees—give your Celebration Cake the final, professional glint. They don’t add flavor, but they catch the party lights beautifully. If you can’t find the exact ones we listed, just look for a sprinkle mix that has a high percentage of actual metallic-coated balls, not just matte or glittery sugar. Texture is huge when serving a formal dessert!
Share Your New Year’s Cake Masterpiece
You have made it through the whole list, from getting inspired by the 12 New Year’s Eve Cakes That Wow to mastering those tricky gold spheres! Now comes the best part: celebrating your success! Baking is all about sharing joy, sweetness, and creativity, and I absolutely cannot wait to see what stunning centerpieces you bring to your table this year.
When you finish that last little gold sphere and stand back to admire your work, please, please tell me about it! Did you try the black frosting? How did the edible gold look under the twinkly party lights? Leave a comment below letting me know how your New Year’s Cake turned out. Knowing what worked for you helps us all bake better as we head into the new year!
And if you took a picture—and how could you not?—share it! Tag me on social media. Seeing your interpretations of these fun, festive designs is honestly the best reward for putting all these crazy ideas together. Let’s make next year the most delicious one yet. Happy New Year, my fellow bakers!
New Year’s Eve Chocolate Cake with Gold Spheres
Ingredients
Equipment
Method
- Prepare your three 6-inch chocolate cake layers. If you do not have a preferred recipe, consider using a fudge sundae cake recipe.
- Color the chocolate frosting black. This may require a significant amount of black gel food coloring. You may need to refrigerate the frosting to firm it up.
- Level the cake layers if necessary. Spread about 1/2 inch of frosting between each layer. Apply a thin layer of frosting to the outside of the cake (crumb coat) and chill in the refrigerator for about 10-15 minutes until set.
- Once the crumb coat is chilled, use the remaining frosting to cover the entire cake smoothly.
- Press Fancy Sprinkles in Black Widow onto the bottom half of the cake for added sparkle.
- Melt the yellow candy melts in the microwave. Start with 30-second intervals, then use 10-second intervals, stirring until smooth.
- Fill 1-inch and 1 1/2-inch sphere molds with the melted yellow candy melts.
- Invert the molds over parchment paper and gently shake to remove excess candy melts. Use a bench scraper to clean the mold openings. Refrigerate until firm, about 10 minutes.
- Remove the half spheres from the molds. To join them, gently heat the open edge of two half spheres on a low-heat pan until they begin to melt, then press them together to form a full sphere. Smooth any excess candy melt that squeezes out.
- Mix gold powdered food coloring with a few drops of vodka to create a paint. Paint the candy spheres gold.
- Gently press the gold spheres into the frosting on the cake. Use any remaining melted candy melts to adhere spheres stacked on top of each other.
- Garnish the cake with Fancy Sprinkles in Metallic Golden Dragee Melange.
Notes
Tried this recipe?
Let us know how it was!
Master of Global Fusion Innovation
My culinary adventure reflects my Lebanese-Italian heritage and a decade spent in the dynamic fusion restaurant scenes of Miami and Barcelona. I’ve made it my mission to prove that beloved global comfort foods can be successfully adapted for low-carb living without losing their soul, their cultural authenticity, or their ability to comfort.
With advanced training in molecular gastronomy and experience spanning Mediterranean, Middle Eastern, and Latin American traditions, I’ve developed what I call “respectful innovation” – culinary creativity that honors traditional cooking wisdom rather than replacing it. My alternative ingredient substitution systems are now taught in specialty diet cooking schools throughout the region.
Drawing from my trilingual upbringing, I understand how deeply food connects to identity and memory. That’s why my flavor-bridging techniques allow classic dishes from around the world to maintain their comforting, familiar qualities while meeting contemporary nutritional standards. I regularly share these techniques at international culinary symposiums and innovation events.
When I’m not experimenting in my Miami fusion kitchen laboratory, you’ll find me at local salsa dance venues – the rhythm and improvisation skills translate directly to my creative cooking process! My role as a foster parent to rescue rabbits has unexpectedly inspired some of my most creative plant-based low-carb innovations.
My personal low-carb journey began as a way to maintain energy for my active lifestyle, but it’s evolved into a professional mission of proving that healthy eating can be globally adventurous rather than restrictively limiting. Every recipe I create is a passport to culinary adventure, transforming kitchens into laboratories for exploring healthy versions of the world’s most beloved comfort foods.