
Oh, if there is one dish that instantly wraps you up like the warmest, coziest blanket, it has to be potatoes swimming in cheese sauce. Seriously, nothing else compares! If you’re looking for that ultimate comfort food moment—simple, creamy, and unbelievably cheesy perfection—then you’ve landed in the right spot. I still remember my first attempt at making Cheesy Scalloped Potatoes for a big family get-together. It was a chilly Sunday afternoon, and I was determined to impress everyone. As I layered those thinly sliced potatoes with bubbling cheese sauce, the kitchen filled with the most irresistible aroma. When I pulled that golden dish from the oven, wow, I felt such a huge sense of accomplishment! My relatives devoured it almost immediately, and in that moment, I knew food was magic for bringing people together. This recipe is my absolute go-to now, a staple at every celebration. I’m Clara Martinz, a Master of Culinary Visual Arts, and I guarantee this will become your favorite, too!
Why This Recipe for Cheesy Scalloped Potatoes Is a Must-Try
You want hearty, cheesy goodness without a million steps? I get it! This is the Baked Casserole that always gets rave reviews. It’s ridiculously creamy and the layering is so straightforward, even if you’re rushed.
- It’s unbelievably creamy thanks to that simple roux base.
- Perfectly tender potatoes bake right in the sauce.
- It’s truly a guaranteed Crowd Pleaser for any potluck.
The Ultimate Comfort Food Experience
Pulling this dish out of the oven makes the whole house smell like home. There’s just something about that bubbling texture in a Cheesy Potato Bake that screams warmth and happiness. Trust me, it makes any meal feel special.
Gathering Ingredients for Perfect Cheesy Scalloped Potatoes
Okay, before we get messy, let’s chat about what we need! Because this is such a simple dish, the quality of your ingredients makes a huge difference in the final Cheesy Scalloped Potatoes. We aren’t using anything fancy here, but paying attention to a couple of specifics—like slicing those potatoes just right—is key for getting that perfect, tender bake. It should only take about 15 minutes to prep everything before it heads into the oven for that long, slow cook.
For the Potatoes and Onions
This is where we start building those gorgeous layers. You’ll want to peel your russets; leave the skin on and it kind of messes up the creamy texture we’re aiming for. And please, slice them thin! I tell everyone: aim for about ¼-inch slices. If they are too thick, they won’t soften up in time.
- 4 medium russet potatoes (that’s about 2 pounds), peeled and sliced ¼-inch thick
- 1 yellow onion, thinly sliced into rings
For the Rich Cheese Sauce
This sauce is the heart of the whole operation! My biggest piece of advice here is to make sure your milk is at room temperature before you start. If you dump cold milk into your hot butter and flour mix (the roux), the whole sauce can seize up and get lumpy. Nobody wants that! We’re using mild cheddar, but this is a great spot to build expertise—feel free to mix in something sharper if you like a more intense flavor explosion!
- 3 tablespoons unsalted butter
- 3 tablespoons all-purpose flour
- ½ teaspoon kosher salt
- 2 cups whole milk (make sure it’s room temperature!)
- 1 ½ cups mild cheddar cheese, freshly shredded (trust me, skip the pre-shredded bag!)
- Salt and pepper to taste
Essential Equipment for Making Cheesy Scalloped Potatoes
Before you even think about slicing those potatoes, let’s make sure your kitchen is ready! Setting yourself up with the right gear makes cooking for a crowd so much easier. You don’t need anything super fancy here, which is what I love—it’s all about reliable basics.
Having these items ready means zero scrambling halfway through making the roux or layering the dish. This is part of setting yourself up for success, building that trust that this simple Comfort Food recipe is totally achievable!
- You absolutely need an 8×8-inch casserole dish. This size gives you just the right depth for those beautiful, tender potato layers to cook evenly throughout those 90 minutes.
- Grab a medium-size saucepan. This is where all the creamy magic happens when you create that rich cheese sauce. Make sure it’s big enough to handle adding the milk without boiling over!
Step-by-Step Instructions for Cheesy Scalloped Potatoes
Alright, now for the fun part! Getting these Cheesy Scalloped Potatoes into the oven is surprisingly straightforward, but patience is your best friend here. Because we are baking them low and slow, this dish needs a good 85 to 90 minutes to fully tenderize those potato slices, so don’t rush the process! If you want that bubbly, hug-in-a-dish casserole experience, you simply have to let the oven do its work. If you’re looking for extra tips on making potatoes perfectly soft, I always check out what my friend Clara does over at scalloped-potatoes. Just remember to keep that foil on tight for the first long bake!
Preparing the Potatoes and Oven
First things first, we need heat! Go ahead and preheat your oven way up high to 400°F. While that’s warming up, give your 8×8-inch casserole dish a good spray so nothing sticks later—we want easy cleanup! Now, take those beautifully sliced potatoes and onions and start layering them in there. Don’t just dump them in! I like to slightly stagger the layers—a layer of potato, a layer of onion, more potato. Uniform slicing is crucial, remember? Those ¼-inch slices ensure every single bite cooks through at the same time.
Creating the Creamy Cheese Sauce Base
This is where you need to focus for just a minute to make sure we avoid lumps. Head to your saucepan and melt the butter over medium heat. Whisk in your flour and salt—this little mixture is called a roux, and it’s what thickens everything up. Whisk it constantly for sixty seconds! Then, slowly pour in that room-temperature milk—think slow, steady stream while you whisk like you mean it. Keep stirring until that sauce thickens up nicely. You’ll see it start coating the back of a spoon; that’s your sign it’s ready for the next step.
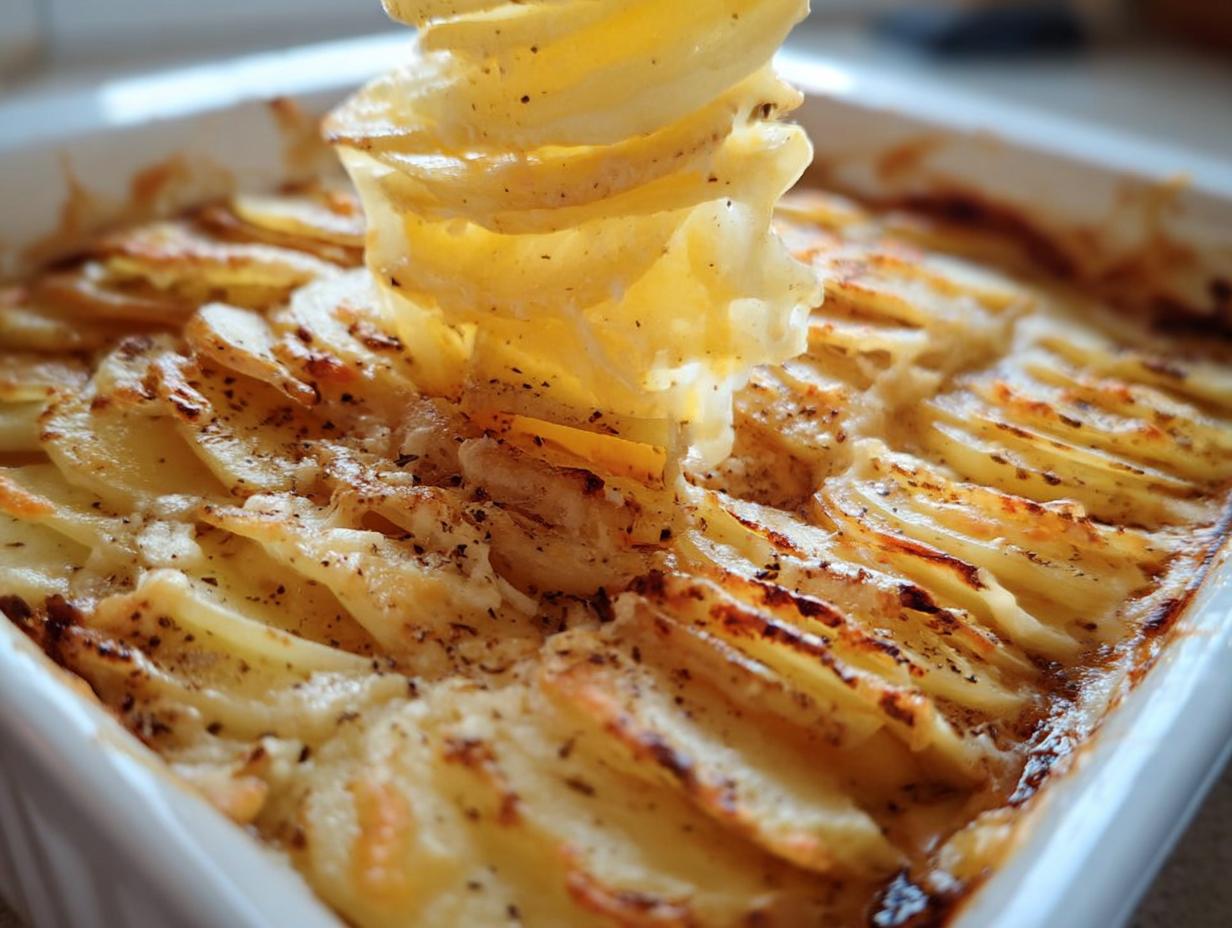
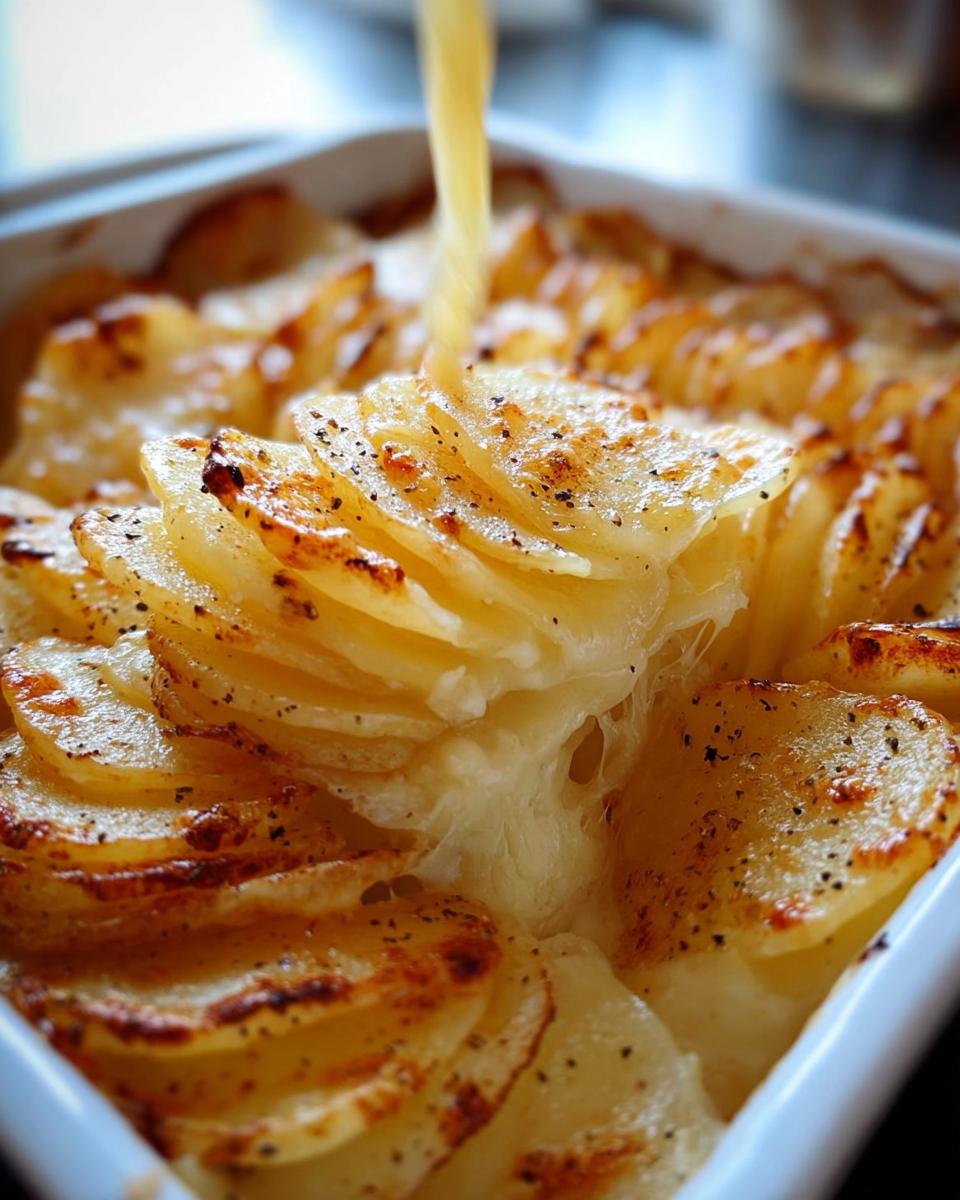
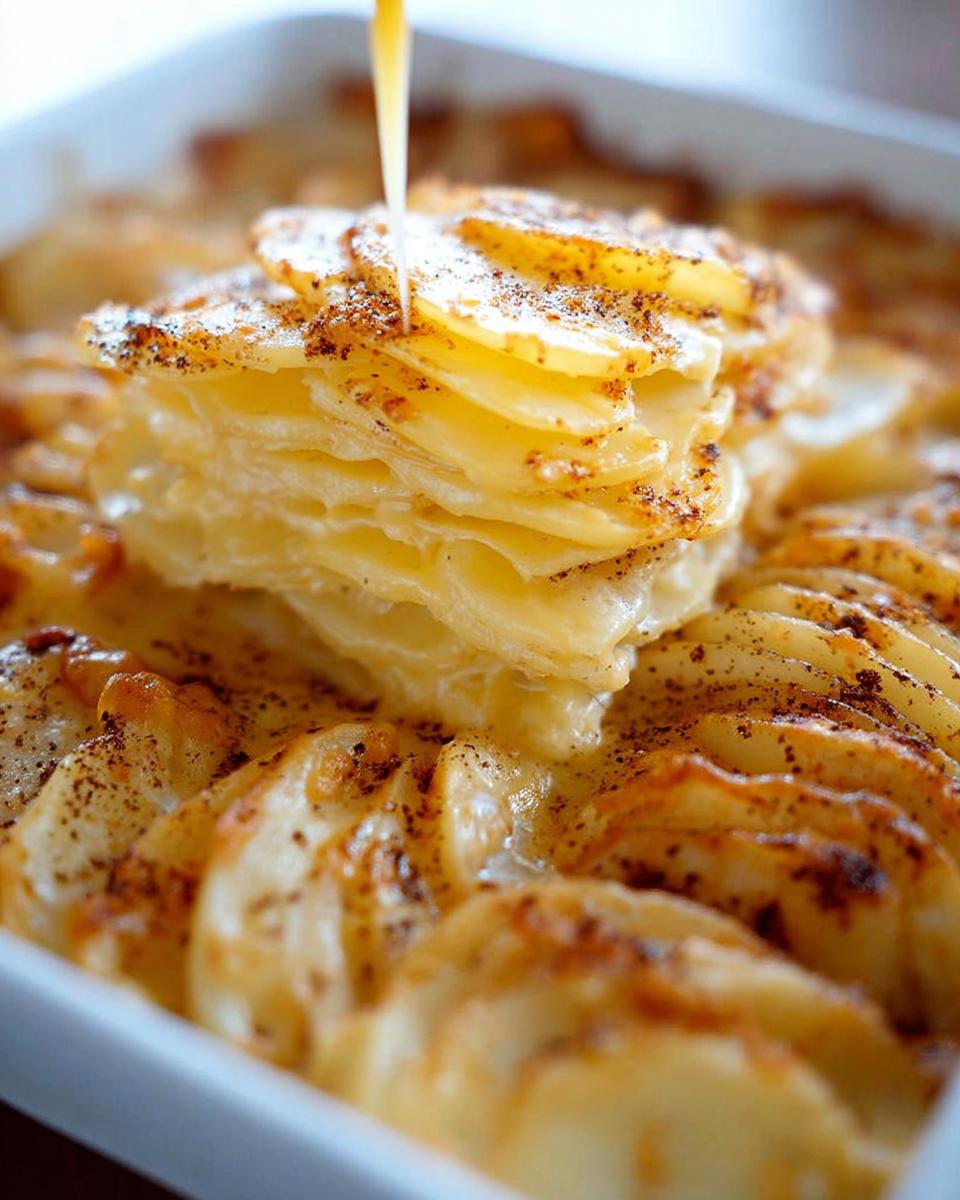
Assembling and Baking Your Cheesy Scalloped Potatoes
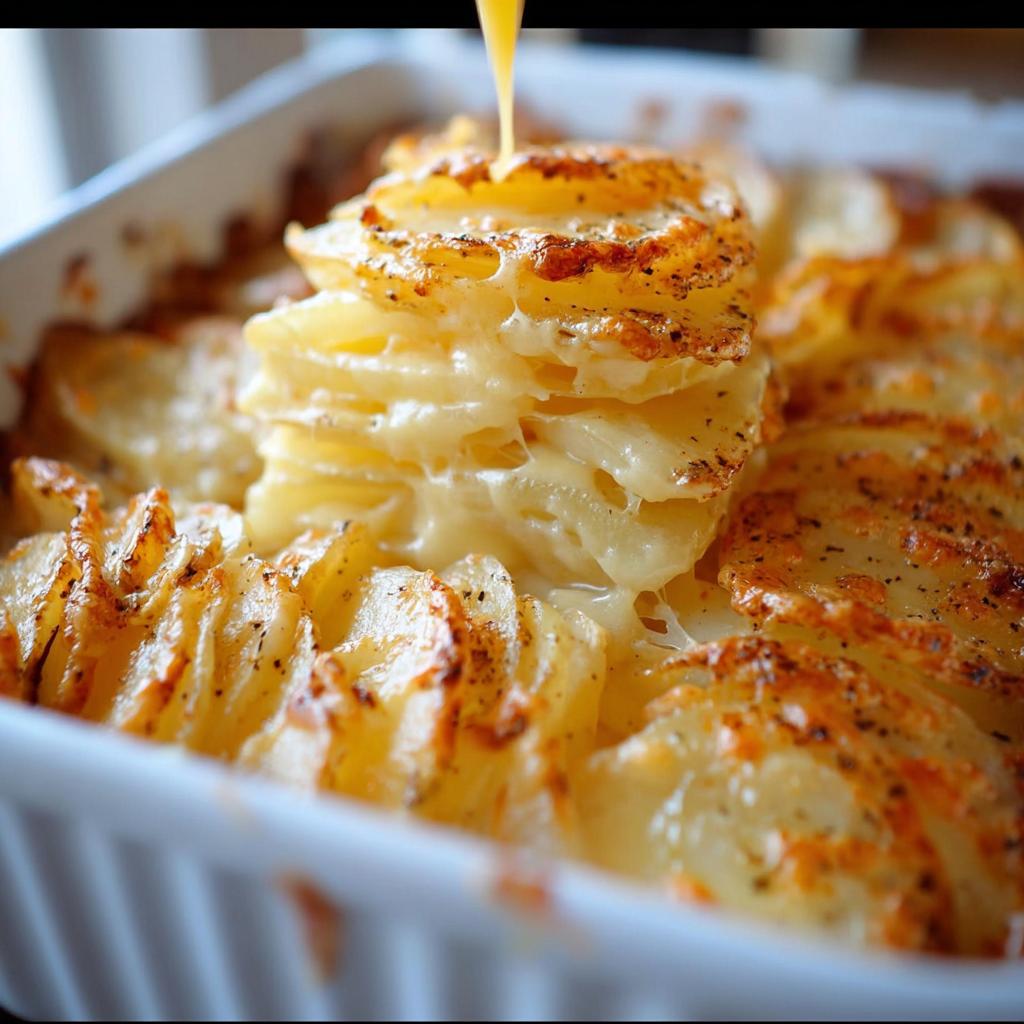
Once the sauce is thick and beautiful, yank it off the heat and stir in all that shredded cheddar cheese—all at once! Give it a minute until it’s completely melted and smooth. Taste it now! Does it need a little more pepper? Perfect. Now take that luscious sauce and pour it evenly over all those layers of potatoes and onions in your baking dish. Be generous! Once it’s all covered, seal that dish up tightly with aluminum foil. Pop it in the 400°F oven and let it bake for a solid 85 to 90 minutes. You know they’re done when a fork slides right through a potato slice with zero resistance. That’s how you get perfect Cheesy Scalloped Potatoes!
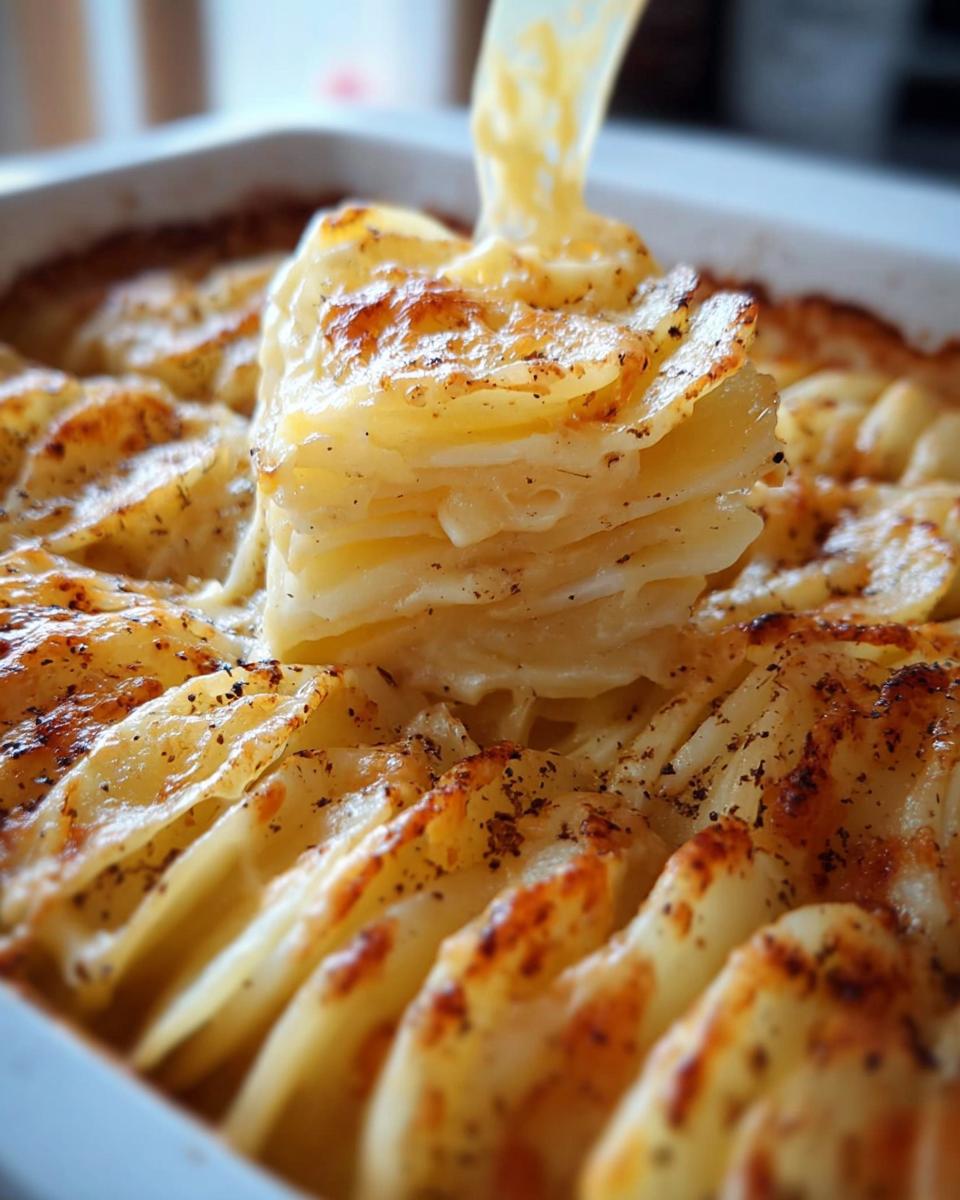
Achieving the Golden Brown Finish
You’ve waited 90 minutes, and your potatoes are tender—fantastic! But we aren’t done yet; we need that gorgeous, bubbly, golden crust. Carefully remove the foil, and switch your oven setting from ‘Bake’ to ‘Broil.’ This is the part where you have to stand right there and watch them like a hawk! Seriously, they go from golden to burnt in about 30 seconds flat. Let them broil for just a minute or two until the top is perfectly caramelized and sizzling. Pull them out, let them rest for five minutes so the sauce sets up, season with a final dash of salt and pepper, and serve immediately!
Tips for Success When Making Cheesy Scalloped Potatoes
I’ve learned a few things over the years making this Cheesy Potato Bake, mostly through happy accidents! The most important thing to remember is moisture management. See, russet potatoes have a lot of starch, which is great for thickening the sauce, but they also need plenty of liquid to cook through properly.
When you’re making that sauce, if it seems a little too thick after you add the cheese, don’t panic! Just whisk in another splash of milk until you get a pourable consistency. Remember, the potatoes are going to soak up a ton of that liquid during the 90-minute bake. Also, please check your potatoes around the 80-minute mark. If they’re still a little hard, just tent the foil back over them and give them another 10 minutes before you risk the broiler. We want melt-in-your-mouth texture, not chewing practice!
Ingredient Substitutions for Your Cheesy Potato Bake
I know sometimes we open the fridge and realize we’re missing that one specific ingredient Mom called for! Never fear, this Cheesy Potato Bake is flexible. While I insist that using whole milk gives you the best richness, I totally understand needing alternatives, especially when cooking for folks with dietary needs.
The biggest thing to remember when swapping ingredients is texture. If you change something that affects thickness, you might need to slightly adjust your cooking time or how much liquid you use. We are aiming for that perfect blanket of sauce, after all!
Let’s talk cheese first. If you don’t have mild cheddar on hand, go for it! Sharp cheddar is fantastic because it means you need a little less cheese overall since the flavor packs a punch. Gruyère melts beautifully and gives a wonderfully nutty background note. However, please don’t substitute the cheese with just processed slices; that just doesn’t melt right into that creamy sauce.
Milk is another common swap we run into. If you need to skip the whole milk, 2% milk will work just fine, but your sauce might be slightly less rich. If you try using half-and-half or heavy cream, you need to be extra careful! Cream is much heavier, so you might need to add an extra splash of water or maybe even a teaspoon of extra flour to the roux so the sauce doesn’t become too thick before you even add the cheese. I haven’t personally tested dairy-free milk options, but if you try almond milk or oat milk, thin out the roux mixture a little more generously to start, okay?
Serving Suggestions for Cheesy Scalloped Potatoes
Whew! You’ve got this incredible, rich dish ready, and now you need things to put next to it so you can call it a real meal, right? Since these Cheesy Scalloped Potatoes are such decadent Comfort Food, you want sides that keep things cheerful without fighting the richness of the sauce.
My very favorite thing to pair with this is a simple roast ham or maybe even some slow-cooked pork shoulder. The sweetness just dances with the salty cheese underneath! If you’re serving this for a big holiday dinner, it looks beautiful next to a perfectly glazed roast chicken—it really elevates the whole table.
Honestly, they are so hearty, you only need something bright and green to cut through! A simple tossed green salad with vinaigrette or maybe some lightly steamed green beans on the side are all you need. Instant perfect holiday spread!
Storage and Reheating Your Cheesy Scalloped Potatoes
Don’t you hate waste? Me too! The good news is that this Cheesy Potato Bake is an amazing leftover, but you have to treat it gently so that sauce stays gooey and doesn’t turn into a brick overnight.
First, make sure you let your casserole dish cool down on the counter for just a bit—maybe 30 minutes—after you pull it out of the oven. You never want to put piping hot food directly into the fridge; it messes with the temperature balance too much. Once it’s cooled slightly, cover the whole dish tightly with plastic wrap or just transfer the leftovers into an airtight container. They will keep wonderfully in the refrigerator for about three to four days. That’s lunch sorted!
Freezing is also an option if you’ve made a massive batch, which I always seem to do! You can freeze the leftovers quite successfully. I recommend scooping individual portions into freezer-safe containers instead of freezing the whole brick at once. This makes thawing much easier later on. You can freeze them for up to two months.
Reheating Tips for the Perfect Texture
Here’s the secret to reviving those leftover Scalloped Potatoes: low and slow is the way to go. If you blast them in the microwave, the milk solids separate, and you end up with dry potatoes swimming in oily cheese. No thank you!
For reheating from the fridge, transfer a serving to an oven-safe dish. Here’s the crucial step: add a tiny splash—maybe a tablespoon—of extra milk or even a little broth right over the top layer. Then, cover it tightly with foil before popping it into a 325°F oven. Let it warm through for about 15 to 20 minutes, or until it’s steaming hot all the way to the middle. The foil traps the steam, reintroducing moisture back into the sauce. If you are using frozen portions, let them thaw in the fridge overnight first, and then follow the same low-and-slow reheating method!

Frequently Asked Questions About Cheesy Scalloped Potatoes
I always get so many great questions whenever I post this recipe, and that’s wonderful! It just shows how much everyone loves a good, hearty Baked Casserole. I’ve pulled together the most common things folks ask me about making these Cheesy Scalloped Potatoes the absolute best for their tables.
Can I make this Cheesy Potato Bake ahead of time?
Oh, yes, you absolutely can! This is the secret weapon for being less stressed when company arrives. You can assemble the entire dish completely—potatoes layered, sauce poured, the works—cover it tightly, and keep it in the fridge for up to 24 hours before baking. Don’t bake it ahead of time, though, because the sauce starts to soak in and gets too dense.
If you assemble it the day before, just pull it out of the fridge about 30 minutes before it’s time to bake. You might need to add an extra 5 to 10 minutes to that 90-minute bake time since it’s starting cold, but it comes out tasting just as fantastic. It’s a super reliable Crowd Pleaser for busy holidays!
What is the best potato to use for Cheesy Scalloped Potatoes?
If you take away only one thing from this whole guide, please remember this: stick with russets! Seriously, russets are your best friend here. They have high starch content, which is vital because that starch leaches out into the milk and flour mixture, helping that sauce naturally thicken up without you having to add tons of extra flour.
Waxy potatoes, like red potatoes, just don’t release enough starch, and you end up with watery sauce around firm potatoes. We need the starch to create that luscious, creamy outcome we all want in our Cheesy Scalloped Potatoes. So, peel those russets and get slicing!
Can I add bacon or ham to make this a main dish?
You totally can! If you want to turn this into a full meal instead of just a side dish, adding cooked, crumbled bacon or small cubes of ham right into the layers with the onions is an amazing idea. Just make sure everything you add is already cooked, since the main bake time is dedicated to tenderizing the potatoes, not cooking meat. It just bumps up the flavor factor immensely!
Why did my cheese sauce separate and become oily?
That’s nearly always caused by adding the cheese when the sauce is too hot, or sometimes it’s just the quality of the cheese itself! When the heat is too high, the fats in the cheese release too quickly, separating from the smooth solids. To prevent this next time, always take the saucepan completely off the heat, let it cool for about 30 seconds, and then stir in your shredded cheese slowly. Also, using good quality, block cheddar that you shred yourself makes a HUGE difference compared to pre-shredded kinds!
Final Thoughts on Making the Best Cheesy Scalloped Potatoes
I truly hope you gather your loved ones soon to share this recipe! This Cheesy Scalloped Potatoes dish is more than just a side; it’s a warm hug on a plate. Give this simple, indulgent Casserole a try this week. Let me know in the comments when you bake your batch!
Cheesy Scalloped Potatoes
Ingredients
Equipment
Method
- Preheat your oven to 400°F. Lightly spray an 8×8-inch casserole dish with nonstick cooking spray.
- Arrange the sliced potatoes and onions in the prepared baking dish, staggering layers of potato and onion.
- In a medium-size saucepan, melt the butter over medium heat. Mix in the flour and salt, and stir constantly with a whisk for one minute. Stir in the milk. Cook until the mixture has thickened.
- Stir in the cheese all at once, and continue stirring until the cheese is melted and the sauce is smooth, about 30-60 seconds.
- Pour the cheese sauce evenly over the potatoes and onions. Cover the dish tightly with aluminum foil.
- Bake for 85-90 minutes, or until the potatoes are tender when pierced with a fork.
- For a crisp topping, remove the foil and change the oven setting to broil after the potatoes are baked. Broil until the top is golden brown. Watch carefully to prevent burning.
- Season with salt and pepper to taste and serve immediately.
Nutrition
Notes
Tried this recipe?
Let us know how it was!
Master of Culinary Visual Arts
My culinary journey started in the fast-paced kitchens of boutique coastal restaurants throughout Southern California, where I learned that beautiful food doesn’t have to be complicated. After nine years of professional cooking, I’ve made it my mission to prove that sophisticated, nutritionally sound meals can be accessible to busy home cooks who refuse to compromise on flavor or visual appeal.
What changed everything for me was watching talented home cooks feel intimidated by healthy cooking. That’s when I transitioned to private instruction, teaching busy professionals and families how to create restaurant-quality meals using simple techniques and ingredients they can actually find at their local grocery store. My “15-minute meal” frameworks are now used by several regional cooking schools!
As a third-generation Mexican-American, I love weaving vibrant Latin flavors into low-carb creations – proving that healthy eating can be both culturally authentic and visually spectacular. My “effortless elegance” philosophy is simple: nutritious food should look as stunning as it tastes, without requiring professional chef skills or expensive equipment.
When I’m not developing recipes in my San Diego coastal kitchen, you’ll find me surfing the local breaks with my Golden Retriever mix, Mango, who’s both my kitchen companion and unofficial taste-testing assistant. My personal low-carb lifestyle started as a way to maintain energy for my active coastal life, and it’s become the foundation for proving that healthy eating enhances rather than restricts life’s pleasures.