
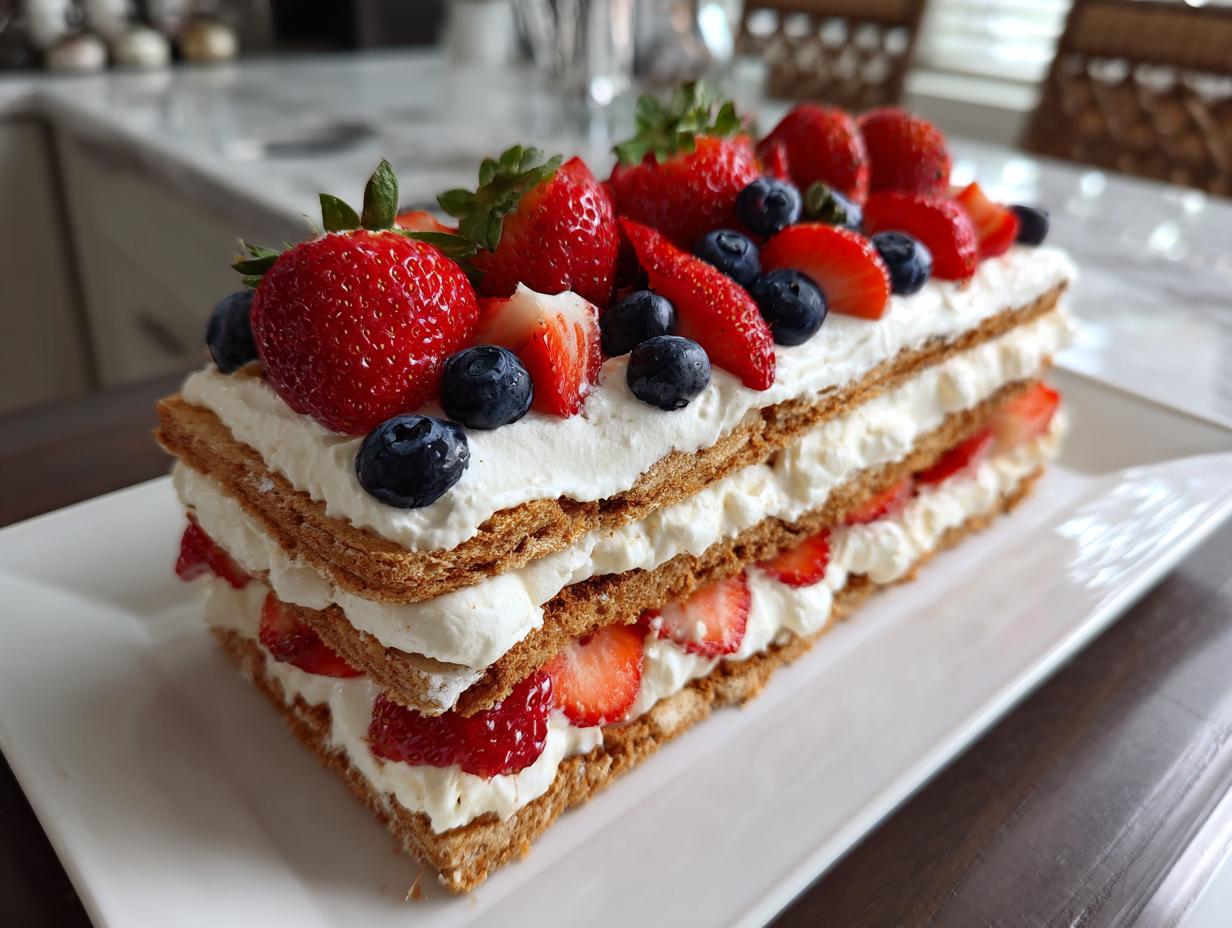
Oh, summer! My absolute favorite time for get-togethers, BBQs, and, of course, delicious desserts. You know what’s always a HUGE hit and requires zero oven time? No-bake treats! And for the Fourth of July, we’re talking about a showstopper: this incredible Red, White, and Blue Icebox Cake. Seriously, it’s one of those Fourth of July Desserts With Red White Blue Icebox Cake recipes that looks way fancier than it is. I remember making this for the first time a few years back, and let me tell you, the ‘oohs’ and ‘aahs’ were endless. It’s become our go-to crowd-pleaser, perfect for those hot summer days when you just don’t want to turn on the oven. If you’re looking for an easy, festive dessert that tastes like pure bliss, you’ve found it!

Why You’ll Love These Fourth of July Desserts With Red White Blue Icebox Cake
Trust me, this Red, White, and Blue Icebox Cake is a total winner for so many reasons:
- Seriously Easy to Make: No baking required means less stress and more time enjoying your guests!
- Perfectly Festive: Those classic red, white, and blue layers make it a patriotic showstopper.
- Crowd-Pleaser Guaranteed: Whipped cream, sweet berries, and soft cookies? It’s a dream combo everyone loves.
- Cool & Refreshing: It’s the ultimate cool-down treat on a hot summer day.
- Make-Ahead Magic: You can totally prep this beauty the day before, freeing you up on party day!
- So Versatile: Easily adaptable with different berries or even a fun fruit pattern.
Ingredients for Your Red White Blue Icebox Cake
Alright, let’s talk ingredients for our amazing Red White and Blue Icebox Cake! The beauty of this dessert is how simple it is, using just a handful of common goodies. You’ll need about two packages of graham crackers – grab the regular kind, about 14 to 16 crackers per package should do the trick to get that nice base layer. For the dreamy cream filling, make sure you have three cups of heavy whipping cream that’s nice and cold; this is key for getting those perfect stiff peaks! We’ll sweeten that up with one cup of powdered sugar (also sometimes called confectioners’ sugar) and a teaspoon of pure vanilla extract for that lovely flavor. And for our star topping, a couple of cups each of fresh, juicy strawberries, all sliced up, and vibrant blueberries. Fresh is definitely best here for that pop of color and flavor!
Equipment Needed for This Easy Icebox Cake
To whip up this fantastic Red, White, and Blue Icebox Cake, you won’t need a whole lot of fancy gadgets. First things first, grab a good old 9×13 inch baking dish – this is where all the magic happens! You’ll also want an electric mixer, whether it’s a stand mixer or a handheld one, for whipping up that dreamy cream in no time. And finally, a sturdy spatula is super handy for spreading all those layers nice and evenly. That’s pretty much it – simple tools for a simple, delicious dessert!
Step-by-Step Instructions for Your Red White Blue Icebox Cake
Alright, let’s get this amazing dessert assembled! It really is as easy as 1-2-3, or maybe more like layer-layer-chill! Grab your 9×13 inch dish and let’s go!
Layering the Base
First things first, we need a nice, even base. Line the bottom of your baking dish with a single layer of graham crackers. Don’t worry if there are small gaps; just break some crackers to fill them in. This layer is going to soften up beautifully, so don’t stress about perfection here. Then, take about half of your dreamy whipped cream mixture and spread it evenly over those crackers. A good spatula makes this part super easy – just smooth it right out!
Adding the Festive Fruit
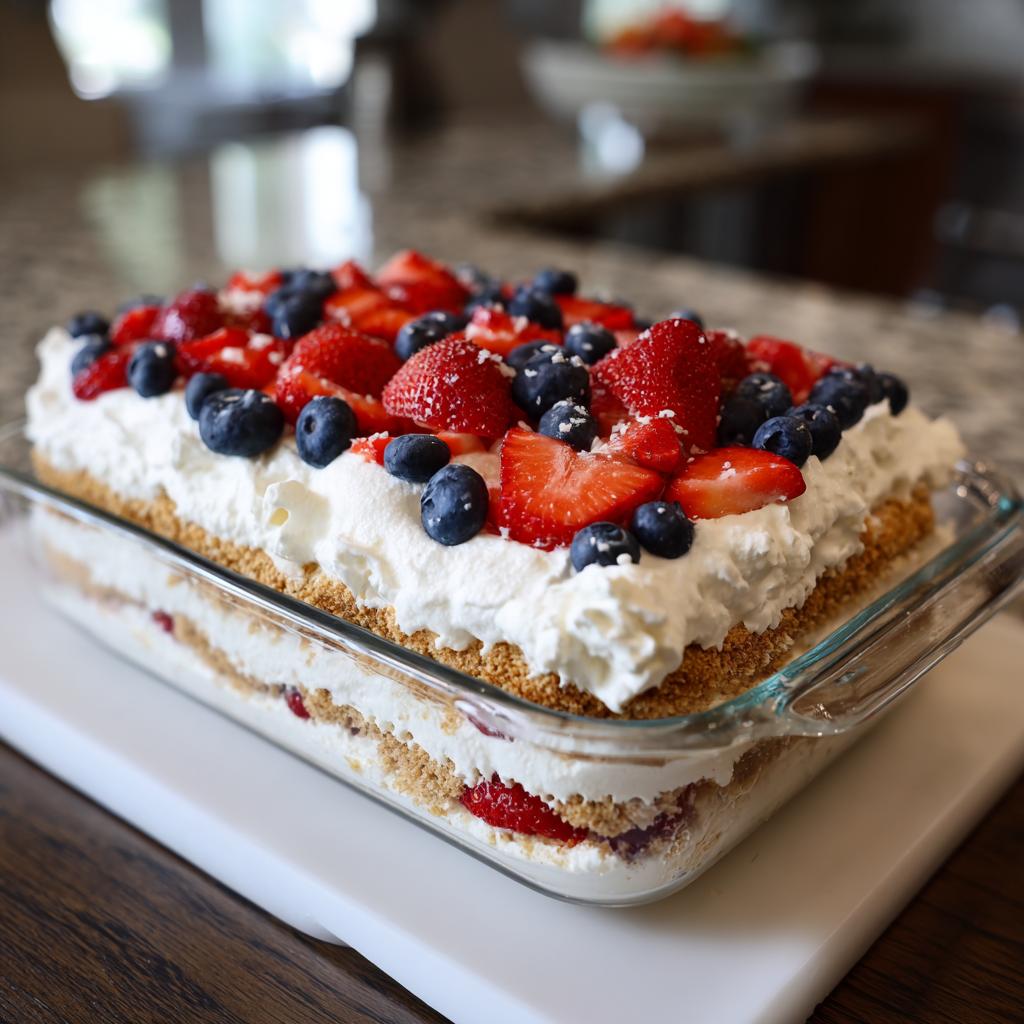
Now for the fun part – the colors! Arrange about half of your sliced strawberries and half of your blueberries right on top of that first layer of cream. You can just scatter them, or if you’re feeling artistic, try making stripes or a cute little star pattern. It’s these little touches that make it feel extra special for the Fourth of July!
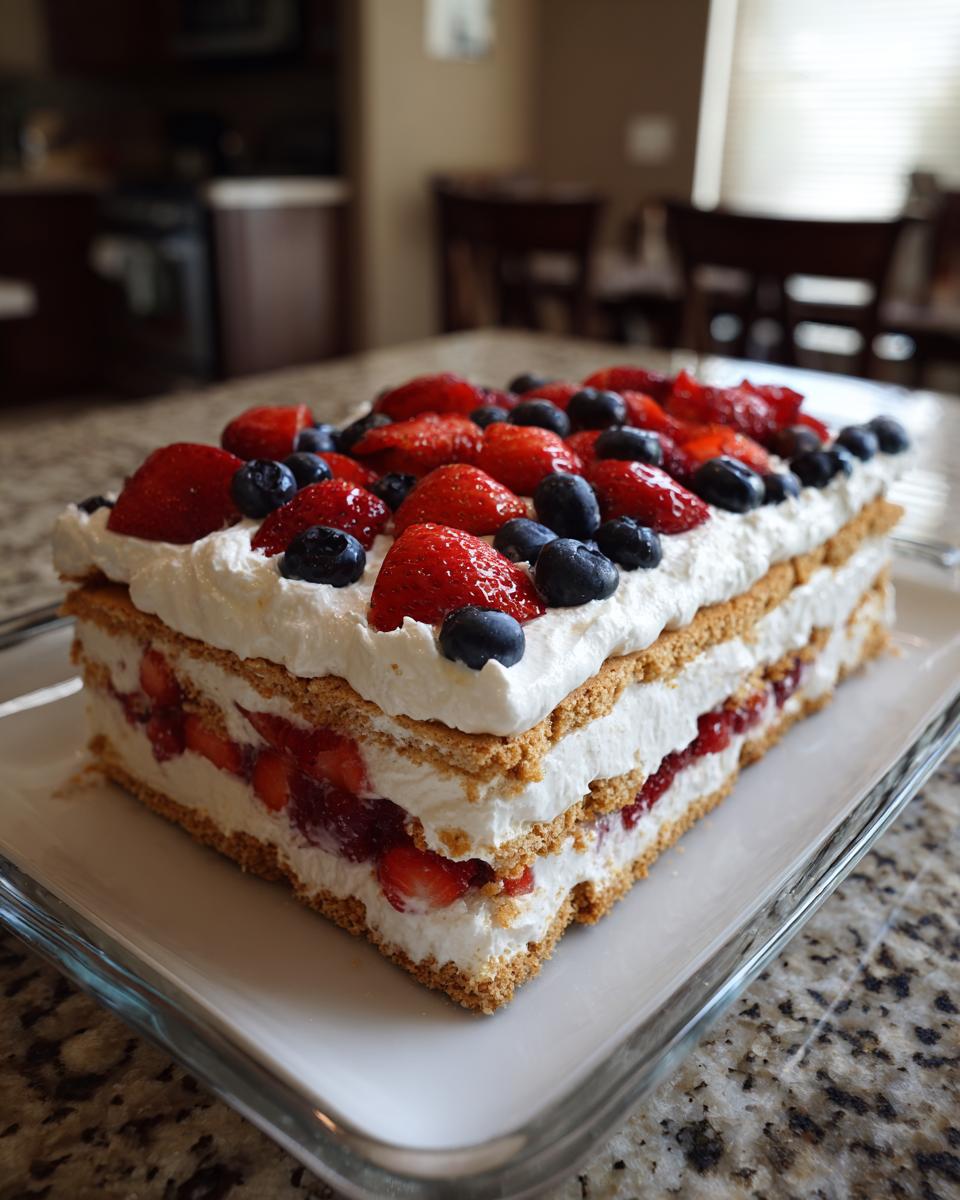
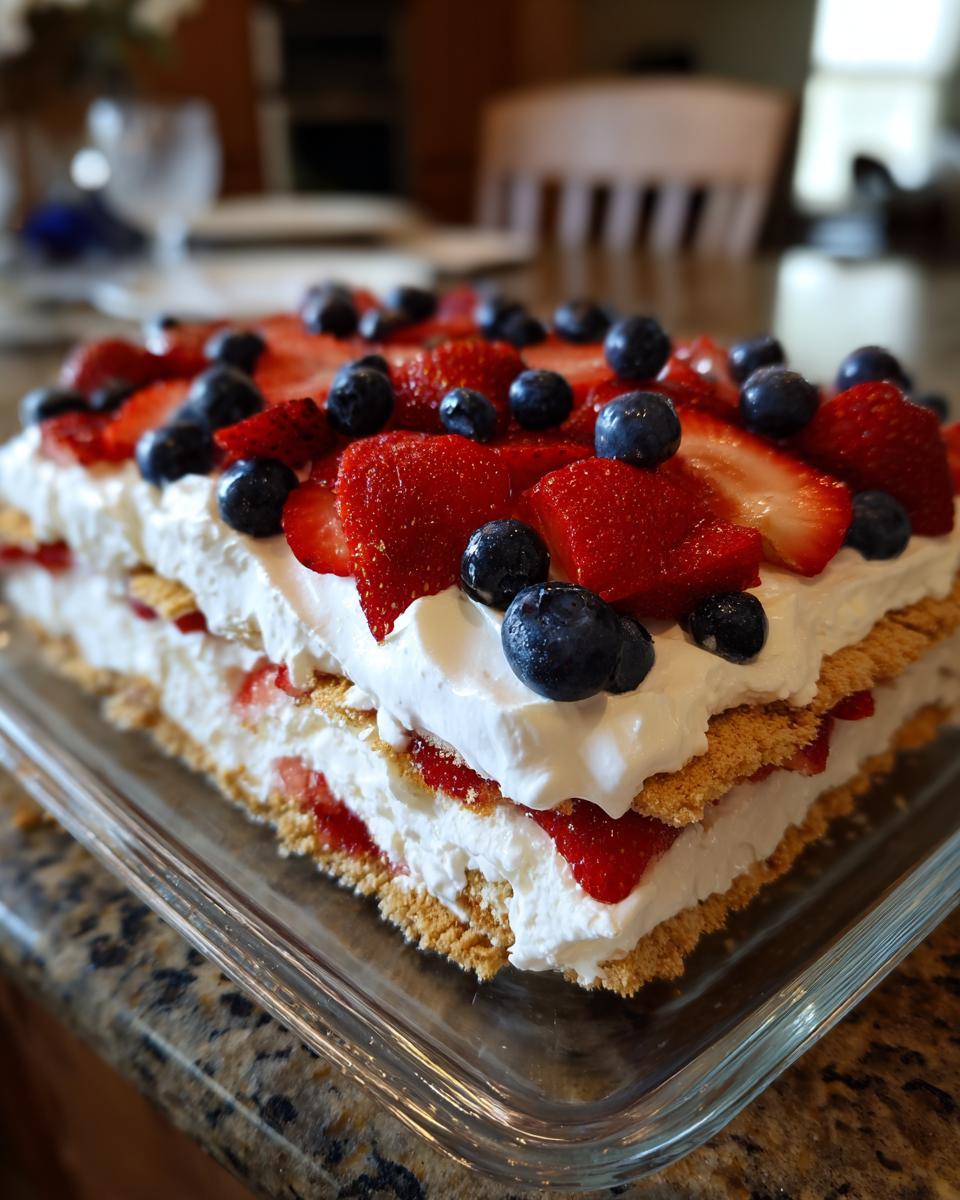
Completing the Icebox Cake
Next up, we add another layer of graham crackers right over the fruit. Then, spread the rest of that luscious whipped cream evenly on top of this second cracker layer. Make sure it covers everything nicely! Finally, top it off with the remaining strawberries and blueberries. This final layer of fruit really makes it pop and looks gorgeous when you slice into it.
The Crucial Chilling Time
This is probably the most important step for texture! Once it’s all assembled, cover your dish snugly with plastic wrap. Now, here’s the magic: you need to refrigerate it for at least 6 hours. But honestly? Overnight is even better! This gives the graham crackers plenty of time to soften up into a cake-like texture and lets all those yummy flavors meld together. That’s what makes it an “icebox cake” and gives it that melt-in-your-mouth goodness. You can peek at other icebox cake ideas for more inspiration on chilling times, but trust me on the overnight method!
Tips for the Perfect Red White Blue Icebox Cake
Getting this Red White and Blue Icebox Cake *just right* is all about a few little tricks I’ve picked up over the years. It’s not complicated, but these little nudges make a big difference!
First off, that chilling time is NOT your enemy! Seriously, give it at least 6 hours, but overnight is where the magic really happens. When those graham crackers get a chance to really soak up the cream, they transform. They go from crunchy to perfectly tender, almost like a soft cake layer. Trust me, you don’t want firm crackers in your icebox cake – it’s just not the same.
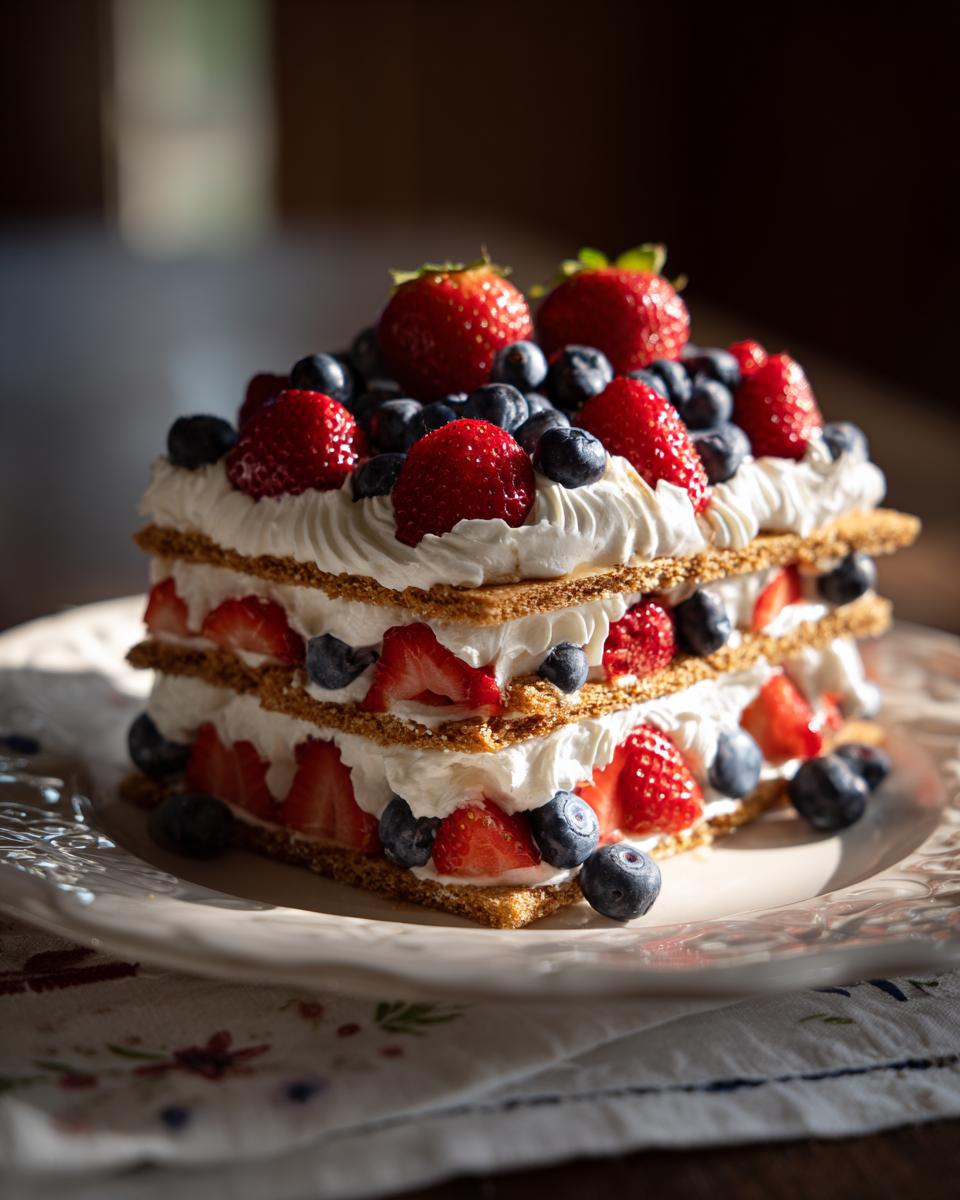
If you’re feeling creative with the fruit, go for it! I love making stripes, but sometimes I’ll do a big red strawberry heart surrounded by blueberries. It’s also a great way to use up whatever berries look best at the market. You might be surprised how much people notice and appreciate those little festive touches! For more inspiration on fruit-filled desserts, you could check out no-bake strawberry swirl cheesecake recipes, they often have great ideas for fruit presentation.
And a little tip from my kitchen: make sure your heavy whipping cream is REALLY cold when you start whipping it. It makes all the difference in getting those beautiful, stiff peaks that hold their shape. If it’s lukewarm, you’ll be whipping forever and might not get the volume you want. Pop that bowl and whisk in the freezer for about 15 minutes beforehand if you want to be extra sure!
Ingredient Notes and Substitutions
So, while this Red White and Blue Icebox Cake recipe is pretty straightforward, let’s chat about a couple of things. Graham crackers are the classic choice here, and for good reason – they get perfectly soft and cake-like. But if you can’t find them, digestive biscuits or even vanilla wafers can work in a pinch, though they’ll give a slightly different flavor and texture. For the whipped cream, cold heavy whipping cream is absolutely best for those stiff peaks. If you absolutely had to substitute, maybe a good quality stabilized whipped topping (like Cool Whip) could work, but just know it won’t be quite the same pure, fresh whipped cream taste. And the berries! Strawberries and blueberries are my go-to for that classic red, white, and blue, but feel free to toss in raspberries or even some blackberries if they look great at the market!
Serving and Storing Your Festive Icebox Cake
Okay, so you’ve let your beautiful Red, White, and Blue Icebox Cake work its magic in the fridge overnight (or at least for 6 hours!). Now comes the best part: serving it up! Make sure it’s nicely chilled before you slice into it. Use a sharp knife to cut it into generous squares. It’s slice and serve straight from the cold dish, no fuss needed! If you happen to have any leftovers – which is rare in my house, but it happens! – just cover the dish tightly with plastic wrap and pop it back in the refrigerator. It’ll stay yummy for about 2 to 3 days. Honestly, it tastes best when it’s nice and cold, so don’t let it sit out too long. Freezing isn’t really recommended for this one, as the texture of the whipped cream and softened crackers can change quite a bit.
Frequently Asked Questions About This Fourth of July Dessert
Got questions about our dazzling Red, White, and Blue Icebox Cake? I’ve got answers!
Can I make this icebox cake ahead of time?
Oh, absolutely! This cake is actually *better* when made ahead. The longer it chills, the softer those graham crackers get, creating that perfect cake-like texture. Feel free to assemble it a whole day in advance – it just makes party day that much easier!
What if my graham crackers don’t soften?
If your crackers are still a little firm after the recommended chilling time, don’t panic! Just pop it back in the fridge for a few more hours, or even overnight. The moisture from the whipped cream and fruit will eventually soften them up beautifully. You can also try breaking the crackers into smaller pieces to maximize surface area for softening. You can find more icebox cake tips if you need more ideas!
Can I use other fruits besides strawberries and blueberries?
For sure! While strawberries and blueberries give you that perfect patriotic red, white, and blue, feel free to get creative. Raspberries are a lovely addition, or you could even use sliced bananas for a white layer. Just keep in mind that other colors might change the overall theme a bit, but it’ll still be delicious!
How long does the icebox cake last in the refrigerator?
This icebox cake is best enjoyed within about 2 to 3 days. Make sure to keep it tightly covered with plastic wrap in the fridge to keep it fresh and cold. Any longer than that, and the crackers might get a bit *too* soggy for my liking, but it depends on your preference!
Estimated Nutritional Information
Just a little heads-up about the nutrition for this fabulous Red, White, and Blue Icebox Cake! Keep in mind these numbers are estimates and can totally change depending on the exact brands of ingredients you use and how generously you slice it. We’re looking at roughly 350-450 calories per slice, with about 20-30g of fat, 30-40g of carbs, and maybe 3-5g of protein. It’s definitely a treat, but oh-so-worth-it for those celebrations!
Red White and Blue Icebox Cake
Ingredients
Equipment
Method
- Line the bottom of a 9×13 inch baking dish with a single layer of graham crackers. You may need to break some crackers to fit.
- In a large bowl, beat the cold heavy whipping cream with an electric mixer on medium-high speed until soft peaks form.
- Gradually add the powdered sugar and vanilla extract to the whipped cream. Continue beating until stiff peaks form.
- Spread half of the whipped cream mixture evenly over the graham crackers.
- Arrange half of the sliced strawberries and half of the blueberries over the whipped cream.
- Add another layer of graham crackers over the fruit.
- Spread the remaining whipped cream mixture over the second layer of graham crackers.
- Top with the remaining sliced strawberries and blueberries.
- Cover the dish with plastic wrap and refrigerate for at least 6 hours, or preferably overnight, to allow the crackers to soften and the flavors to meld.
- Slice and serve chilled.
Notes
Tried this recipe?
Let us know how it was!
Master of Culinary Visual Arts
My culinary journey started in the fast-paced kitchens of boutique coastal restaurants throughout Southern California, where I learned that beautiful food doesn’t have to be complicated. After nine years of professional cooking, I’ve made it my mission to prove that sophisticated, nutritionally sound meals can be accessible to busy home cooks who refuse to compromise on flavor or visual appeal.
What changed everything for me was watching talented home cooks feel intimidated by healthy cooking. That’s when I transitioned to private instruction, teaching busy professionals and families how to create restaurant-quality meals using simple techniques and ingredients they can actually find at their local grocery store. My “15-minute meal” frameworks are now used by several regional cooking schools!
As a third-generation Mexican-American, I love weaving vibrant Latin flavors into low-carb creations – proving that healthy eating can be both culturally authentic and visually spectacular. My “effortless elegance” philosophy is simple: nutritious food should look as stunning as it tastes, without requiring professional chef skills or expensive equipment.
When I’m not developing recipes in my San Diego coastal kitchen, you’ll find me surfing the local breaks with my Golden Retriever mix, Mango, who’s both my kitchen companion and unofficial taste-testing assistant. My personal low-carb lifestyle started as a way to maintain energy for my active coastal life, and it’s become the foundation for proving that healthy eating enhances rather than restricts life’s pleasures.