

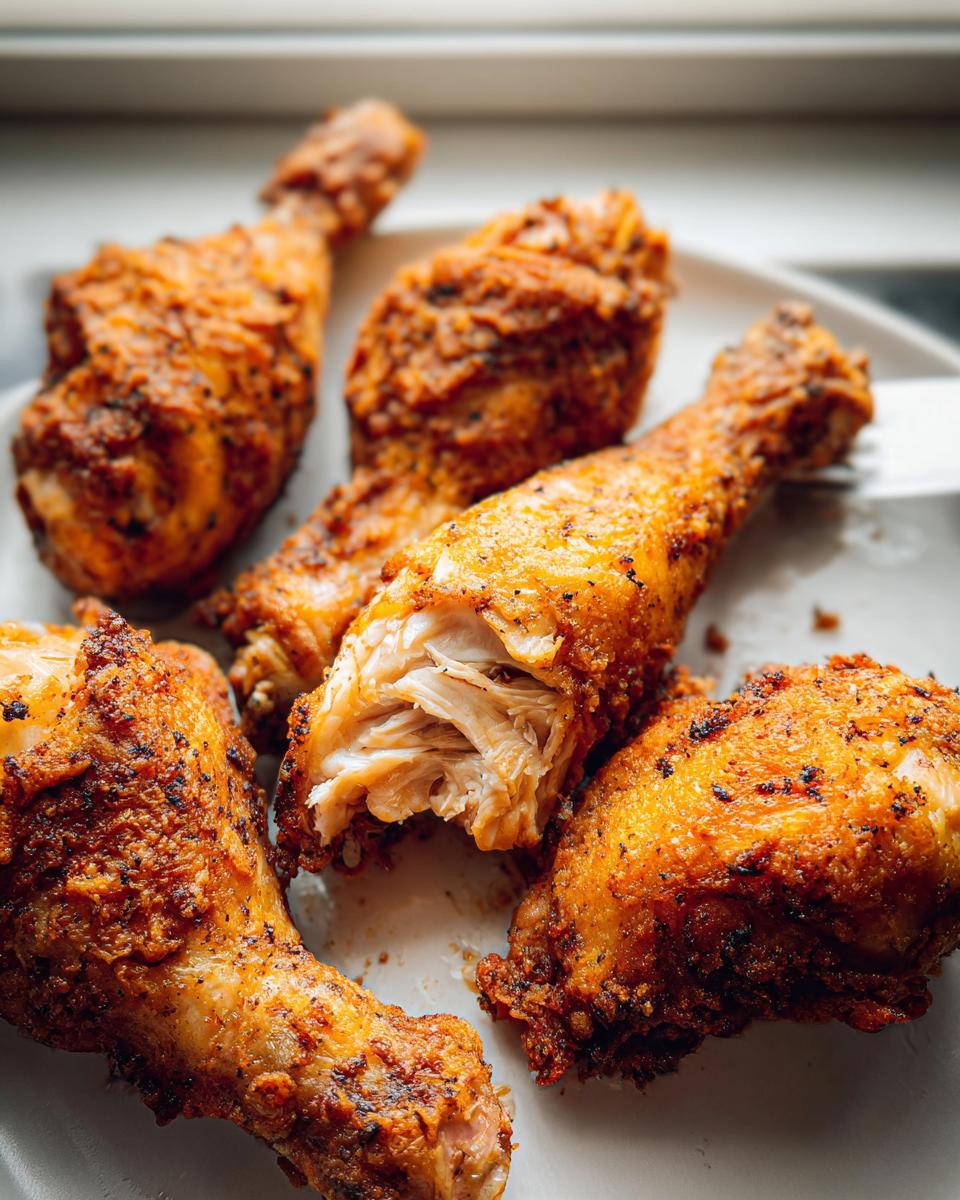
Oh my gosh, let me tell you about the *best* Crispy Oven Baked Chicken Drumsticks you will ever make! I remember the first time I put these in the oven for friends—I was aiming for homemade ease but wanted that satisfying crunch you usually only get from frying. Trust me, I was stressed! But as that amazing, savory smell started filling up my kitchen, I knew I was onto something special.
When the timer finally rang, everyone rushed over! That loud, beautiful crunch in every single bite had my friends practically fighting over the last drumstick. Seriously, this recipe proves gourmet flavor doesn’t need complicated deep-frying equipment. We’ve made this baked drumsticks recipe a staple because it’s fast, cheap, and absolutely delivers that crispy oven chicken skin every single time. It’s true home cooking magic!

Why This Crispy Oven Baked Chicken Drumsticks Recipe Works (E-E-A-T)
Listen, just throwing chicken in the oven rarely gives you that satisfying crackle we’re all hunting for. But this recipe? It’s built on a couple of non-negotiable steps that turn basic poultry into a fantastic, budget friendly meal. We’re replacing the messy oil bath with sheer technique, and the results are spectacular every time. If you follow these two things, you’ll never go back!
The Secret to Crispy Oven Chicken Skin
The first thing you absolutely must do for killer crispy oven chicken is grab that paper towel and work those drumsticks over until they are bone dry. I mean bone dry! Any surface moisture steams during cooking, and steam is the enemy of crispiness. It’s my number one expert tip for your Crispy Oven Baked Chicken Drumsticks.
The second vital step is getting that chicken up off the pan surface. We use a wire rack, right? That allows the hot oven air to actually circulate completely around the drumstick. If the bottom sits in its own juices, you get softness, not that crunch we want. Trust me, lifting it up makes all the difference for the skin!
Gathering Your Ingredients for Crispy Oven Baked Chicken Drumsticks
I love that this recipe is perfect proof you don’t need a fancy grocery haul to make something truly amazing. Chicken drumsticks are an incredibly budget friendly meal staple, and these flavor boosters are probably already in your spice drawer! The key here is getting quality chicken and using fresh spices—that’s how we build authority in our kitchen, even when keeping things simple.
You’ll want about 13 drumsticks total, and I always try to grab pasture-raised if I can find them; the flavor just pops more. Don’t forget your olive oil since we’re skipping the deep fryer! You can check out a similar approach over here for extra baked drumsticks recipe ideas: seasoned crispy chicken drumsticks.
Seasoning Blend for Flavorful Baked Drumsticks Recipe
This spice mix gives you that incredible color and savory kick without tasting overly spicy. Using fresh spices makes a huge difference, honestly. We use a good amount of garlic powder and oregano.
- Sea salt is key—don’t just grab the iodized stuff if you can help it!
- Make sure your paprika is vibrant; it’s what gives us that gorgeous golden finish.
- Don’t skimp on the pepper, either. We want flavor everywhere!
Essential Equipment for Perfect Crispy Oven Baked Chicken Drumsticks
Okay, preparation is half the battle when you’re aiming for that perfect crunch, and you don’t need a ton of fancy gadgets for this! For these amazing Crispy Oven Baked Chicken Drumsticks, we rely on four simple things. Honestly, if you have these four pieces of gear, you’re set to go.
First up is your trusty large bowl. This lets us toss everything together without making a huge mess over the counter. Next, you’ll need a sturdy baking sheet to catch any little drips that might escape our setup.
But the real hero here, the MVP of crispiness, is definitely the wire rack. You absolutely must place that rack onto your baking sheet. Why? Because as I mentioned before, we are lifting the chicken right off the sheet pan surface. This wire rack lets scorching hot air circulate under the drumsticks the entire time they cook. If the bottom is sitting in the pan juices, you get steamed chicken—and nobody wants that soggy bottom!
Finally, don’t forget the humble paper towel. We use those to get the chicken skin as dry as possible before we even touch the seasoning. Little steps, massive payoff!
Step-by-Step Instructions for Crispy Oven Baked Chicken Drumsticks
Alright, let’s get these beauties in the oven! This whole cooking process, soup to nuts, takes right around 50 minutes, which is fantastic for a weeknight. Remember, we’re not frying, so there’s next to no hands-on time once the seasoning is done. Following these steps precisely guarantees that fantastic crunch we talked about earlier!
First things first—we need that heat cranked up! Always preheat your oven to 420 degrees Fahrenheit. I know some recipes say 400, but trust me, a slightly hotter start gives us the best initial sear on that dry skin, which locks in the juices while drying out the surface.
Preparing the Chicken and Seasoning Mix
Before anything touches the spices, you have to commit to Step Two: drying the chicken! Grab those paper towels and pat, pat, pat every single drumstick until the skin feels almost tacky, not damp. This is crucial for anyone trying to nail this baked drumsticks recipe.
Toss the dried drumsticks into your large bowl. Now, make sure you drizzle gently with the olive oil—just enough to make the skin tacky so the seasoning sticks, but not so much that it pools at the bottom of the bowl. Then, dump in all your gorgeous spices: salt, garlic powder, chili powder, oregano, paprika, and pepper. Mix it all up until every single piece looks deeply coated.
Here’s my personal tip for uniform color, especially since these are going to be kid friendly dinners: Use your hands (after washing them, of course!) and work the seasoning directly into the skin folds. If any part of the skin is bare, it won’t crisp up or color, so make sure every surface has that beautiful reddish-brown coating!

The Baking Process for Crispy Oven Chicken
Now that we have perfectly seasoned chicken resting on the wire rack atop our baking sheet (remember, air circulation!), it’s time for the two-part bake. This method ensures the insides cook through evenly while the exterior gets its glorious crispiness.
Slide that setup into your preheated 420°F oven and set a timer for 35 minutes. During this time, the skin is rendering fat and getting crispy without burning. Seriously, if you’ve set up the rack properly, the air flow underneath is what prevents sogginess—it’s like miniature convection baking for the bottom side!
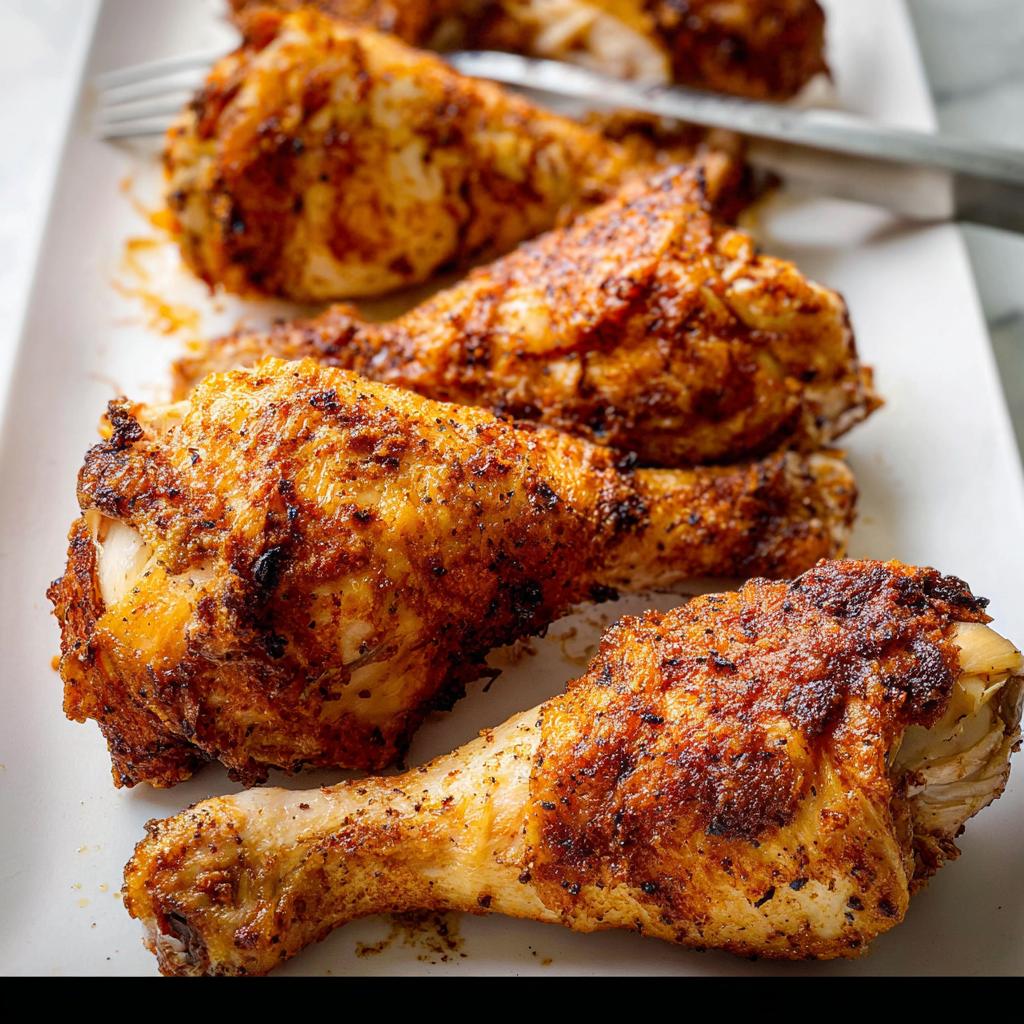
After 35 minutes, carefully remove the pan. You’ll see the chicken has shrunk a bit and the skin looks tight. Using tongs, flip every single drumstick over gently. Slide it back into the oven for the final 15 minutes. Once they hit that 50-minute total mark, they should be golden brown, deeply colored, and amazingly crispy. Pull them out, let them rest for just five minutes, and get ready for compliments!
Tips for Success with Your Baked Drumsticks Recipe
Look, even with the best recipe, sometimes the oven gods aren’t totally on your side. But don’t panic if your Crispy Oven Baked Chicken Drumsticks aren’t shattering quite like you hoped! The beauty of this method is that it’s incredibly forgiving, and we have a few last-minute saves in our back pockets. Remember, we’re aiming for internal temperature perfection here, which is the ultimate sign of successful cooking expertise!
When you pull them out at the 50-minute mark, always grab a meat thermometer. They need to hit 165°F internally, but honestly, for juiciness, I pull mine closer to 170°F. That slightly higher number helps ensure all the connective tissue breaks down beautifully.
Troubleshooting Common Issues with Crispy Oven Baked Chicken Drumsticks
So, the meat is cooked, but maybe the skin is looking a little pale instead of deeply browned and crispy? Don’t worry! This is where a little last-minute heat totally saves the day for your baked drumsticks recipe.
Quickly switch your oven setting to the broiler—the top element only. Put the rack in the top third of the oven, but you have to stand right there and watch like a hawk! Broilers work fast, and I mean fast. After about 60 to 90 seconds, that skin should start turning that deep golden color you want. Pull them out the second you see that color you love because they can go from perfect to burned in a blink! This is a great trick for making sure your crispy oven chicken never disappoints.
Serving Suggestions for Your Crispy Oven Baked Chicken Drumsticks
Now that you’ve got these gorgeous, crunchy flavor bombs out of the oven—what are you going to serve them with? Since this recipe is quick, budget friendly, and perfect for busy evenings, the sides need to keep up the pace! We are keeping things simple but vibrant here since the chicken already packs so much savory punch.
First off, if you’re looking for minimal effort, you can’t beat roasting vegetables right alongside the chicken, though you’ll need a separate pan or two, of course. Broccoli or asparagus tossed with just a little olive oil, salt, and pepper roast up perfectly in the time it takes the chicken to rest. They add some necessary green color and nutrients to what is otherwise a protein powerhouse—especially important when making these for kid friendly dinners!
If you have just a few extra minutes, nothing beats a big, bright salad. I often wilt some spinach in a pan for literally thirty seconds, then toss it with a homemade vinaigrette—something sharp like lemon or balsamic works wonders against the richness of the chicken skin. It feels fancy, but it takes five minutes max.
For a filling, classic dinner, these Crispy Oven Baked Chicken Drumsticks pair beautifully with mashed potatoes or some quick-cooking rice. But honestly, my favorite thing to do because I’m a little lazy? Serve them right alongside some buttery corn on the cob. It’s easy, it’s nostalgic, and it means cleanup is super straightforward. Enjoy every crunchy bite!

Storage and Reheating Instructions for Leftover Crispy Oven Baked Chicken Drumsticks
Oh, the glorious leftover challenge! If you somehow managed to have any of these amazing Crispy Oven Baked Chicken Drumsticks left—seriously, congratulations on your restraint!—you want to make sure you handle them right. We worked so hard to get that perfect initial crispiness, and we definitely don’t want to ruin it when we reheat them later.
First things first: storage. Once the chicken has completely cooled down, you need to get it into an airtight container. Don’t wrap them loosely in foil or plastic wrap; you need that seal to keep the moisture out. Once sealed up tight, they should last beautifully in the refrigerator for about three to four days. They honestly taste almost as good the next day if you handle the reheating process correctly!
Now, I’m going to be blunt: do not, I repeat, do not try to microwave these. Microwaving leftover crispy chicken is like signing the death warrant for that lovely skin. It steams the skin from the inside out, and you end up with soft, rubbery disappointment. We worked too hard for that!
Instead, you have two much better options to bring back that crunchy magic. If you have an air fryer, that is hands-down the best way to go. Pop the drumsticks in for about 4 to 6 minutes at 375°F. The circulating dry heat immediately attacks the skin and brings back the texture in minutes.
If you don’t have an air fryer, the oven is your backup hero. Spread those chicken pieces out onto a clean baking sheet (don’t overcrowd them!) and heat them in a 350°F oven for about 8 to 10 minutes. This gentle heating warms the meat through while letting the dry heat refresh that crispy coating. It works perfectly, making these leftovers feel almost freshly made, which is exactly what we want for future kid friendly dinners!
Frequently Asked Questions About Crispy Oven Baked Chicken Drumsticks
I always get so many questions after people try this recipe for the first time—it just seems too easy to get this crispy in the oven! I gathered the most common ones right here so you can feel like a total pro when you try this baked drumsticks recipe next time you need an easy dinner solution.
Can I use different cuts of chicken in this baked drumsticks recipe?
Yes, absolutely! This technique is fantastic for other cuts, too. If you use bone-in, skin-on thighs, they will take longer—probably closer to 55 or 60 minutes total, so check the temperature carefully. Wings are fun, but since they are smaller, they usually cook faster, maybe closer to 40 minutes total. Just remember we are always aiming for that safe 165°F internal temperature, though I often cook mine a little higher for maximum crispiness!”
Is this recipe suitable for making large batches of kid friendly dinners?
It is seriously perfect for large batches of kid friendly dinners! Chicken drumsticks are already naturally portioned, which is wonderful. If you are cooking for a huge crowd, though, you may need a second baking sheet. The main thing is not to overlap the pieces. If you put too many on one rack, the air circulation stops, and you’ll end up with steamed spots instead of crispy ones. If you need more than one sheet pan, rotate the pans halfway through the cook time to ensure everything browns evenly!
Nutritional Estimates for Crispy Oven Baked Chicken Drumsticks
I know some of you amazing home cooks are tracking macros or just curious about what’s in your food, especially when making these for the family every week. Since we skipped the deep fryer and relied on simple olive oil and spices, this Crispy Oven Baked Chicken Drumsticks recipe keeps things relatively light while still delivering huge flavor!
Please keep in mind these numbers are just estimates based on using standard ingredients and dividing the whole batch across 13 servings, which is about one drumstick each. Your exact numbers will vary slightly depending on the size of your chicken and how much oil you actually used!
Here’s a quick look at what you’re getting per serving (one drumstick!) when you make this wonderful baked drumsticks recipe:
- Calories: Roughly 210-240 kcal
- Total Fat: About 13-16 grams (Much of this is healthy fat from the skin rendering)
- Protein: A whopping 18-20 grams! Great for growing kids!
- Carbohydrates: Less than 2 grams (Mostly from the spice blend)
See? That’s fantastic, especially for a meal that tastes this indulgent! You get all the savory satisfaction of crispy oven chicken without the heavy feeling you get from fried foods. It’s a winner for making sure everyone, even picky eaters, gets a protein-packed dinner!
Share Your Experience Making Crispy Oven Baked Chicken Drumsticks
Now that you know all my secrets to getting that unbelievably crunchy skin on your Crispy Oven Baked Chicken Drumsticks, I seriously want to hear from you! Have you tried the paper towel trick? Did your kitchen fill up with that incredible savory aroma while baking?
Cooking should be a conversation, and I love seeing how my recipes turn out in your kitchens. Whether you served these as part of an epic lineup of kid friendly dinners or just made them for a quiet weeknight meal, your feedback helps me and other home cooks feel more confident tackling new dishes!
Please, take a moment to leave a rating below. A simple little star rating tells me if I need to tweak the seasoning, or if that 420°F temperature was just perfect for you. Did you try adding a different spice to the mix? Tell me all about it in the comments!
If you snapped a picture of your golden, crackly drumsticks—and I hope you did!—tag me on social media! Seeing your beautiful, successful batches of crispy oven chicken honestly makes my whole week. I read every comment and look at every picture, so don’t be shy. Let’s celebrate making simple, budget friendly meals that taste incredible together!
Crispy Oven Baked Chicken Drumsticks
Ingredients
Equipment
Method
- Preheat your oven to 420 degrees Fahrenheit.
- Pat all of the drumsticks dry with a paper towel to remove excess moisture, then add them to a large bowl.
- Once all drumsticks are in the bowl, make sure the skin is covering the drumstick and is not folded. Toss with olive oil, then add your seasonings and mix until everything is fully coated.
- Prepare a baking sheet and rack by spraying both with oil. Stack the rack on top of the baking sheet to allow enough air to circulate around the drumsticks while cooking. Add each drumstick to the pan, then bake for 35 minutes. Remove the pan, flip the drumsticks, and return them to the oven for the remaining 15 minutes.
- The drumsticks are done when they are golden and crispy. Enjoy your meal.
- Store any leftover, cooked drumsticks in an airtight container in the refrigerator for up to 3 to 4 days.
Notes
Tried this recipe?
Let us know how it was!
Master of Culinary Visual Arts
My culinary journey started in the fast-paced kitchens of boutique coastal restaurants throughout Southern California, where I learned that beautiful food doesn’t have to be complicated. After nine years of professional cooking, I’ve made it my mission to prove that sophisticated, nutritionally sound meals can be accessible to busy home cooks who refuse to compromise on flavor or visual appeal.
What changed everything for me was watching talented home cooks feel intimidated by healthy cooking. That’s when I transitioned to private instruction, teaching busy professionals and families how to create restaurant-quality meals using simple techniques and ingredients they can actually find at their local grocery store. My “15-minute meal” frameworks are now used by several regional cooking schools!
As a third-generation Mexican-American, I love weaving vibrant Latin flavors into low-carb creations – proving that healthy eating can be both culturally authentic and visually spectacular. My “effortless elegance” philosophy is simple: nutritious food should look as stunning as it tastes, without requiring professional chef skills or expensive equipment.
When I’m not developing recipes in my San Diego coastal kitchen, you’ll find me surfing the local breaks with my Golden Retriever mix, Mango, who’s both my kitchen companion and unofficial taste-testing assistant. My personal low-carb lifestyle started as a way to maintain energy for my active coastal life, and it’s become the foundation for proving that healthy eating enhances rather than restricts life’s pleasures.